Friday, September 28, 2018

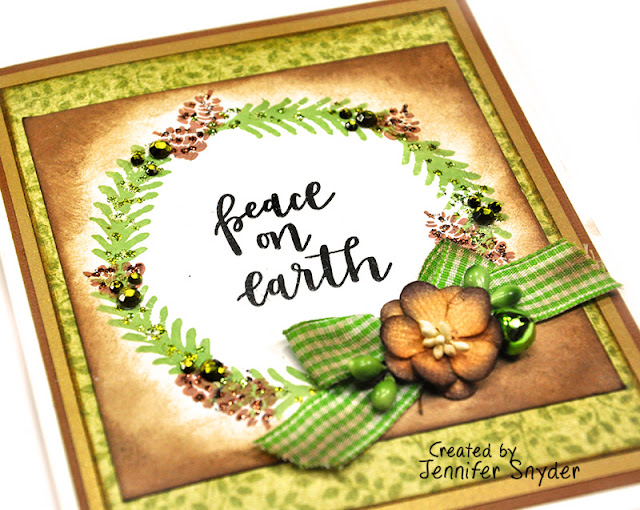
Peace on Earth - DIY Cards Using Stamps

JustRite Papercraft has released it's new Christmas stamp collection and I am enchanted.  

Now is the perfect time to start your DIY cards.  The summer has rounded to a close ( sob sob)  - school is in session.  This seems to be the time of year when we speed like a jetliner towards Christmas.  
Three blinks and it's Halloween,  Thanksgiving and Christmas Eve.

JustRite's stamps help make the DIY holiday card preparations easy.  
I have created two cards using some of the new releases paired with one of JustRite's beautiful medallion dies.  JustRite Merry Christmas Sentiment Stamps Set


I decided how large the stamped wreath needed to be first, then I drew a circle in pencil as a guideline for stamping.  I then was able to stamp and actually be satisfied with my wreath shape.
After the inks are dry, the pencil marks can be erased. 


Thanks for stopping here. 

Where to shop? 
You can shop for  the JustRite Merry Christmas Sentiment Stamps Set
and other new JustRite Christmas releases as well as all their other gorgeous dies and products right here.

Monday, September 24, 2018

DIY Christmas Cards Using Stamps

JustRite Papercraft has released it's new Christmas stamp collection and I am enchanted.  

Now is the perfect time to start your DIY cards.  The summer has rounded to a close ( sob sob)  - school is in session.  This seems to be the time of year when we speed like a jetliner towards Christmas.  
Three blinks and it's Halloween,  Thanksgiving and Christmas Eve.

JustRite's stamps help make the DIY holiday card preparations easy.  
I have created two cards using some of the new releases paired with one of JustRite's beautiful medallion dies.  
The image above shows the two new Christmas stamp sets I used on the cards.  
Look at the adorable assortment of options  included in the  Christmas Elements Stamp Set.
So many possibilities. 


This is the first card created using an assortment of stamps to create clusters of festive holiday greens.  
The greens, pinecones and berries were all stamped with inks using the sweet stamps from JustRite Christmas Elements Clear Stamp .

After the inks were dry, I accented with Stickles Glitter Glue and Red Nuvo Crystal Drops .  There are a ton of perfect holiday images on this stamp set.
These are the inks  and Stickles I used: 


This is the second card I made using the fun new stamps from JustRite Papercraft 
I did use a stamping platform (MISTI Stamping Tool) to stamp the background.  I wanted to make sure I had complete and crisp coverage before I removed the stamp.  I am a giant fan of the platform  - which ever platform you choose - because it eliminates or at least majorly reduces stamping frustration.  It also cuts down on paper waste from half-stamped images, and helps me move through a project successfully and happily without frustration. 

Crafters craft to relieve stress,  right?    Tools like stamps, platforms, inks all help to make our hobby a happy and enjoyable one.  


How Did I create the Background?  
I had fun making this particular multi-colored dotted background.  

I stamped JustRite Dotted Lines Background Cling Stamp  using a stamping platform (MISTI Stamping Tool) as described above using a Clear Embossing Ink Pad  and three different colored embossing powders sprinkled on the card: 


How Did I create the Decorative Medallions?  

The medallions were created by stamping with Ranger Archival Ink by WendyVecchi - Leaf Green

Where to shop? 
You can shop for JustRite Papercraft's new Christmas releases as well as all their other gorgeous dies and products right here.


Product Links 
JustRite Christmas Elements Clear Stamp CR-05508
JustRite Dotted Lines Background Cling Stamp - CL-06008
JustRite Damask Flourish One Die -DIE-05069
Fine Gold Embossing Powder
Fine Antique Gold Embossing Powder
MISTI Stamping Tool
Clear Embossing Ink Pad
Ranger - Wendy Vecchi Geranium Red Embossing Powder
Ranger - Wendy Vecchi Leaf Green Embossing Powder
Stickles Glitter Glue - Lime Green
Stickles Glitter Glue - Crystal
Stickles Glitter Glue - Platinum
Nuvo Crystal Drops - Red Berry
Ranger Archival Ink by WendyVecchi - Leaf Green
Ranger Archival Ink by Wendy Vecchi - Red Geranium 
Hero Arts Green Apple Ink

Saturday, September 22, 2018

Frosty and Faux Gold Filigree Christmas Ornaments


DIY Christmas Ornaments

I'm here with a jump on Christmas.
I made some tree ornaments by combining Creative Embellishments chipboard frames with Christmas papers from Maja Design.

Creative Embellishments recently released some beautiful new chipboard frames. The Small Intricate Frames looked like they were perfectly sized for ornaments so my imagination went to work creating two different looks.

If you scroll down, I will show you how I made the ornaments.


The chipboard on this first ornament has been transformed into faux gold filigree. 
These chipboard pieces have been embossed using Stampendous - Frantage Aged Gold Embossing Enamel. The embossing adds a bit more structural strength to the chipboard. 

These are the Creative Embellishments  chipboard pieces used to make the ornaments.

These are the papers I used from  the gorgeous Maja Design - I Wish collection
I Wish Ephemera
I wish for a Holly Jolly Christmas


This short video shows how the ornament looks from all sides.  
Photos simply cannot capture the dimension and angles of the project.  


Instructions for DIY Ornaments
So how did I make these? 

 You'll need two packages of  Creative Embellishments - Small Intricate Frames.  The great thing about that is you can now make two ornaments like I did or save the unused frames for other projects.
Step 1.  Emboss or paint both sides of the chipboard.  You'll need one oval and two matching square frames/diamond frames.

Step 2.  Using the square frames as your sizing guide, cut paper to fit behind the squares and then cut two more pieces a little larger to use as side panels.

Step 3.  Glue paper to each of the square chipboard frames.  Then fold the chipboard to form a 45degree angle.

Step 4.  Glue the square chipboard frames to the oval.  You will only be gluing the top and bottom of the square to the oval.  At this point, the squares are not really secure enough and need more support.

Step 5.  Glue the paper squares to the sides of the ornament.  This now


This is the second ornament I created. 
I topped this ornament with a chipboard snowflake as the finishing touch.  This is also from Creative Embellishments - Snowflakes

The chipboard pieces have been embossed with Stampendous - Frantage Aged Ivory Embossing Enamels  for a frosty feel as well as to reinforce them. 


This short video shows how the ornament looks from all sides.  
Photos simply cannot capture the dimension and angles of the project.  

These are the Maja Design papers I used:
Maja Design - Joyous Winter Days collection
Ephemera
Chilly


  Where to shop? 
You can shop for Maja Design Papers here
Shop for chipboard, wood and flair buttons from Creative Embellishments here.  


Creative Embellishments - Small Intricate Frames
Creative Embellishments - Snowflakes
Stampendous - Frantage Aged Ivory Embossing Enamels 
Stampendous - Frantage Aged Gold Embossing Enamel
Maja Design - I Wish Christmas collection
Maja Design - Joyous Winter Days paper collection

Thursday, September 20, 2018

Bright and Bold Poinsettia Card


Bright and Bold Christmas Cards are something I usually do not create.  BUT I surprised myself and stepped out of my comfort zone...and had fun doing it. 

I created this cheery bright card using some stamps from JustRite Papercrafts.  

There's not a lot to this card.  Some stamping, some embossing, a ribbon and a flower.  


Where to shop? 
You can shop for JustRite stamps and dies right here


Monday, September 17, 2018

Tulips and Happy Thoughts - DIY Card with JustRite Stamps

Thinking of You!

 There are people all around us who could use a kind word of encouragement, a quick "pick-me-up" note, or even just mail.  Yep happy mail that is not a bill, a payment notice or junk mail. Gosh who isn't sick of receiving ONLY junk mail and bills in the mail.   

Raise your hands if you smile when you actually receive a card in the mail.  Come on...raise those hands.  

This card was made for just that reason.  It's a card that can be popped in the mail and can mean so much to the recipient.  JustRite's Rose Garden and Leaves Clear Stamp helped to make this super easy.   Scroll down and I'll tell you how I made this.  

This card was created using the following stamps: 


These are the Inks I used: 
Tsukineko Momento Dye Ink- Pear Tart
Tsukineko Momento Lux Dye Ink- Rose Bud
DIY Instructions: 
Step 1.  I used a pencil and drew a circle to start my tulip wreath.  The circle helps me in the stamping process and lets me know where I should be placing the stamp in order to make a decent wreath.  
Step 2.  I used two of the tulip stamps for this wreath however I only added only one tulip stamp to an acrylic stamping block at a time.  I thought this was the easiest way to avoid overlapping stamps.  

Stamping TIP -  You'll get better, crisper, clear stamped images if  you avoid using textured cardstock.  If the cardstock is flat on the backside, that is OK to use. 

Step 3.  I used cheap watercolors to add a splash of imperfect color to the tulips and leaves.  

Step 4.  Finishing Touches - I finished the card by stamping green accent dots (from the  stamp set) around the wreath and drawing stitch lines with a fine point black marker.  
I stamped "Get Well Soon" Sentiment last -  after I had a feel for where the bow was going to be added.  I didn't want to bow to cover the sentiment so placing the sentiment  off center was perfect.


Thanks for stopping here today.

Where to shop? 
You can shop for JustRite stamps and dies right here


Products Used on this Card:
JustRite "Get Well Soon Clear Sentiment Stamp" CR-05513
Spellbinders Ink by Jane Davenport - Squid Ink Pink 
Tsukineko Momento Dye Ink-Tuxedo Black
Ranger Archival Ink by Wendi Vecchi- Prickly Pear 
Tsukineko Momento Dye Ink- Pear Tart
Tsukineko Momento Lux Dye Ink- Rose Bud

Saturday, September 15, 2018

Beach Themed Card and Tag - Creative Embellishments


Welcome to Creative Embellishment's Birthday Beach Challenge

Happy Birthday creative Embellishments.  Join us at the Facebook Event page here 

In celebration of Creative Embellishment's Birthday, I am hosting a beach challenge - found right here

The Rules: 
 There are no rules other than to present a NEW creation featuring the ocean/beach/ sea....you've got the idea.   You DO NOT have to use Creative Embellishments chipboard to enter the challenges.  However you cannot combine CE challenges.  
This event is meant to Thank Customers and Introduce others to the product.   

 All the Challenges are listed on the   event page found here.  
Enter as many as you like.  There are 7 challenges and a total of  8 chances to win. 
  
The challenges are open until 11:59pm (EST),  Monday Sept. 17th 11
All projects must be uploaded to the Fan page by that time.  
Be careful of Time Zones. 

Prize for the Beach Challenge
The winner of my beach challenge will win the following price.  
I know, right?  Look at all the fabulous chippies. 


These are the chipboard pieces I used on my card and gift tag.  They are lightly dabbed with creamy white paint.  


My paper choice is Stamperia's Sea Land collection.  It's peaceful, relaxing and refreshing. 

Thanks for playing along with Creative Embellishments.

Remember to add your work to the  Creative Embellishments  Birthday  Event Page or simply stop by and see how great the chipboard is.  


Products Used: 
Stamperia Sea Land paper collection

Friday, September 14, 2018

Sweet Christmas Cards -Spellbinders Christmas Blog Hop


Welcome to Spellbinders - New Collections Holiday Blog Hop
 Spellbinders has gotten into the holiday spirit with several new collections from some amazing designers.  Today's hop features:
Holiday Die D-Lites

The Prize and Rules
 To celebrate this release, we are giving away a $50 gift certificate to one blog reader - selected from the comments across all of the blogs in the hop. Giveaway closes on Sunday, September 23rd at 11:59 pm EDT. The winner will be announced in the blog hop post the following Monday. Winner is responsible for shipping cost, duties and taxes. 

The Blog Hop Order is located at the bottom of my post.  Scroll on down, enjoy the card samples, and hop to see more inspiration.

My cards feature dies from A Sweet Christmas by Sharyn Sowell.

I created two cards that use the following dies: 

This is the first card.  I thought the Mistletoe Gatefold die made a beautiful festive flap fold type card.  I layered a green die cut under the gold for shadowing to make the Mistletoe Gatefold die pop.  
When the card is opened, a  warm surprise awaits.  

Here's a quick video


This is the inside of the card featuring Spellbinders Hanging Stocking Die from A Sweet Christmas Collection by Sharyn Sowell.  I have once again layered the dies for a bolder effect.  


This is the second card.  I decided to use the Spellbinders Mistletoe Gatefold from A Sweet Christmas Collection by Sharyn Sowell as a border on this card.  I cut the die from cream colored cardstock and enhanced with inks and mist.  


Thanks for stopping here as you hop through the blog order.  I value your time and you comments.

Blog Hop Order:
Jennifer Snyder ( that's me)

Your next stop is Becca Feeken


Spellbinders Dies Used: 
Spellbinders Hanging Stocking Die from A Sweet Christmas Collection by Sharyn Sowell
Spellbinders Mistletoe Gatefold from A Sweet Christmas Collection by Sharyn Sowell