

DIY Christmas Ornaments
I'm here with a jump on Christmas.
I made some tree ornaments by combining Creative Embellishments chipboard frames with Christmas papers from Maja Design.
Creative Embellishments recently released some beautiful new chipboard frames. The Small Intricate Frames looked like they were perfectly sized for ornaments so my imagination went to work creating two different looks.
If you scroll down, I will show you how I made the ornaments.

The chipboard on this first ornament has been transformed into faux gold filigree.
These chipboard pieces have been embossed using Stampendous - Frantage Aged Gold Embossing Enamel. The embossing adds a bit more structural strength to the chipboard.
These are the Creative Embellishments chipboard pieces used to make the ornaments.

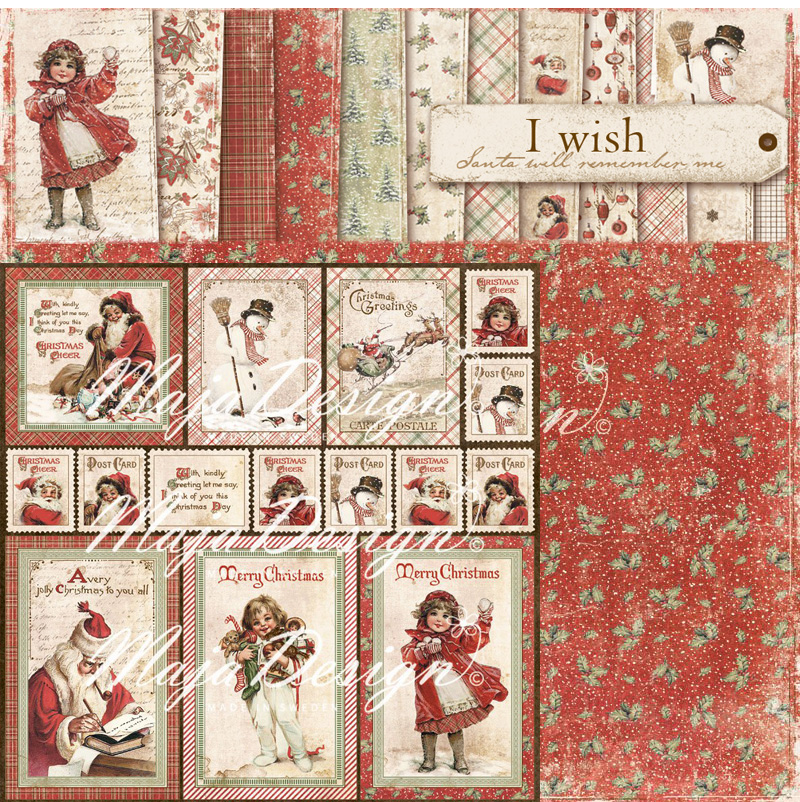
These are the papers I used from the gorgeous Maja Design - I Wish collection
I Wish Ephemera
I wish for a Holly Jolly Christmas

 This short video shows how the ornament looks from all sides.
Photos simply cannot capture the dimension and angles of the project.

Instructions for DIY Ornaments
So how did I make these?
You'll need two packages of Creative Embellishments - Small Intricate Frames. The great thing about that is you can now make two ornaments like I did or save the unused frames for other projects.
 Step 1. Emboss or paint both sides of the chipboard. You'll need one oval and two matching square frames/diamond frames.
Step 2. Using the square frames as your sizing guide, cut paper to fit behind the squares and then cut two more pieces a little larger to use as side panels.
 Step 3. Glue paper to each of the square chipboard frames. Then fold the chipboard to form a 45degree angle.

Step 4. Glue the square chipboard frames to the oval. You will only be gluing the top and bottom of the square to the oval. At this point, the squares are not really secure enough and need more support.

Step 5. Glue the paper squares to the sides of the ornament. This now


This short video shows how the ornament looks from all sides.
Photos simply cannot capture the dimension and angles of the project.
These are the Maja Design papers I used:
Maja Design - Joyous Winter Days collection
Ephemera
Chilly


Where to shop?
Creative Embellishments - Small Intricate FramesI made some tree ornaments by combining Creative Embellishments chipboard frames with Christmas papers from Maja Design.
Creative Embellishments recently released some beautiful new chipboard frames. The Small Intricate Frames looked like they were perfectly sized for ornaments so my imagination went to work creating two different looks.
If you scroll down, I will show you how I made the ornaments.

The chipboard on this first ornament has been transformed into faux gold filigree.
These chipboard pieces have been embossed using Stampendous - Frantage Aged Gold Embossing Enamel. The embossing adds a bit more structural strength to the chipboard.
These are the Creative Embellishments chipboard pieces used to make the ornaments.

These are the papers I used from the gorgeous Maja Design - I Wish collection
I Wish Ephemera
I wish for a Holly Jolly Christmas

Photos simply cannot capture the dimension and angles of the project.

Instructions for DIY Ornaments
So how did I make these?
You'll need two packages of Creative Embellishments - Small Intricate Frames. The great thing about that is you can now make two ornaments like I did or save the unused frames for other projects.

Step 2. Using the square frames as your sizing guide, cut paper to fit behind the squares and then cut two more pieces a little larger to use as side panels.


Step 4. Glue the square chipboard frames to the oval. You will only be gluing the top and bottom of the square to the oval. At this point, the squares are not really secure enough and need more support.

Step 5. Glue the paper squares to the sides of the ornament. This now


This is the second ornament I created.
I topped this ornament with a chipboard snowflake as the finishing touch. This is also from Creative Embellishments - Snowflakes
The chipboard pieces have been embossed with Stampendous - Frantage Aged Ivory Embossing Enamels for a frosty feel as well as to reinforce them.

This short video shows how the ornament looks from all sides.
Photos simply cannot capture the dimension and angles of the project.
These are the Maja Design papers I used:
Maja Design - Joyous Winter Days collection
Ephemera
Chilly


Where to shop?
Shop for chipboard, wood and flair buttons from Creative Embellishments here.
Creative Embellishments - Snowflakes
Stampendous - Frantage Aged Ivory Embossing Enamels
Stampendous - Frantage Aged Gold Embossing Enamel
Maja Design - I Wish Christmas collection
Maja Design - Joyous Winter Days paper collection
Wow Jennifer these are just beautiful!
ReplyDeleteGorgeous as usual hun, beautiful use of the chipboards and the papers, Liz xx
ReplyDeleteWonderful. Love the products and video.
ReplyDeleteGorgeous ornaments! I really want to give this a try! Thanks for the inspiration!
ReplyDeleteThese ornaments are so incredible,Jen! I really need to try this! I really love that Maja Design-I wish collection! So vintage!
ReplyDeleteTheese ornaments are absolutely Stunning! WOW!
ReplyDeleteGreat colour theme on each one. And I love the exclusive look! Veeeeeery Elegant!
Jennifer, your ornaments are beautiful. What a great tutorial! I would leave my tree up all year if I had these beauties hanging on it! :)
ReplyDelete