This is the second example using the same die set. I simply used the negative space from the die and added lace behind the negative space for a little softer look. A simple card to create with a dab of grace.
These are the papers I chose from the Summertime collection. This is a double sided sheet called "Flowers Everywhere". Beautiful, isn't it?
You can see here that the lace adds a sweetness to the card. Not much else needed between the design of the die and the pretty lace mixed with the gorgeous papers.
This is the third card created and also created using the Maja Design Summertime collection. The collection has a perfect blend of colors that hop from beautiful raspberry to soft and pastel navy blue.
These are the dies used on this card...also from JustRite.
DIY Easy Instructions Hello. I'm here today to share some projects using a few collections from Lemoncraft. The first project is a wedding card using the delicate and graceful Lemoncraft collection called 'House of Roses'. The second project is an 8x8 layout using the 'Christmas Greetings' and 'House of Roses' collections.
First up is the card. So let me show you the wedding card I created first. I really love the Lemoncraft 'House or Roses ' collection. It is perfect for romantic wedding cards. The beautiful rose on the heart is from the Lemoncraft 'House of Roses Labels 2 - Vintage labels'.
DIY Step By Step Instructions
I will share my simple DIY instructions so you can see the steps taken to make this card.
Step 1. I am creating a card that is sized 5in x 6.5 in. You can fold your own card base or use a pre-folded card. I used a pre-folded ivory card base.
To build the base of my card, I selected 2 sheets of patterned paper for layers from Lemoncraft House of Roses - Time Flies 6x6 paper pad and one sheet of ivory cardstock. I also punched a decorative border from sheet of the 6x6 Lemoncraft pad.
I lightly ink all edges for definition and glue the paper layers to the cardstock as desired. I set the punched border aside for use in step 2.
Step 2. I created an ornate strip for the card. The four layers as follows from top to bottom ( with paper edges gently inked):
Top layer 1 - I selected a piece from the 6x6 paper pad with delicate florals. I cut a strip about two inches wide - or wide enough to include the beautiful floral images. Layer 2 - The border punch from step 1 Layer 3 - 1/4 inch paper strip Bottom Layer 4 - lace
Step 3.Attach all decorative layers onto card.
Step 4. Assemble the embellishments. Cut out a vintage image from the Lemoncraft Vintage Labels sheet. Cut or punch a heart shape about 3 inches wide. Select the flowers.
Ink the edges of everything for consistency - even the flowers.
Step 5. Add the embellishments to the card. I added a piece of cardboard to the back of the heart for added dimension.
Step 6.Print a card sentiment from computer. Ink the edges and glue to card.
And here is another photo of the completed card.
My second project is an 8x8 layout for my friend's young son. I wanted to make the page have a little bit of a masculine feel without it being too manly. I used the greens and neutral colors from the 'Christmas Greetings' Basic paper pad for the border.
The background is paper from 'House of Roses' Basic paper pad. I also used some green ribbon from the 'Christmas Greetings' ribbon and lace set. The family is Irish so the green ribbon was perfect.
I hope you are also having fun with all the beautiful LemonCraft collections.
I created a quick easy birthday card/invitation using just one set of stamps from JustRite Papercrafts.
This super versatile stamp set has enledd possibilities for birthdays and celebrations including ideas for school projects and for the teacher even - as you can see in the image of the set below.
My Steps and Easy DIY instructions
OK - soooooo easy… I wanted the sentiments to look like candles.
I found the easiest way to stamp the sentiments was to line them all up on my clear acrylic stamp block first and then stamp - repeating as necessary to complete the border.
After stamping the sentiments, I doubled back and stamped the itty bitty candle flame.
Last step…I added my watercolors as the last step. I just happened to have used Prima's Tropical Confections watercolor set.
I have a simple yet beautiful frosty card I created using some dies and stamps from JustRite.
Not a lot to this card, but sometimes simple is effective and I love the colors I chose.
The background of the card was created using JustRite Confetti Trio Background Stamps. I thought I would dab the stamp with three different colored distress inks - Dusty Concord, Broken China and Bundled Sage. The sentiment in the corner is JustRite Small Oval Christmas Tidings Clear Stamps and is stamped using Tim Holtz Distress ink in Faded Jeans. Finally the sweet little snowflake in the upper corner was created by cutting the circle from
Marker's Mart From Spellbinders is Now Open And a Chance to Win....
Spellbinders has opened it's new Maker's Mart shop - where you can be the first to grab a monthly kit. They also have a cool chance to win a prize. Scroll on down and you'll find the details.
Today I am sharing two cards that I made from my Maker's Mart dies.
This set of cards was created using the Holiday Themed Card Kit from Maker's Mart. This is chock full of darling dies from Spellbinders. They are perfectly sized for cards...I love them.
Share your Maker's Mart creations and win!
You can see all the details right here on the Maker's Mart blog. All you have to do is tag your Social Media with #MakersMart and on Twitter with #MakersMart and @TeamMakersMart or upload your designs to theMaker's Mart web pageeven.
Wanna see some other ideas from Maker's Mart? I have two super short videos showing the Die kits from July and April. Got 4 mins? I promise 4 min of quick moving crafty entertainment. I'd especially love if you would leave a comment on the video.so the Spellbinder's folks know I'm working hard.
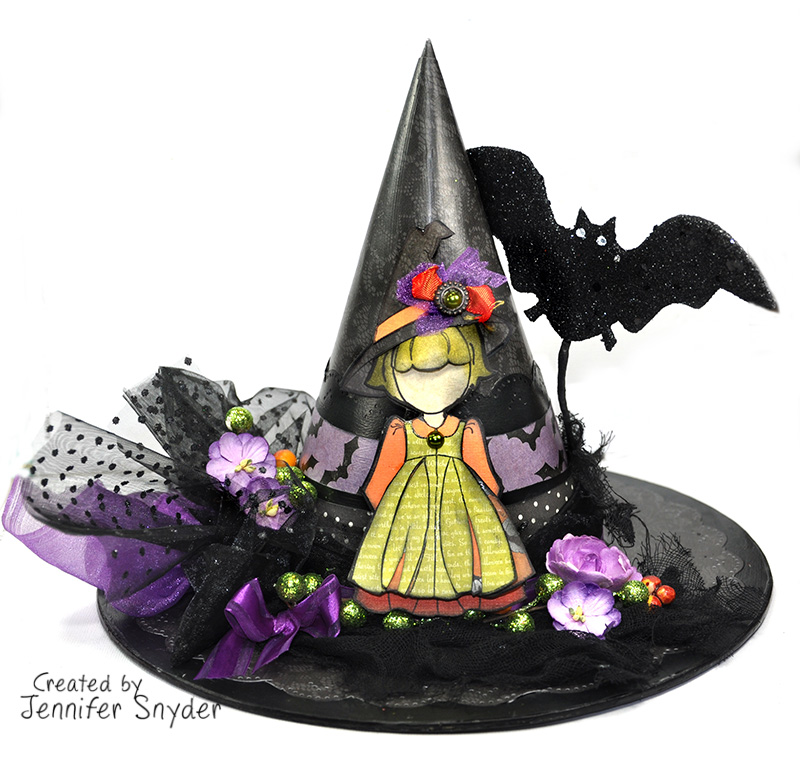
It's Halloween and Time for some Home Decor - With Julie Nutting/Prima and PhotoPlay
I created this witch hat using Julie Nutting's new die and stamp set from Prima. I combined it with PhotoPlay Papers Bootiful Collection. The colors in the collection make for perfectly festive fun home decor pieces.
This started as a plain paper mache hat that needed to be gussied up. I grabbed this at a great discount from Joann's - part of the new Fab Lab collection.
I had a few options for decorating my hat. I could paint the entire thing, or use paper. I chose paper because I love the PaperPlay Bootiful collection. However it's way too difficult to paper something with such precision without edges and crevices showing. Impossible for me at least.
Painting the edges and crevices BEFORE papering and decorating helps eliminate the stress of perfection. That's what I did. I painted the edges of the hat, the tip of the hat, and the underside of the hat. I absolutely did not want to bother decorating and wasting paper on the underside of the hat.
After the paint is dry, I went ahead and added paper to the hat.
Creating a Template to Start the Decorating Process
I have to admit that when I started the decorating phase of this project, I was certain it would be super easy and quick to cover the cone on the hat. Heck , how difficult can it be? And how difficult can it possibly be to make a hat band as well?
Wrong, wrong wrong. I was so wrong. It was not easy. In fact it was frustrating as all heck. But I have this quick technique I use when I am working with odd shapes, paper mache and wood pieces. My template process is a snap and takes the frustration out of the paper crafting process - at least for me.
I have a super quick 2 min video that will help provide some tips when working with paper mache and tips on how to make easy templates in a flash.
The doll die is much taller than I wanted so I cut her legs off. Sorry little darlin' but I had to do it!
In order to make her be a sturdy and durable embellishment on my hat, she is 3 layers thick. I cut 3 layers, glued them together and then decorated the top layer. Then I added a layer of black foam to her in order to attach her to the hat. The foam adds a nice dimensional layer between the hat and the doll.
You can see the foam in the photo below ( near the bottom of the doll).
In order to protect the paper hat from moisture, I coated the entire hat with Mod Podge in a matte finish - even the under side.
Looking down on the hat....
Thanks for stopping.
Products Used:
Prima - Julie Nutting - Halloween - Cling Mounted Stamps and Metal Die Set - Lil Witch -911614
PhotoPlay Paper - Bootiful Collection 12x12 paper Paper Mache Witch Hat - JoAnn's Fab Lab collection Black Cardstock Black Acrylic Paint Mod Podge - Matte Finish Ribbon