

Ringing in the Christmas Season with some Fab-ulous Joy.
I made a swag or some garland from the FabScraps Christmas collection and Marie Antoinette Collection. They actually go nicely together.
If you scroll down, you'll see my instructions for this project as well as the wonderful papers I selected.
I must start out telling you about the inspiration for my piece. This decorative branch. It was salvaged from a floral piece delivered to my office. As the flowers leave their last beautiful petals upon the office floor, I'm stripping out all the cool stuff, like this branch.

I love using the FabScraps chippies in unconventional ways. This has the Burlesque Collection Music Swirls – DC44 013 on it because it goes so nicely with what I think joy means. Joy is a happy word and meant to be sung. At my house, with a musician husband, everything is meant to be sung....just not by me. hahahahaaaaa.
I also used some of his guitar strings that he winds up into a circle after he is done and has changed them out to new fresh strings. He leaves all his old strings for me to use. He started winding the strings in a roll years ago so that the garbage collection man would not poke his eyes out. Now, it's just for my purposes.

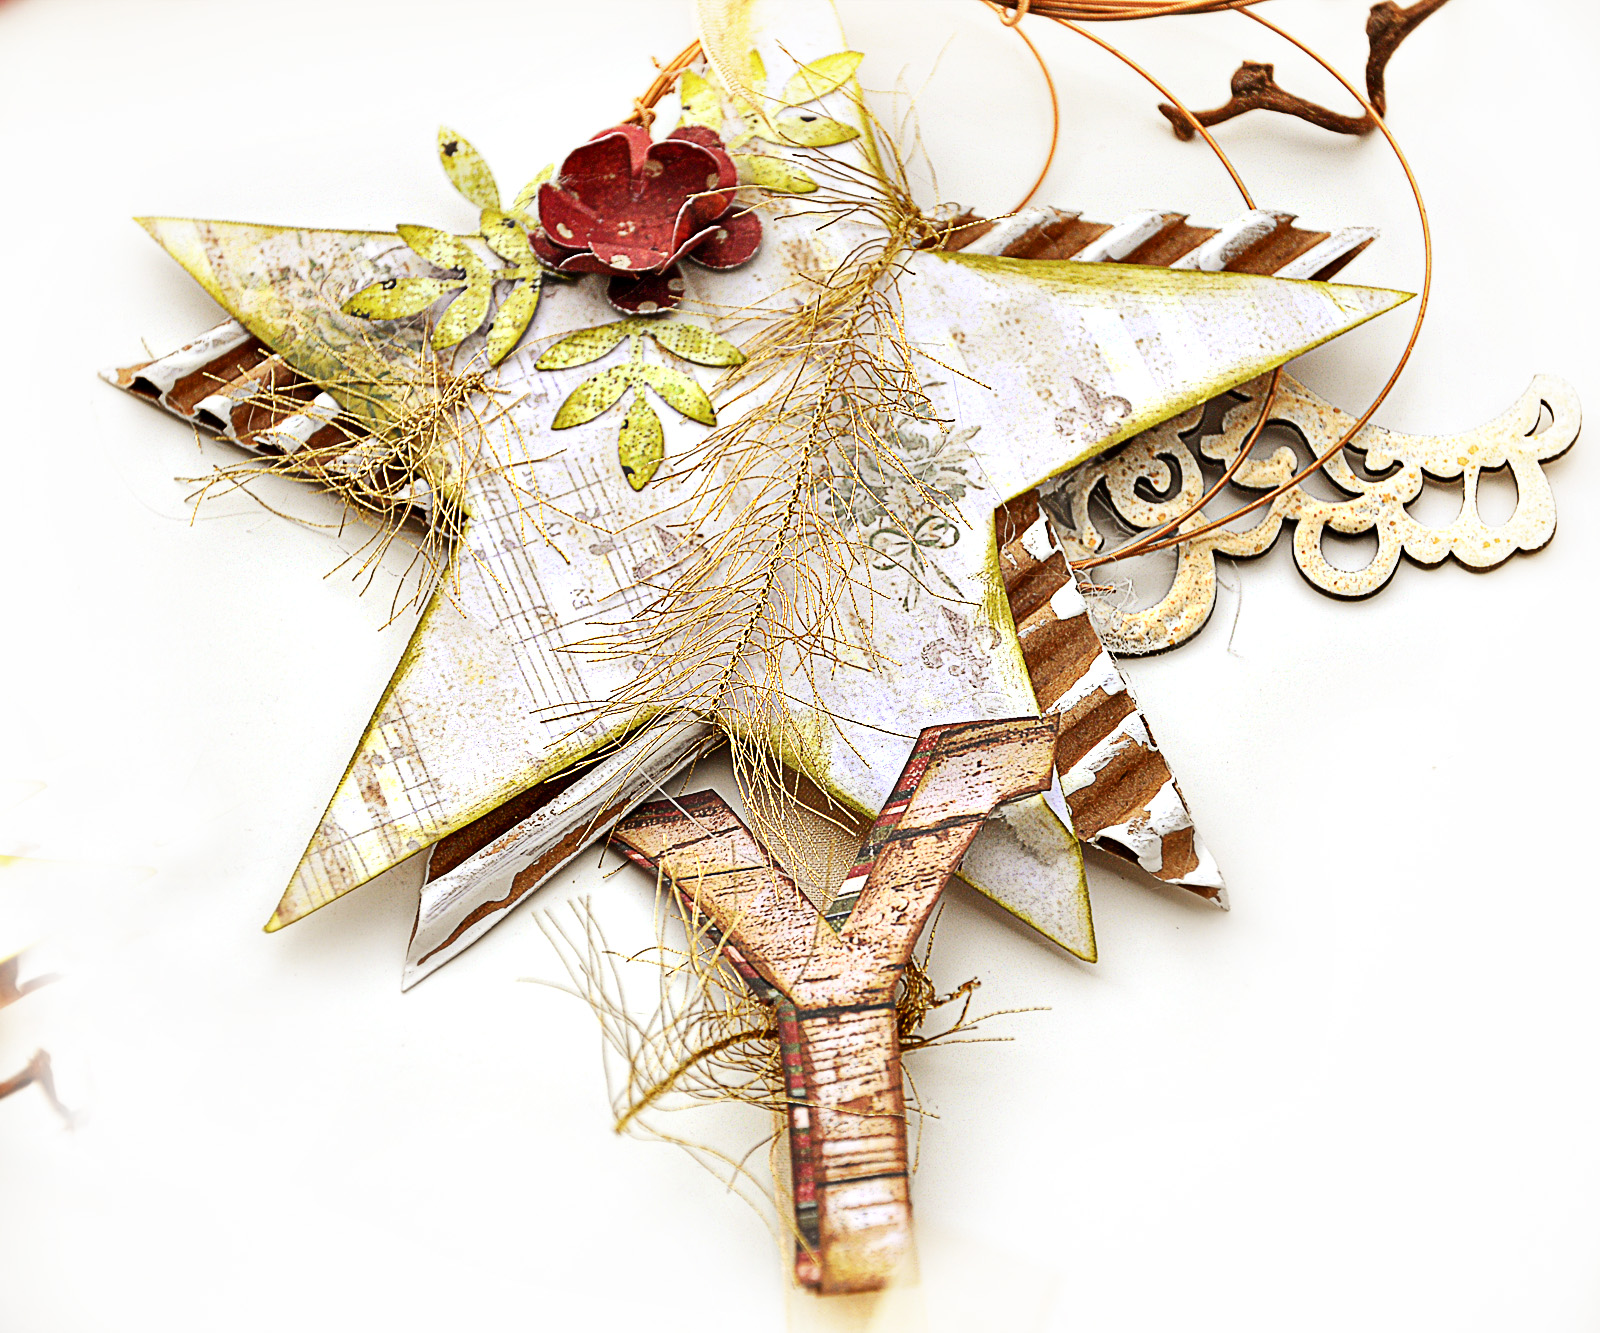
The background paper of the star is Marie Antoinette Collection Garden C53 003. The letters are Christmas Collection Bells and Whistles C51 001 and Christmas Collection Santa’s Helper C51 008.


Thanks for looking. May your Christmas season be Fabulous and Joyful.
Check out the FabScraps blog for more Christmas inspiration.
Like us on Facebook...
Follow FabScraps on Pinterest...
Joy Garland
For This Project You Will Need
- FabScraps papers – Victoria Collection Victoria’s Tree - C49 001
- FabScraps Christmas Collection Bells and Whistles – C51 001
- FabScraps Christmas Collection Little Children C51 007
- FabScraps Christmas Collection Santa’s Helper C51 008
- FabScraps Marie Antoinette Collection Garden C53 003
- FabScraps Chipboard Vintage Baby Collection Angel Wings -DC43 022
- FabScraps Chipboard Burlesque Collection Music Swirls – DC44 013
- Flowers, floral sprays , floral berries
- leaf punch or die
- small flower punch/die
- gems for flower centers
- Embossing powder/heat gun
- Fibers (some must be 60cm long), ribbon, wire
- Cardboard
- Decorative branch, wood piece
- White paint
- Green/olive and brown colored ink
Instructions
1. Using various fibers that are 60cm long, wrap a decorative piece of wood/branch in a swag-like fashion. Glue in place.
2. Cut 3 stars (measuring 10cm point to point) from cardboard and distress with white paint.
3. Cut 3 stars (measuring 10cm point to point) from Marie Antoinette Collection Garden C53 003. Ink the edges with green/ olive ink. Glue on top of the cardboard stars, a little off center making sure the cardboard is peaking out from the sides.
4. Decorate the stars with fibers.
5. Cut 3 ribbons 30cm long. Tie one end to the decorative wood branch and glue the star to the ribbon near the center. Make sure approx 8cm of ribbon sticks out from the bottom end of the star.
6. Flower Embellishment Preparation: mini flowers – each flower has 2 layers punched from Christmas Collection Little Children C51 007. Use your choice of small flower punch or die. Glue two layers together and ruffle up the edges with your fingers. Add a gem on the center and glue on stars.
7. Punch leaves from Victoria Collection Victoria’s Tree - C49 001 – glue to accent the flowers.
8. Punch snowflake shape from Christmas Collection Bells and Whistles – C51 001. Glue onto stars.
9. Decorate stars with fibers, metal, flowers, floral sprays as desired.
10. JOY Letter Embellishment Preparation: cut or punch letters (5cm long) from Christmas Collection Bells and Whistles C51 001 and Christmas Collection Santa’s Helper C51 008. Ink edges of letters with brown ink. Glue on top of each other for a layered effect.
11. Glue letter to the bottom foot of the star and also to the ribbon. Decorate with fibers.
12. Chipboard Embellishment Preparation: Vintage Baby Collection Angel Wings -DC43 022 – emboss with white. Glue to the stars.
13. Burlesque Collection Music Swirls – DC44 013 – emboss with white and glue to the top wood branch.
14. Finish off the piece with metal loops, fibers or floral sprays.
Fabulous piece!
ReplyDeleteYour wall hanging is beautiful! The perfect mix of shabby, elegant and sparkle! :)
ReplyDeleteBeautiful, just Beautiful!!!
ReplyDelete