Showing posts with label Christmas Greetings. Show all posts

Monday, October 24, 2016

DIY Elegant Card Ideas Using Lemoncraft

DIY Easy Instructions

Hello. I'm here today to share some projects using a few collections from Lemoncraft.  The first project is a wedding card using the delicate and graceful Lemoncraft collection called 'House of Roses'.   The second project is an 8x8 layout using the 'Christmas Greetings' and 'House of Roses' collections.   

First up is the card.  So let me show you the wedding card I created first.  I really love the Lemoncraft 'House or Roses ' collection. It is perfect for romantic wedding cards.   The beautiful rose on the heart is from the Lemoncraft 'House of Roses Labels 2 - Vintage labels'.

DIY Step By Step Instructions 
I will share my simple DIY instructions so you can see the steps taken to make this card.  

Step 1.  I am creating a card that is sized 5in x 6.5 in.   You can fold your own card base or use a pre-folded card.  I used a pre-folded ivory card base.

To build the base of my card, I selected 2 sheets of patterned paper for layers from Lemoncraft House of Roses  - Time Flies 6x6 paper pad and one sheet of ivory cardstock.  I also punched a decorative border from sheet of the 6x6 Lemoncraft pad. 

I lightly ink all edges for definition and glue the paper layers to the cardstock as desired.  I set the punched border aside for  use in step 2.  
Step 2.  I created an ornate strip for the card.  The four layers as follows from top to bottom ( with paper edges gently inked):

 Top layer 1 -  I selected a piece from the 6x6 paper pad with delicate florals.  I cut a strip about two inches wide - or wide enough to include the beautiful floral images.

Layer 2 - The border punch from step 1

Layer 3 - 1/4 inch paper strip

Bottom Layer 4 - lace
Step 3.  Attach all decorative layers onto card. 

Step 4. Assemble the embellishments.  Cut out a vintage image from the Lemoncraft Vintage Labels sheet.  Cut or punch a heart shape about 3 inches wide.  Select the flowers.
Ink the edges of everything for consistency - even the flowers.  

Step 5.  Add the embellishments to the card.  I added a piece of cardboard to the back of the heart for added dimension.  
Step 6. Print a card sentiment from computer.   Ink the edges and glue to card.  
And here is another photo of the completed card.  

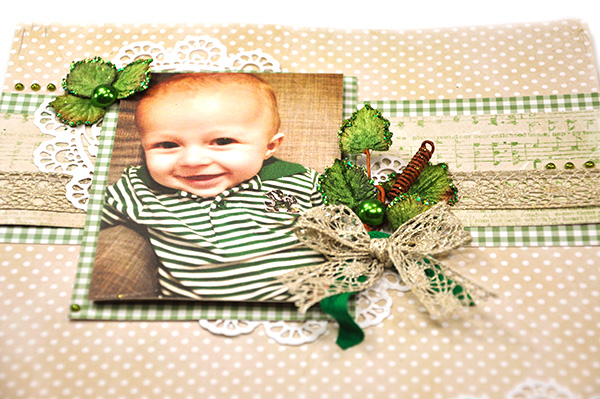
My second project is an 8x8 layout for my friend's young son.  I wanted to make the page have a little bit of a masculine feel without it being too manly.  I used the greens and neutral colors from the 'Christmas Greetings' Basic paper pad for the border.  

The background is paper from 'House of Roses' Basic paper pad.   I also used some green ribbon from the 'Christmas Greetings' ribbon and lace set.  The family is Irish so the green ribbon was perfect. 


I hope you are also having fun with all the beautiful LemonCraft collections.  
Thank you for stopping by! 

Jennifer Snyder


Supplies Card:
lace
Martha Stewart Doily Lace Edge Punch
Lemoncraft House of Roses Labels 2 - Vintage labels
Tim Holtz Distress ink - Vintage Photo
Ranger Tim Holtz Blending tool

 Supplies for Layout:
Lemoncraft House of Roses 12x12 Basic Paper pad
Lemoncraft Christmas Greetings  -Set of Ribbon and Lace
Lemoncraft - 'Christmas Greetings'  Basics12 x12 paper
Lemoncraft 'Christmas Greetings' 12x12 paper -04  P0073
Prima Die -
Petaloo Floral Vines - Canterbury Collection Grape Leaf Vines 1809-100

Thursday, January 28, 2016

DIY Cards to make all year - Using LemonCraft

Everyday Cards Using Lemoncraft "Christmas Greetings"

Hello - I'm on the Lemoncraft Blog today making some everyday cards using leftover Christmas papers. If you scroll through my post, I'll show you how I made two of the cards also. 

Lemoncraft introduced a gorgeous collection before the holidays called "Christmas Greetings". Everyone got excited for the new Lemoncraft papers and products.  We made Christmas cards, gifts, scrapbook pages and some home decor pieces.  Everyone loved the cards and gifts.   The holidays came and went.  

Now what?  What do you do with leftover Christmas papers?  Easy!  Just keep right on crafting and making cards, gifts and scrapbook pages. You see, the Christmas Greetings collection has fabulous patterns that can be used all year round.  Who doesn't love polka dots, checked patterns, gingham and music notes?  Rich reds, pinks, greens and creams. 


 The paper I used is gorgeous, right? Just pretend that the word "Christmas" isn't even on this paper pack, and let your mind think of the wonderful possibilities.  And where can you buy this collection?  You can grab your Lemoncraft "Christmas Greetings", and many other gorgeous Lemoncraft papers from Flying Unicorn.  

Let me show you a few of the cards I made - one for Valentines Day, a spring card, and a card to celebrate our snowy winter ( and there is a lot of snow where I live - much to celebrate).  


This is the first card I made.  The rich reds and garnet color are perfect for Valentines Day.  I just happen to have a sweetheart who needs a special card, so my leftover papers will be put to great use.  

I also used the Christmas Greetings coordinated Trim from Lemoncraft as well as a button form Lemoncraft too as an embellishment.  

Let's see how I made this: 
These are the papers I pulled from the 6x6 paper pad - great classic patterns.  

I cut the papers to fit my kraft card.  This card is 6in x 4.75in ( 15cm x12cm).  I also love to ink the edges of my paper.  I used Distress ink in two different colors to get the perfect blend. 


 Before I glued the top layer to the card, I added some ribbon from the Christmas Greetings collection. I taped the ribbon to the back of the cardstock before gluing down to give a nice finished look.  

Time to add embellishments.  I chose some flowers with cute berry picks.  The burlap leaves really compliment the colors of the paper.  
After this, it's time to add  the final touches.   I added a die cut heart from Spellbinders for Valentines Day, a beautiful decorative button from Lemoncraft, and some flowers.  
I tucked some more of the ribbon onto the card to look like a bow. 
Here is the close up of my cluster:


The supplies for card one: 
Lemoncraft Christmas Greetings 6x6 paper pad,  Lemoncraft paper - A Lot of Hope,  Lemoncraft Ribbon from Christmas Greetings Collection, Lemoncraft Decorative Buttons,  Petaloo Flower Forget -Me-Not in Antique Beige, Petaloo Burlap Berry Pick, Spellbinders Vines of Passion Heart die S2-022, Tim Holtz Distree Ink in Vintage Photo and Walnut Stain


This card has a spring theme with the flowers and fresh greens from the papers.  These are the papers I used.   You can see a lot of great classic patterns, not too Christmas-y.

I cut the papers to size, and inked the edges.  I should probably stop saying that by now.  If it's a "Jen " card, it's going to have inked edges. 
Now to make the main embellishment.  Using this Prima die, I cut into the gingham patterned paper and then glues the diecut over the top of cream colored cardstock. 

I used the die cut from the Vintage Images sheet from Lemoncraft.  Such gorgeous images on these sheets.  I used the vintage image as a topper over my diecut. 
Oh yeah, and I inked the edges too!  Of course. 

I wanted the diecut to have some dimension so I added cardboard to raise it.  Foam tape os great as well, but I like to take the cheap way out. Nothing is cheaper than FREE!
I punched some leaves...and did some inking. 
Then I assembled, glued and decorated my card. The sweet butterflies are also cut from the Vintage Images from Lemoncraft. 


The supplies for card two: 
Lemoncraft Christmas Greetings paper pad, Lemoncraft paper - A Lot of Joy, Lemoncraft Ribbon from Christmas Greetings Collection, Lemoncraft Vintage Labels 1,  Petaloo Flower  Mini canterbury Pink 1823-320, Prima Die Parisian 584047, Tim Holtz Distree Ink in Vintage Photo and Walnut Stain

My third card is a shaker card with a focus on winter. 

These are the Lemoncraft "Christmas Greetings" papers I used on this card. 

I make the window of the shaker cards using acrylic from packaging.  For example, I think the acrylic on this card was from a discarded plastic cookie container.  I also save packaging from flower embellishments, and anything else I see worthy of being saved. 

I punched a snowflake using Spellbinders Snowflake dies.  I inked and layered them, then added the to the card before setting the shaker card window over them. 

This is a better view of the snowflake and the dimension of the shaker card.  I used Fun Foam for the inside layer of the card.  It's easy to cut and inexpensive to buy.  I found that cardboard is not that great to use for shaker cards as the main dimensional layer.  The embellishments chosen for shaking can fall through the corrugation of the cardboard.  It's not good to loose the "guts" of your shaker card as you are shaking.  


The supplies for card three: 
Lemoncraft Christmas Greetings 6x6 paper pad, ,Spellbinders Triple Tear Die s4-490,  Petaloo Flower Mini Canterbury Flowers Pink, Spellbinders Create a Flake s4-340, Tim Holtz Distress Ink in Vintage Photo and Walnut Stain, Cardstock in kraft, gold trim and gold mini braiding, gold floral berries, gold sequins

Find all your Lemoncraft goodies right here, at the Flying Unicorns.