Friday, November 6, 2015

Autumn Themed Shadow Box - Flying Unicorns


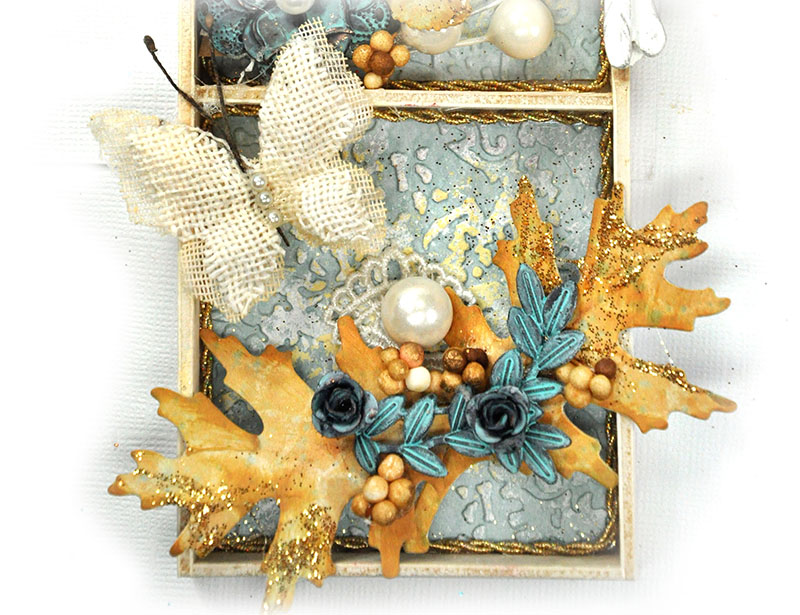
I'm here today to show you my shadow box created from the November Your Passion Your Art main kit and elements from the Mixed Passion floral addon kit. 

This kit features Studio75, "Splash It" collection from Poland.  
The cool thing about this paper collection is that it is really versatile and can be used for kids projects, bright and cheery projects, masculine projects, vintage, and even seasonal.  I opted to use it for a vintage holiday themed project.  


So how did I make this?  Here are my steps:

The base of my shadow box comes from the Prima butterfly resin icons that came in the Nov  Main Your Passion Your Art kit. It's a beautiful clean wood shadow box that I chose not to paint.  I didn't want that hassle. 

My backgrounds come from cutting Studio 75 Splash It papers to size for each compartment - then embossing each one.   

Next I dabbed the embossed papers with a sponge using white and light yellow acrylic paint to create a little interest in the background and yet not take away from the embellishments.


The best way to hide imperfections on altered items is by hiding them with trims.  So that's what I did.  I took some thin gold braiding and glued it to the edges of each compartment.  In the photo, I am using a wood skewer to help manipulate the cording and get it tucked nicely onto the project and snuggly into the corners.  No way my fingers could  do that!  If anyone were to ask?  My favorite tool on my desk is the simple inexpensive amazing wood skewer.
Next task was to make my Prima resin birds look a little more rustic. 

 I dabbed 13Arts Ayeeda acrylic paint  in Old Gold, onto them with my finger tip.  I just dipped my finger tip lightly into the paint and brushed it over the bird feathers to accent them.   The old gold also picks up the gold from the braiding trim used. 


Making The Leaves 
Moving on to decorating.  I made some leaves  using the Darice Assorted Leaved Die, that came in Oct Your Passion Your Art kit.  I punched them using Studio 75 "Splash It" paper collection and then enhanced them a bit with inks and glitter.

I inked the edges using Clearsnap Donna Salazar Mixed Media Inx in Vintage.   I enhanced them by adding glue to the tip of each leaf and dipping the tips into glitter. This adds a touch of holiday glitter, glam and elegance. 


After my leaves were created, I was  free to start embellishing.  The patina metal embellishments are Prima Metal Patina Trinkets.


Here are a few more close ups of the finished shadow box. 


Unicorn Fabulous Pre-Order Option
If you were not able to get your hands on the kit this month, do not be discouraged.  OK, you can be discouraged, but it's time to take matters into your hands with the pre-sale option

   Kits sell out fast.  Unicorns offer the Premier papercrafting kit WITH NO subscription obligations.  That is HUGE!  That means you are free to skip months; free to preview the kit to see if it is a kit to your liking; free to walk away on those months where your finances need to be re-directed.  We all have those months.  Unicorns understand.  

We offer a pre-order option of the 20th of every month.  You have 48 hours to pre-view the kit and all add-ons:
  • main Your Passion Your Art kit , with the monthly OTP, Off the Page, altered item
  • Mixed Passion Floral add-on chock full of gorgeous coordinating flowers
  • Mixed Art  add-on brimming with the newest mixed media products available 
  • Small Art Big Passion add-on - the coolest mini kit on the planet - for cards, tags and all projects of a mini nature
You can see all the pre-order details right HERE


Supplies:
Flying Unicorns  - Nov Your Passion Your Art Kit ( Featuring Studio 75 Splash It collection)
Prima Art Extravagance  Glitterset - Luminous 961596
13Arts Ayeeda Metallic Old Gold paint
Prima Ingvild Bolme Shabby Chic Treasures - Bird Resins 892470
Prima wood box from Resins Butterfly
Prima Metal Patina Trinkets 584924
Prima Flowers Victorian Christmas - Red Stocking 583477
Sizzix Tim Holtz Texture fades embossing folder - Damask & Regal Flourish 656994
Darice Assorted Leaved Die
Clearsnap Donna Salazer Mixed Media Inx - Vintage


Wednesday, November 4, 2015

Autumn in New England - Flying Unicorns and 2Crafty ( with leaf making tutorial)


Autumn In New England
(You can find this post on 2Crafty's blog here)

This is a layout I created based on a photo I took in Vermont, US, a few years ago.   My father-in-law lived in Vermont and each time I visited, I was enchanted with this church that everyone must pass upon entering into town from a certain direction.   It appears like a welcoming beacon for travelers and a symbol of home for residents. 

One Autumn day as we were driving into Bennington,  Vermont, the sky was perfect and the trees were at near peak in Autumn glory.  I asked my husband to pull over and I jumped out to snap a few shots.  In order to get the best shot, you have to stand in the middle of the road.  Thank heaven it was early morning before church got started. 

 This page was created using the Nov.  Kit for the Flying Unicorns - 7Dots papers, along with a fun set of chipboard from 2Crafty:
2Crafty Chipboard "Autumn Leaves " m00018
2Crafty Words "Nothing Beats a Father's Love"
2Crafty "Winter Twig Branches"


Available in my ETSY shop while it lasts. Right here

Chipboard Instructions:
2Crafty's chipboard leaves were absolutely perfect for my project.  I'll show you how I altered them.   
 First I painted the leaves with gesso to prime them.  After dying, I misted with 13Arts Ayeeda mist in Yellow.  I sprayed them a few times to darken in spots as needed. I did not blot them dry - I used the heat gun to dry them. 

Next step,  I added some embossing powder to give them some crinkled texture.


Below is a page that shows the "Autumn Leaves " and  "Winter Twig Branches" nicely inserted into a cluster of  paper leaves, floral berries and flowers.  The  "Winter Twig Branches" were simply stained with orange ink.  

Paper Leaf Instructions:
Next I want to show you how I created some paper leaves to be used along with the chipboard leaves.  I didn't have enough chippies so I had to make some paper leaves. 

Step 1. I used a fun Darice leaf die ( Assorted Leaves) that came with the Flying Unicorn Oct kit and punched a bunch of leaves from Studio75 "Splash It" paper collection . I enhanced the colors using some inks. 


Step 2. Step 2 is leaf crunching and inking. 

OK let's break  the leaf process down even further:
 fold the leaf in half.  Lightly touch or dab the fold onto the ink pad.  

Next - crunch the leaf and gently roll the leaf on the ink pad so that the crunched folds get slightly inked.  When you unfold the leaf and open it up, you have a cool looking "old leaf" effect. 


I decided to leave the  title, Nothing Beats a Father's Love ", as a natural chipboard piece with no finishing.   


The chipboard on the left matches nicely with the paper leaf I made.  

I love showing dimension in my photos if I can get a decent shot.  It really shows the depth of the page ands how wonderfully the chipboard is on the page up close adding nice pops of texture, dimension and interest.   

Thanks for stopping here.  I value your time. 

 If you missed the Flying Unicorns Oct kit, consider pre-ordering your kit each month.  Pre- orders start the 20th of each month, you get the best selection, you get to see a preview to determine if you like the colors and style of the particular month, AND it ships early.   Bonus all the way around.   Details here

Grab this layout on my ETSY while it lasts. 


Products:
2Crafty Chipboard "Autumn Leaves " m00018
2Crafty Words "Nothing Beats a Father's Love"
2Crafty "Winter Twig Branches"
Flying Unicorn Kit of the Month - Nov -Your Passion Your Art
Studio 75 papers Splash It collection
13Arts Ayeeda Mists
Darice Assorted Leaves thin metal dies
DieNamics Royal Leaf Dies
Tim Holtz Distress Powders - Scattered Straw and Marigold
Clearsnap - Donna Salazar Mixed Media Inx - Mossy, Vintage, Patina, Butternut,
Floral Berries
Hemp Twine
Petaloo Flowers


Monday, November 2, 2015

Embossed Christmas Tree Card - Flying Unicorns


This embossed card was created using the November - Your Passion. Your Art kit of the Month from the Flying Unicorns.  It's packed with fun little surprises like washi tape that is extraordinary in person.  I tucked a little on this card...its on the left side and has polkadots.

This kit features Studio75, "Splash It" collection from Poland.  
The cool thing about this paper collection is that it is really versatile and can be used for kids projects, bright and cheery projects, masculine projects, vintage, and even seasonal.  I opted to use it for a vintage holiday themed  Christmas Card.

  The main kit includes:
Main Kit Includes : Papers—Studio 75—Splash It Collection 2 sheets of each : 01, 02, 03, and 04, Splash It Cut outs 05, and tags 06. Prima Resin Icons Butterflies, Prima Metal Trinkets, Creative Embellishment Dangling Heart, Prima Art Ingredients Glass Beads Turquoise, Little B Rub Washi Tape 

This card also uses the patina metal trinket from Prima as the cluster anchor, the main feature in my cluster.  It's really pretty and delicate. 


Unicorn Fabulous Pre-Order Option
If you were not able to get your hands on the kit this month, do not be discouraged.  OK, you can be discouraged, but it's time to take matters into your hands with the pre-sale option

   Kits sell out fast.  Unicorns offer the Premier papercrafting kit WITH NO subscription obligations.  That is HUGE!  That means you are free to skip months; free to preview the kit to see if it is a kit to your liking; free to walk away on those months where your finances need to be re-directed.  We all have those months.  Unicorns understand.  

We offer a pre-order option of the 20th of every month.  You have 48 hours to pre-view the kit and all add-ons:
  • main Your Passion Your Art kit , with the monthly OTP, Off the Page, altered item
  • Mixed Passion Floral add-on chock full of gorgeous coordinating flowers
  • Mixed Art  add-on brimming with the newest mixed media products available 
  • Small Art Big Passion add-on - the coolest mini kit on the planet - for cards, tags and all projects of a mini nature
You can see all the pre-order details right HERE


Thanks for looking.


Products Used
Flying Unicorn Nov Kit of the Month - Your Passion Your Art
Prima Patina Metal Trinkets 584924
Prima Say It In Crystals SIIC Green 530655
Little B Washi Tape - polkadots
Studio 75 Splash It paper collection
Couture Creations Embossing Folders - Bauble Tree
Clearsnap Donna Salazar Mixed Media Inx - Patina and Mossy
floral breeies
McGill - Branch punch

Sunday, November 1, 2015

Julie Nutting Canvas - Christmas scene and Step by Step ( Flying Unicorns)


Welcome to the Flying Unicorns kit for November.  Getting closer to Christmas, I thought I'd create a frosty scene using the "off the page" project.

 http://www.flyingunicornstore.com/category_s/1522.htm
November's bounty comes with a perfectly selected "off the page" project. Included in each Main Kit, is always a fun and unique "off the Page " item. This darling wheel barrow is perfect for the season. This unique item is chosen just for November, and just for you.


This is the November Off the Page project - "OTP".  The actual OTP item is a sweet metal wheelbarrow and was included in the main kit for November.  The main kit, Your Passion Your Art , always comes with an item to alter.

I wanted to create a winter scene at Christmas time with Toby and his dog have cut their tree down and are wheeling it home to decorate.  The doll stamps are from Prima- Julie Nutting and are two of my favorites to use because they represent the love and loyalty between a boy and his dog.

Grab this piece in my ETSY shop right here


How did I make this?

When I am making a project like this, I make it to withstand a little physical abuse.  I find it important to figure out ways to attach the embellishments to the canvas so it will last.   I believe I have come up with some pretty clever ways of attaching items if I do say so myself!

Important items in my scrap box of tricks?
  • Clear fishing line (nylon filament)
  • Heavy duty staple gun.  
  • Wood skewers
  • Needle nose pliers and palette knife
To create the shadow box effect, I simply turned a canvas around and used the reverse side.  I then painted the canvas and wood with Prima's Chalkboard paint because it has a great matte finish that I love.  I tried to create an ombre effect by painting the darker Jewel Blue first at the top , then progressing down to Sea Breeze and Egg Blue before transitioning to white for the snowy ground.

I prefer using a foam brush because they are inexpensive, provide great coverage and I don't have to clean them.  I am honestly horrible with paint brushes and sadly irresponsible.  I hate washing them out so they will be crusty and dirty when I go to use them.

To secure the wheel barrow, I use clear nylon filament or fishing line.  Yep - common fishing line.  It's pretty inexpensive, very very durable,  and is a staple in my crafting box.  I often secure the fishing line with a few heavy duty staples stuck into the wood part of my canvas.

I will also secure the trees to the canvas with fishing line. 


The palate knife or needle nose pliers are used to slightly raise the staple so I can wind the fishing line around the staple to use as an anchor to tie the fishing line to.

You can also see that I used the heavy duty staples to secure the Christmas trees.  I tied the trees tightly with fishing line so they would stay exactly where I want them. Then I anchored the fishing line by tying it to the staples.


This is what the canvas looks like before I embellish it.  I did add some of the new Prima Snowflake paste to the bottom for a snowy effect. 

Julie Nutting Doll Stamps
Julie Nutting Dolls = when I make a dimensional project and want the dolls to be part of the dimension, I often stamp two images.  I glue pieces of wood skewer  onto the bottom stamp layer to help stabilize the doll.  Then I glue the images together.    As you can see, I stamped and cut two Toby images and two dog images.  I also made sure I inked the edges of the bottom layer to help blend the layer and make it less noticeable.

After I have the wood skewers in place, I glue the top layer on and am then ready to continue with my project.

I made sure to provide a little extra support to the heads with some dimensional foam dots ( pop dots).


Here is a shot to show how I added the nylon fishing line.  

I made a  tree sign using paper and more skewers.  I decorated my tree sign with some Lime Green Stickles and Prima snowflake paste. 


Last finishing touch, I covered all my staple mess with cheese cloth for a snowy base.  I also dabbed the cheese cloth with Prima's Snowflake paste.  


You can also find this piece in my ETSY shop right here

Prima Chalkboard Paint, Sea Breeze 577230
Prima Chalkboard Paint, Jewel Blue 577223
Prima Chalkboard Paint,Egg Blue 577216
White Gesso
Prima Finnabair Extravagance Snowflake Paste 962906
Darice Metal Wheel Barrow 7in x2.8in
Prima Flowers - Victorian Christmas Rudolph's Nose 583446
Prima Flowers - Victorian Christmas Poinsettia Kiss
Prima Poppies and Peonies Canvas Banners
Prima Julie Nutting Dolls - Toby 910969
Prima Julie Nutting Dolls - Dog 910846
Prima Watercolor Paints Soft Neutrals - 576707
Prima Chalk Edgers - Branch Bark
Stickles - Lime Green and Christmas Red
Wood Skewers
Cheese cloth
8.5 x11 canvas