Showing posts with label box. Show all posts

Saturday, June 24, 2017

Re-Purposed Decorative Gift Box and Secrets from Jennifer Snyder


Chocolate....Petaloo flowers.....Spellbinders dies...Maja Design papers....and did I mention Chocolate? ahhhh

Today I'm sharing a cheery decorated box and a "behind the scenes glance into Jennifer's sneaky homelife. "

I received my first box of "See's Chocolates"  last Christmas all the way from California.    Let me tell ya....wowzers.  What quality - what deliciousness - and what a chocolaty secret to keep from my family.    My husband will snatch up candy from the counter quicker than one can blink.  I can't have that.  Then I have my kids to contend with and fight off.  Nope can't have that either.

Sorry - no way could I possibly divulge this gift to my family.  So I did the only reasonable thing a responsible mom and loving wife could do - I hid the box and ate them all.  Yes - EVERY heavenly melty wonderful piece of chocolate.

 The box was all that remained from that sensational chocolate memory saved from last Christmas.
 I tucked the empty box in my stash as if it had always been just an empty box.
BUT  now I can enjoy it again and gussy it up!!! (ahhhhh stills smells like chocolate too.)

To do this, I gathered up a few of my favorite products and set to work.   Flowers from Petaloo by Floracraft.  Dies from Spellbinders.  Papers from Maja Design in Sweden.


I grabbed the gorgeous Maja Design collection called Life in the Country to cover the box.
These are the papers I used from the collection and shown in the image below:
Porch, Summer Kitchen, Our Deer Summer Cottage
Next comes the die embellishments.
The top of the box is decorated with a gorgeously fabulous die from Spellbinders called Spellbinders Shapabilities Die - Heirloom Oval.

I added white cardstock behind the die to really make the design pop.
The paper makes me happy and reminds me of a summer picnic.


Next of course - come flowers as decorative toppers.
It's gussied up with some exquisite flowers from  Petaloo by Floracraft:
Petaloo Botanica Collection - Faux Dried Flowers Ephemera in Red 
Petaloo Botanica Fairy Rose Bud in Red (new release available soon)


The side of the box also has a diecut from the same die set, Spellbinders Shapabilities Die - Heirloom Oval.  A sweet little ornament to add additional interest to the sides of the box.


I added paper to the inside of the box as well.  Helps cover up the fact that I actually ate a whole box of chocolates.  Chocolates?  What chocolates.  Not me!  hahahaa


More views of the box.  


Keep your eye on the Petaloo website.  It will be moving soon and is being relocated to the Floracraft website.  Floracraft is the new owner of Petaloo.  You'll be able to see all the new flowers on that site.

If you are interested in learning more about being a Spellblogger, click here for all the information to set you on your way. .   

 Shop for Spellbinders  products and visit their blog for daily inspiration. 
Thanks for stopping here today. I value your time. 
Happy Crafting
#NeverStopMaking  #Spellbinders 


Products Used
Maja Design -Life in the Country Collection   Porch, Summer Kitchen, Our Deer Summer Cottage
Spellbinders Shapabilities Die - Heirloom Oval S4-447
Petaloo Botanica Collection - Faux Dried Flowers Ephemera in Red 1100-205
Petaloo Botanica Fairy Rose Bud in Red RS5013-192/4
Red Gems
Floral Berries
Gold Trim

Friday, January 20, 2017

Petaloo Star Box - DIY Home Decor With Tips


Home Decor Featuring Petaloo (with important tip)
Today I am showcasing a patriotic box featuring Petaloo flowers to accent some fun papers from Graphic 45.

I used the "Place in Time" collection from Graphic 45 and paired it with the perfect flowers.  The Petaloo Darjeeling flowers look like they were made just for this collection.  

Tips on Avoiding Critical Mistakes When Decorating Boxes:
I have decorated a lot of boxes in my crafting time.   I started off making one critical mistake that cannot be fixed.  Don't make the same mistake I made.  Scroll down and I'll explain the gigantic problem and how to avoid being frustrated. 


I used the following Petaloo flowers to help gussy up this patriotic box.  


And I even added some Petaloo blooms to the inside of the box because it's equally nice to open a box of beautiful surprises.  
These lovely flowers adorn the inside of the box:

Tip Time
My first box was a mess.  A real train wreck.  Why?  Because the lid would not fit on after I finished adding the decorative paper and covered the sides of the box.  
Sooooooo, here is my TIP for avoiding heartache and problems when decorating boxes.  

This step is only necessary if you plan to decorate sides with paper.  You cannot place paper on the entire side because then the lid will not fit.  So absolutely MUST mark where the paper will go.  To do this, place the lid on the box and draw a pencil line around the bottom of the lid. This will give you an idea of how wide to cut your paper and exactly where your paper needs to stop. 

The photo below shows how your finished box will look.  
The top will fit nicely and will not rip and peel the decorative paper.

Thanks for stopping.  Please visit the Petaloo blog to see all the newly released flowers coming your way soon.  

Petaloo Products:
Petaloo Darleeling Dahlias - Teastained  Blue 1467-103
Petaloo Darleeling Dahlias Red - 1467-101R
Petaloo Darleeling Mini Garden Rosette Blue 1492-103

Other Products:
Graphic 45  - Place in Time Deluxe Collectors Edition 4501470 (July Cut-Aparts)
Graphic 45  - Place in Time  Chipboard
Webweave Trim
Gold Floral Berries

Sunday, January 10, 2016

DIY - Create a Sweet Valentine Box with Coordinating Card


Thinking about giving your sweetheart something from the heart?   How about something with a heart! Create a decorative Valentine gift box and matching card.

I started with a paper mache heart from 
You can find a detailed step-by-step tutorial on the Blitsy Blog, right here

The matching card is equally easy to make.  Go check it out!


I started with a paper mache heart. When I am working with a product like this, I try to work with the natural kraft color of the paper mache. It's just so much easier than painting the box.

Create a temple for the patterned paper by tracing the heart onto your paper using a pencil. My paper is from the Simple Stories "You & Me" collection.
Next few steps have the potential to be messy. When I am working on projects like boxes and canvases, I like to adhere my patterned paper using Prima's Soft Matte Gel. I slather on a nice layer of gel with my foam brush, lay down the paper and then use a brayer to make sure the paper has no ripples and bubbles.


Once I'm satisfied my project is bubble free, I apply a thin coating of gel over the paper to seal it. You do not need to do this step, but I find the box will stay cleaner and be more durable with that top coat of gel. 

This step may be the MOST OVERLOOKED step when decorating any box in my opinion - major emphasis on those words "most overlooked".
Place the top on the box (whatever box you are using - including metal tins). See where the lid stops. It's important to note where the top ends - or how far down the top goes on the sides. If you glue paper all the way up the sides of the box and cover the sides totally in paper, the box top MAY NOT FIT, or may rip the paper each time the lid is removed and set back on. No good! You need to think ahead. Take note and work around that potential glitch.
I pop the top on. Make sure it's secure and then trace all the way around the box marking where the lid stops. This is where my paper is going to end. I need to leave the rest of the side bare naked so the top fits properly.


The sides can now be papered in the same way the top was papered; a layer of Soft Matte gel, layer of paper, followed by a top coating of matte gel.

I punched a decorative edge and glued it to the sides. Once glued in place, I coated the punched border with gel medium as well. NOTE: where the paper on my sides ends!
Glue gold glitter tape to the sides. Now I realize the gold tape has adhesive on it but I take no chances and add my own glue. I've found it's better to be safe and secure, than to have my beautiful glitter embellishments peel off when I give the gift to someone.
The tape also covers up the paper mache sides perfectly and adds that finishing touch to the box.

I grabbed a paper doily and adhered it to the box as well. Paper doilies are very thin and fragile. If you don't totally adhere it to the lid, it will most certainly rip and tear. No good! Save yourself from the aggravation!

Add embellishments as desired. I added some Petaloo flowers, leaves, floral berries and gold glitter ribbon.

I also added just a touch of embellishing to one side.
To complete the lid, I added a sticker from the Simple Stories "You & Me" collection coupled with some flowers and gold glitter ribbon.


Here is the completed box lid.

Here's is the completed box....now on to make an accompanying card that is equally gorgeous. 


Create a quick coordinating card:
This is a simple card primarily made of just some layers. I used a prefolded card because it's easy and the prefolded cards come with matching envelopes. You can score your own custom card as well.
Select the layers that will coordinate nicely with the gift box. I chose a journal card from the Simple Stories "You & Me" collection as the topper to my card.
Before you glue all the layers together, tie some string around the top layer and secure with a flower. In my example I used gold twine.


Final step is to add some foam tape to the layers for a bit of dimension and mount to the card.

It's always easier when you can see the steps .  
I hope you enjoyed.  Thanks for stopping here. 

Products
Paper Mache Heart Box  
Simple Stories - You & Me 12x12 Simple Set 
Simple Stories - You & Me 6x12 Stickers 
American Crafts DIY Glitter Tape - Gold 
Strong  Adhesive Glue 
Martha Stewart Edge Punch Doily Lace 
Foam Brush 
Prima Art Basics Soft Matte Gel Medium - Clear Transparent  
Petaloo Forgetmenots - Antique Red
Petaloo Bontanica Blooms - Coral or these would look great 
Petaloo Botanica Collection  pink Spring Berry Cluster
Gold Glitter Ribbon 
Paper Doily 4in
Gold string trim
Prefolded cards/envelopes 
White cardstock - for card 
cream/Ivory Cardstock for border edge 
Brayer


Tuesday, October 6, 2015

Sunflower Decorated Cigar Box With Tips on Building Clusters

I'm here to share an autumn inspired piece of home decor.  I used the Oct. Your Passion your Art kit and embellished it with the gorgeous coordinated autumn Mixed Passion package.    


While the  Our Mixed Passion collection is perfectly suited to complement the main kit, this is also an amazing stand alone collection.  

You can also find this on my ETSY page - grab it quick!


The Cigar Box
So back to my box.  This is a cigar box I bought at a flea market.  This one happens to be a cool black wooden box.  I did absolutely nothing to the box except pull the brand stickers off and smell the inside of the box...mmmmmm.  Reminds me of my grandpa who smoked cigars back in the day. 

Cigar boxes are pretty inexpensive. You can search on ebay and etsy and snag some great prices. If you are bold enough, you can walk into a local smoke shop, flash that charming smile of your's and ask for a box or two in your sweetest voice.  Who can refuse you?


Creating Cohesion
I started with the front and made my flower embellishment look like a sunflower.   I used the Petaloo Darjeeling Yellow Daisies and topped it with a Petaloo Daisy Center from the main kit. I liked the simplicity of the sunflower so much that I decided to repeat it on the top and make the piece a bit more cohesive.  


Building a Cluster
On to my clustering and embellishing. I focused on using the Mixed Passion collection as I said above.  When I am  decorating a box, I prefer to have the embellishments set at an angle and not flat on the piece. Why?  Because I am making the piece to place on a shelf or dresser.  You want to be able to see  all the embellishing at a distance and not have to be directly on top of the piece to appreciate it's detailed beauty.  If the flowers and leaves were arranged flatly, like a scrap page, then you lose all the purpose of the decor.   

Step 1. I started with my main flower and work outward. A cluster needs an "anchor".  That will be my largest main Petaloo flower.  I also inked the petals of the flower to enrich it.  I glued the flower onto the box at an angle. 

Step 2.  The anchor flower is set at an angle but now needs some support so it can stay at an angle and not squish down over time. Something needs to be added behind the flower.  In this case I used the Prima leaf vines because they have wired stems.  The wire acts as a super great support. 

You have no wired vines you say? OK, then glue several small pieces of cardboard together or several layers of foam tape to support the flower.  I also used the wooden key embellishment that came in the kit and glued it behind the flower to support the flower.  Metal pieces work well also - as do small hinges that are bent with one side glued down and the other side as support.


Step 3. Now that the main anchor flower is secure and well supported with something, the back of the cluster looks like a hot mess.  No worries!  This is where the magic of embellishing comes into play.  I pulled out the gorgeous weave trim that came in the main kit and used that to cover all that unsightly horror behind the flower.   I tied a giant bow and glued it to cover up all the mess.  The bow needs to be large enough to cover messes AND large enough to be taller than the anchor flower.  It needs to be seen.   I left long bow tails because they will be used to help cover messy areas.  I secured my bow with dabs of glue to the anchor flower and I glued down the bow tails to the box. They can't flutter about if they are meant to cover messes.

Step 4. Start building the cluster.  I like both sides of the cluster to resemble each other without being exactly the same. They don't need to have similar flowers but I think they need to be similar in color.  I also like one side of the cluster to be slightly longer than the other, including the ribbon piece.  I stray from symmetry. That's just me.


Finishing the Cluster
The cluster is pretty much done.  I've added all the flowers and leaves that I care to add. To fill in the bare spots, I love to add snippets of stuff.  In this case my "stuff" happens to be cheap floral berries cut apart and glued down.


Did You Miss Out On Oct's Kits?  Never Miss A Kit Again
If you missed out on Oct's kits for any reason and want to make sure you never miss out again, then plan to exercise the Pre-Order option.  This is available starting the 20th of each month.  You have 48 hours from that point to hit the "buy" button.

We provide you with previews of the kit so you can decide if it fits your style.  It also ships right out so you are the first to get your hands on that coveted kit.

Grab this sunflower decorated box on my ETSY shop.  It's a one-of-a kind so grab it quick.  
Products:
Flying Unicorn - Your Passion Your Art Kit - Oct and Mixed Passion AddOn Kit
Cigar Box
Petaloo Dahlias - Yellow 1467109
Petaloo Flower Center Daisy Centers - Ivory 4200009
Petaloo Darjeeling  - Wild Blossoms Large Craft Brown
Prima Vines 578251
7 Dots Lost and Found - "213" SDPP0129, "Elements" SDPE8029, "Labnotes" SDPP0130


Plan a day trip! Crops -Classes-Fun
926 North Monroe St   
Tallahassee, Florida
Tel: 850.270.6366 Toll Free 800.231.7119


Please share your gorgeous creations with us on our Facebook page.  You can find it HERE.  You can also "tag" the Flying Unicorns on your Facebook post and we will be happy to feature you on Facebook.   To "Tag", just type @Flying Unicorn and our name should pop up in blue.  Select our name and you're good to go!
 Thanks for stopping

Sunday, July 12, 2015

Flying Unicorns Box - July


Flying Unicorn July Kit of the Month  - Your Passion Your Art

Flying Unicorn July kit features Lemoncraft papers and embellishments.

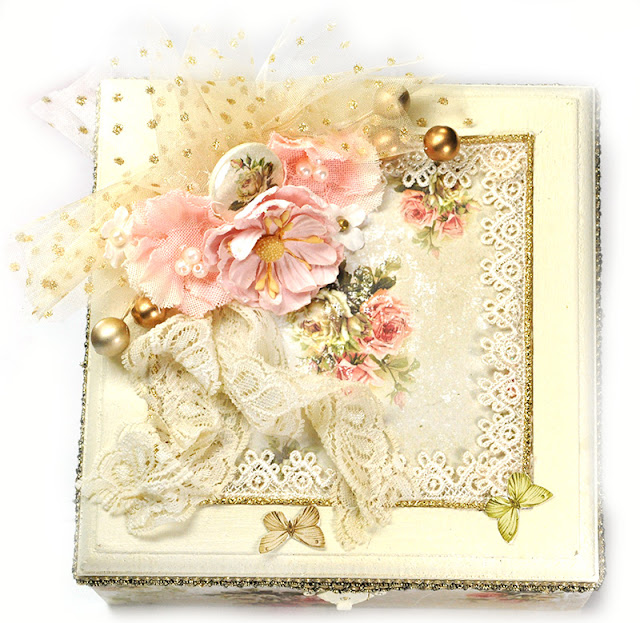
I had a wooden box lying around waiting to be decorated.  I painted the inside about outside a French Vanilla color and  thought it would match nicely with the Lemoncraft House of Roses collection.  I only needed one sheet of paper so I was happy about that as well.  The Lemoncraft paper is so delicate and gorgeously floral that I wanted the finished look of the box to be also light, delicate, and ultra feminine.


I accented this with a combination of Petaloo and Prima flowers from the July kit as well as embellishments from the kit as well.  The flair buttons from Lemoncraft are just fabulous  They tuck into a cluster easily.


If you missed the kit this month and want to protect yourself in the future from such despair, Flying Unicorns offers a pre-order option available the 20th of every month.  Sneak previews are available at that time and you decide if you want to place an order.  This option is only available for 48 hours.  At which point, the offer vanishes and you risk having to fight the sell out shoppers.

Visit my Etsy shop as well.  You never know what you may find.  I cannot save everything in my house.  You can find this and other similar items in my shop.  All items in the Etsy shop are here. 

Happy Crafting and thanks for stopping.

Supplies:
Lemoncraft House of Roses Collection -Flair Buttons
Prima Flowers - Pura Alexa 581848
Prima Lyric Flowers 565664
Lemoncraft Paper Collection - House of Roses
Bo Bunny Flowers
Lace
gold trim