Monday, November 28, 2016

Home Decor with Julie Nutting, Petaloo and Maja Design


Embroidery Hoop Home Decor
I created this seasonal holiday piece using a few of my favorite products centered around a 10inch embroidery hoop - Petaloo flowers, Prima's Julie Nutting doll stamps, and Maja Design's gorgeous new Christmas collection, "I Wish".  

I added some natural colored burlap to the back of the hoop as my canvas and planned around that framework.   The big wooden snowflake is from Michaels.  


The doll stamp I chose is one of the newest releases from Julie Nutting's collection.  This is Valentina and I used her companion die from Prima as well to cut the doll shape.  


Valentina is holding a darling little Christmas bouquet from Petaloo flowers.  She's holding Petaloo Vintage Velvet Holly Leaves  and Petaloo  Flowers - Darjeeling Mini Poinsettias


This photo shows how dimensional I made Valentina's skirt.  I like to create the clothing using layers to show movement.  
Thanks for stopping by.  I appreciate your time. 


Products Used:
Prima -Julie Nutting - Valentina Metal Die - 911584
Prima Julie Nutting - Valentina stamp 910778
Petaloo Flowers - Pine Pick w/Cones and Berries - RS1146-000/6
Petaloo Vintage Velvet Holly Leaves RS1164-001/6 
Petaloo  Flowers - Darjeeling Mini Poinsettias in Red RS1143-002/6
Maja design - "I Wish" paper collection 12x12
Wooden Embroidery Hoop 10"
JustRite - Inside and Outside Christmas Clear Stamps - CR05097
JustRite Hello Oval Decorative Frame Die DIE05064
Burlap
Wire
Wooden Snowflake 8 inches

Tuesday, November 22, 2016

Lemoncraft - Christmas Pages with Non-TraditionalPaper

Start to the Christmas Season -  Day Two
Hello. I set out this season to create Christmas with some everyday collections to show how easy it is to turn something nontraditional into Christmas delight.  A little imagination and it's actually pretty easy since the focal point is usually imagery and not necessarily color choice. 

 This  layout uses the delicate and graceful Lemoncraft collection called 'Everyday Spring' along with a sheet from 'Neverending Summer'.    I showcased a Christmas layout recently using Lemoncraft's  gorgeous reprinted 'Heart Painted' collection.  You can see that piece on my blog here and you will find the original post on Lemoncraft's blog right here


This Christmas layout combines two collections -  the top layer that looks like wood is from 'Neverending Summer' and it goes so perfectly with the other papers from 'Everyday Spring' collection.   I kept the layout fun and cheery with layers embellished with chipboard pieces and paper punches.  
I have to give a giant shoutout to the embellishments I used becuase they perfoirmed the monumental task of creating the imagery to tramsport you to a snowy frosty Chrismtas morning.  

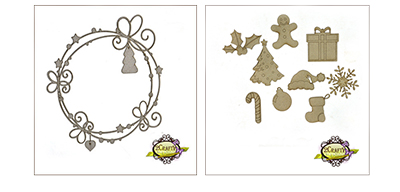
The first honor rollcall goes to the chipboard pieces from 2Crafty.  The circle page frame is : 2Crafty Chipboard - Whispy Christmas Page Frame 120080
and the darling holiday shapes are 


The holiday shapes were painted with acrylic paints and then gussied up with wires, crystal gems  and the tree has some Stickles glitter glue for extra shimmer.  The gingerbread cookie has gems for buttons and eyes.   The candycane has some striped bakers twine wrapped around it.  

The next important roll call goes to the Petaloo flowers I selected.  While very simple, they really make a giant soft statement.   These are Petaloo's - Mulberry - New Camelia In the Pink. I stuck in some white generic floral berries and twig pine punches to fill out the cluster.  

This is available in my ETSY shop while it lasts.  I can customize and add your photo to this if you prefer.  Click here to see it.  


Keep watching for the newest release to be available soon.  You will need to add it to your Christmas wish list along with Lemoncraft's other gorgeous collections.  

I hope you are also having fun with all the beautiful LemonCraft collections.  
Thank you for stopping by! 

Jennifer Snyder


Lemoncraft -Everyday Spring 12x12 Basics collection
Lemoncraft Neverending Summer 12x12 sheet
Petaloo Flowers - Mulberry - New Camelia In the Pink - 155-320
2Crafty Xmas Assortment Chipboard CAR035
2Crafty Chipboard - Whispy Christmas Page Frame 120080
Acrylic paint - white, green, brown
Prima Die -Crochet Doily 584054
White Pearl dots
Floral Berries
Pink and Green JewelryWire
Stickles Glitter Glue - Icicle

Friday, November 18, 2016

Lemoncraft -Christmas Season with Heart Painted Collection

Start to the Christmas Season
Hello. I'm here to share some Christmas joy using Lemoncraft's re-released Heart Painted collection.   These are not Christmas papers, but I would like to show how to transform these to work nicely for Christmas. You can see the original post on the Lemoncraft blog right here

The gorgeous reprinted 'Heart Painted' collection has such soft pinks and greens - untraditional Christmas colors and yet I love pink and green for Christmas. 
  
I accented the page with some chipboard from 2Crafty -  2 Crafty Chipboard - Card Word Circles - Christmas  that have been painted white and backed  with the Lemoncraft paper to make them pop. 
They have been embellished with die cut greens from Tim Holtz and rolled flower buds.  

I want to point out the rose button on the "No Peeking" Lemoncraft's Heart Painted collection as well.  
The tree below is also from 2 Crafty Chipboard - Whimsical Christmas Tree and has been treated just as the Word Circle chipboard pieces...painted white and backed with Lemoncraft paper.   The tree was topped with blush pink pearls.  

The beautiful pink and green flowers are from Petaloo.  What a perfect match!
 2 Crafty Chipboard - Whimsical Christmas Tree
 2 Crafty Chipboard - Card Word Circles - Christmas

This is available in my ETSY shop - while it lasts.  Click here to see it.  


Keep watching for the newest release to be available soon.  You will need to add it to your Christmas wish list along with Lemoncraft's other gorgeous collections.  

Thursday, November 17, 2016

Petaloo Blog Hop - Christmas Home Decor with Graphic 45 and Xyron


Petaloo blog hop with special guests, Graphic 45 and Xyron

 I'm Jennifer Snyder - welcome to my blog.  This is a special blog hop with Graphic 45, Xyron and Petaloo and spans several days so make sure you catch all the art on display.  A great place to start is at the Petaloo blog, found here.  

 As you scroll through this post, I'm sure you'll be able to see the fun and creative joy I had with all these wonderful manufacturers.  

I made a matching wooden box/card gift set.  My inspiration for the set was taken from the Graphic 45, St Nicholas collection - the traditional Christmas colors and imagery but with a marvelous twist. I found the bits of black in the paper and matching embellishments so alluring.  I had a black wooden cigar box in my stash and it finally needed to be used.  A divine pairing I must say!

 Here's a look at the Graphic 45 "St Nicholas" collection so you can get a feel for those traditional colors and imagery...just with Graphic 45's world famous twist.  

This is a close look at the box.  The front is adorned with Petaloo  Flowers - Darjeeling Mini Poinsettias in Red   nestled in the Petaloo Vintage Velvet Holly Leaves - surrounding Graphic45 - St Nicholas collection's chipboard.  


Below is the top view of the box - my "helicopter view" as I like to call it.  My gold accent choices really make that red and black of the paper and Petaloo flowers pop.  

Once again a Graphic 45 chipboard piece is used as a wreath adorned with Petaloo florals -Petaloo Flowers - Regal Velvet Poinsettia in Red  and Petaloo's Pine Pick w/Cones and Berries .

This is the card that I created to go with the gift box.  I used similar elements from the box to create cohesiveness - like the Graphic45 - St Nicholas chipboard, Petaloo Holly Leaves and the Poinsettia.   I used the berries from the Petaloo Pinecone Pick.  

I used the Xyron Tape Runner to help assemble the layers of the card.  the tape runner glides along the paper with super ease.  
Now for the inside of the gussied-up cigar box.  I grabbed Xyron's 3" Disposable Sticker Maker to adhere the Graphic 45 Die Cuts.  This was a fun process as well.


And one last look at the gift set from the inside.  

Thanks for being a part of this blog hop between Petaloo 
Graphic 45 and Xyron.   


Petaloo Products
Petaloo  Flowers - Darjeeling Mini Poinsettias in Red RS1143-002/6
Petaloo Flowers - Regal Velvet Poinsettia - Red - RS5009-002/4
Petaloo Flowers - Pine Pick w/Cones and Berries - RS1146-000/6
Petaloo Vintage Velvet Holly Leaves RS1164-001/6 

Graphic 45 "St Nicholas" collection
Graphic45 - St Nicholas collection - Die Cuts #2 - 4501413
Graphic45 - St Nicholas collection - Chipboard 4501416
Xyron Adhesive Products: 
Xyron 3" Disposable Sticker Maker
Xyron Tape Runner

Graphic45 - St Nicholas collection - 12x12 Pad 4501412
Graphic45 - St Nicholas collection -- St Nicholas sheet paper 4501397
Graphic45 - St Nicholas collection - - Be Jolly sheet paper 4501401
Graphic45 - St Nicholas collection - - Starry Night sheet paper  4501403
Graphic45 - St Nicholas collection - - Seasons Greetings  sheet paper 4501407
Graphic45 - St Nicholas collection - - Holly Daze sheet paper 4501408

Other:
Rub-N-Buff Gold Leaf
Prima Mechanicals Metal Stars 961169
Prima Paper Doilies - Gold  -585006
Gold Ribbon

Monday, November 14, 2016

Christmas Card with Julie Nutting, Petaloo and JustRite

Merry Christmas with Julie Nutting, JustRite  and Petaloo
Time to rev up some holiday cheer and get that wish list started.  I have a few items that you'll definitely want to add to the list.  Maybe get the shopping done early and pop in a few items to use early (gotta be honest - I'm guilty of popping a few things into the cart for me to use before Christmas.  I just can't help myself).  

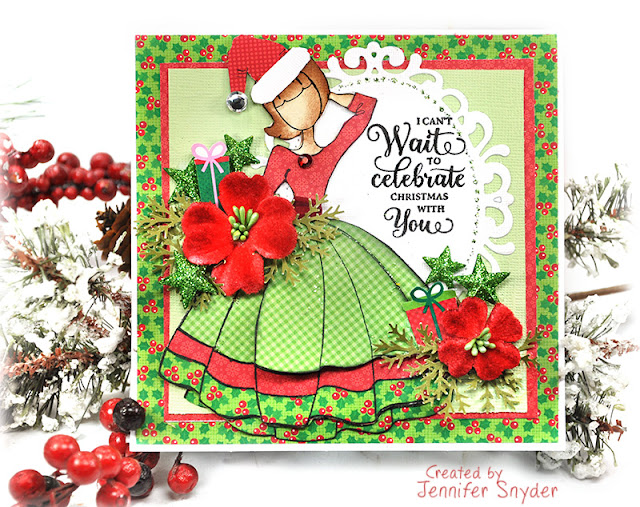
  For this card,  I pulled out the Prima/Julie Nutting Audrey Doll die and stamp, my JustRite stamps and die,  and Petaloo's gorgeous floral adornments.   

The bright, festive paper choice is Doodle Bug Design  - Here Comes Santa Claus Collection.  Isn't it fun and cheery? 
First, let me tell you a little about the doll stamp I used.  This is from Prima and Julie Nuttings summer 2016 release  -Audrey die and matching Audrey stamp.  The die makes the whole process a breeze.  No more fussy cutting so you have perfection with each cut of the die.  
Tip:  In my opinion, it helps to stamp first, then use the die.   

The Petaloo Botanica Vintage Velvet Dogwood's are a perfect match for the papers.  It's really hard to match red and I am quite satisfied.   Tucked into the floral cluster  are Petaloo's Botanica Glittered Star Pick and some pine branch punches. 
In this photo, you can see the beautiful cursive greeting stamp.  This is from 

I love to add layers to my doll stamps to give the skirts the appearance of movement.  The Echo Park paper collection provided a perfect selection of small bold patterns that enhance the layers in the skirt. 

Thanks for stopping.  I hope your holiday season is filled with cheer.  
Products:
Prima Julie Nutting Doll Metal Die - Audrey - Metal Die -911607
Prima Julie Nutting Doll Stamp - Audrey - 911119
Petaloo Flowers - Botanica Glittered Star Pick - RS5012-502/4
Petaloo Botanica Vintage Velvet Dogwood in Red - 1145005
JustRite Papercrafts - Hello Decorative Oval Frame Die 
JustRite Papercrafts - Inside and Outside Christmas Sentiments Clear Stamp
Black Onyx ink
Stickles Glitter Glue - Seafoam
Doodle Bug Design - 6x6 paper  - Here Comes Santa Claus Collection 5408

Thursday, November 10, 2016

DIY Soft -Sculpted Canvas with Matching Card - with Petaloo, FloraCraft and Authentique

Soft Sculpture Canvas with Petaloo and FloraCraft
Hello.  I'm here today to share more autumn goodness using the beautiful colors of the season.  Today, I am sharing a canvas/sculpture and matching card crafted using Petaloo flowersFloraCraft Foam Balls  and other assorted products from FloraCraft in conjunction with Authentique's Harvest paper collection.   

My inspiration for both projects started with the Authentique Harvest paper with it's warm orange, browns and festive theme.  The card came first.  I picked an adorable 3"x4" image from the journal card sheet called "Harvest One"


The adorable pilgrim boy is pushing a cart full of pumpkins, squash and produce from the field.  I selected the Petaloo flowers to accentuate the colors of his abundant harvest.      

Here are the close ups of the gorgeous Petaloo floral cluster.  
The green center flower, Petaloo Botanica Mini-Pistachio , makes me smile because I think it looks like cauliflower in the cluster.  How perfect!

My makeshift cauliflower is surrounded by Petaloo Sugar  Mini Mocha flowers and dotted with some older Petaloo berry sprays from my stash in burgundy.   The finishing touches include a rich burgundy ribbon and some paper punched pine sprigs.  


After I created the card, I did some thinking and imagined how fun it would be to make those wonderful fruits come to life so I set out to make it happen.  That's how the canvas came about.   If you keep scrolling down, I provide a mini-tutorial as to how I created the assorted produce.  

 The canvas started with FloraCraft's  foam balls.  This package was great because there were various sized balls to help make my vision possible.  The pumpkin was created with the 4inch foam ball while the apple and pear were created using the 2.5inch foam balls.  


Step 1.  Cut foam ball in half so that it can fit nicely in a reverse canvas setting.  
Step 2. Cut a piece of muslin cotton to wrap and cover the foam.  I added color to the muslin by using a combination of mediums to color the fabric - some mists and inks.  A pumpkin has a variety of colors - yellow, brown, green, orange - so I used a variety of colors.   

Notice in the photo below that the fabric is not totally colored. I left a bit of white space in the fabric to provide a bright highlight on the finished piece.  Do not worry that the colors are not blended nice and softly at this point.    

Step 3. I saturated the muslin cotton with a sculpture medium, then draped the fabric over the foam ball, smoothing till I was happy.  

There are many mediums that will work well including the old fashioned and inexpensive white school glue thinned with water. 

Tip: Once you add a sculpting medium to the fabric, the colors will all blend together and make your project look more unified and nicer.  Trust me!
 
Step 4.  This is what the back of my pumpkin looks like.  A mess!  But no need to stress over this because no one will see it.  I did make sure to twist some fabric into a stem.  

Step 5. The glorious thing about foam is that it can be shaped and sculpted.  I chose to sculpt and shape after the fabric was added and had dried.  I just thought the pumpkin ridges would be more apparent if added after the foam was covered.  

I used a wooden skewer to make the ridges by rolling the skewer over the foam and rocking it back and forth till the ridge was satisfactory.    It worked quite nicely.  I also was able to add more color after the fabric was on the foam.  

Step 6. I added thin jute to the pumpkin and tied it in the back.  I believe this helped accentuate the ridges.  
Step 7.  I have a few finishing touches. I wrapped the stem with brown floral tape and I added some tendrils to the pumpkin's stem created using FloraCraft Green Stem Wire.  I twisted the stem wire around a wood skewer - which is a great tool for making tendrils.   
 Additional tips for making the pear and the apple:  I made the pear and apple the same way - using muslin covered FloraCraft foam balls.  Once covered, I sculpted the shape of the pear and apple by rolling the covered foam on the edge of a table to help mold the foam till I was satisfied.    The stems of the apple and the pear were created using the end of the wood skewer.  


Step 8.  Moving on to the canvas...
This is an 8x8 canvas.  I turned it around and used the back as a sort of shadow box. 
I cut a piece of Authentique Harvest paper  and inserted it into the background of the canvas.  I added ink to the frame of the canvas to blend the project and provide a finished, cohesive look.  

I stapled  FloraCraft Burlap Garland to the wood frame of the canvas so that the sculpted fruits could rest nicely in the burlap.  

And here are a few more close ups of the finished canvas to show the gorgeous Petaloo floral accents.  This photo shows  the beautiful reds and greens of the Petaloo Briar Rose Canvas Holiday Mix  flowers (RS5008-502/4).  

This shows the beautiful image from the Authentique Harvest paper  topped with a bow and Petaloo's Botanica Mini-Pistachio flowers.
This photo shows how sweet the Petaloo Botanica Mini-Gold/Sienna flower looks here to resemble the cauliflower.  


I wish your family a wonderful and warm Thanksgiving.  Thanks for spending time here.  


Canvas Sculpture - Petaloo Supplies:
Petaloo
Petaloo Flowers - Botanica Mini-Pistachio 1101-108
Petaloo Briar Rose Canvas Holiday Mix RS5008-502/4
Petaloo Flowers - Botanica Mini-Gold/Sienna RS1131-0124/6
Petaloo  Flowers - Berry Spray Burgundy 1829-322
Petaloo - (leaves from )Sugared Blooms Royal Blue 1130-122

Other Supplies including FloraCraft :
Authentique Harvest Collection 
FloraCraft Burlap Garland
FloraCraft  Stem Wire - Green
FloraCraft Foam Balls - bag of various sized balls
Authentique Harvest Collection 
Green Floral Tape
Pinecones
Cinnamon Sticks
Wood Skewers
Muslin Cotton Fabric
Various mists/ inks
Prima Sculpture Mixture

Card -Petaloo Supplies:
Petaloo Flowers - Botanica Mini-Pistachio 1101108
Petaloo Flowers -Sugar  Mini Mocha -RS1131-123/6
Petaloo  Flowers - Berry Spray Burgundy 1829-322

Other Supplies:
Authentique Harvest Collection 
Green Cardstock
Ribbon (Misc)
Martha Stewart Punch - Branch
Spellbinders -Card Creator Dies -Valiant Honor A2