Showing posts with label Jennifer Snyder. Show all posts

Wednesday, July 12, 2017

DIY Denim Pocket Card with Easy Instructions


Coolest DIY Denim Ever Created with Spellbinders and Maja Design

Denim is in.  It's trendy, it's chic and now it's available in the form of beautiful papers by Maja Design.  It also looks darn adorable with die cuts from Spellbinders.  

I created an adorable pocket card to fit a tag or gift card with my two featured products from Spellbinders and Maja Design. 

If you scroll down the page, I have DIY instructions to show you how I crafted the pocket. 

I created my card with new scrumptious papers from Maja Design called, Denim & Friends and the coordinating set of solids called Maja Design - Monochrome Collection  Shades of Denim & Friends  .  This collection has something for everyone; masculine, feminine, playful, fun.  PLUS their new solid monochrome collection designed to accompany the Denim & Friends collection perfectly.

The monochrome papers do not have patterns but they have added richness in the design making them unlike solid cardstock.  

Introducing

These are the papers I used from the collection: 
(Stonewashed, Summershirt, Jeans & Tie, Paisley)
My DIY card is a sweet play on the denim theme - a pocket card with a frilly twist because jeans look great with lace.  Perfect for a gift card or tag.  Plus some DIY tips to show you how I made my easy pocket card. 

The pocket was made using this die from Spellbinders: (little side note:  I adore this die set and tend to grab this for many of my cards because of the classically clean lines and versatile shapes)

I  opted for crafting a coordinating tag for the card because I am obsessed with the "medallion" die that comes with the set. 

Here is a close up of the card with the tag tucked into the pocket.  


DIY Steps to Make a Pocket Card

Step 1.   Using the Spellbinders Card Creator Dies -A2 Divine Eloquence , cut the border frame.  Next add doodled stitches using a black fine tip pen. 


Step 2.  I used a die from Spellbinders (Spellbinders Card Creator Dies A2 Divine Eloquence)  and cut about 1/3 of the way down the die to create the base of my pocket.  
Step 3. After cutting the die to size, I backed the die cut with a piece of a piece of white cardstock for extra support and trimmed the white cardstock, leaving a small white edge around the die shape. 

The cardstock also helped accentuate the beautiful details of the delicate die and make them pop a bit more on the pocket.  I made sure the white cardstock was a bit longer at the top as well so I could add some embellishments as shown below in Step 4.

Step 4.  After backing with white cardstock in Step 3, I decorated the pocket by adding more doodled stitching, some lace trim and coordinating patterned paper from the new  Denim & Friends 12x12 collection.  

Step 5.   Making the Tag - I made a quick double sided tag using Spellbinders Card Creator Dies A2 Divine Eloquence .  
a.   Cut 2 dies.  
b.  Back both the die cuts with white cardstock.
c.  Glue some thin ribbon to the white side of one die (to use as a pull tab)
d.  Glue the dies together
e. Trim the cardstock to fit ( I left a thin white edge). 

Note:  I did add a piece of thin ribbon between the two dies before gluing the two died together.  By adding the ribbon before gluing, it helps make the tag look clean and polished.  

Step 6.   I wanted to pop the pocket off the page a bit with some foam tape so make the tag or a gift card tuck easily into the pocket.
  
In order to make sure my tag fit into the pocket, I flipped the pocket over and used the tag/die as a template to determine where I needed to place the foam so that the tag doesn't fall deep into the pocket.


Here is a photo of the finished piece.


Thanks for your time today.  I value your visit.  If you would like to be a Spellblogger, check out the details here: 

Shopping Details
The new Maja Design paper collection is shipping NOW! You can buy the papers from your favorite stores located in the Store Finder link here.  

You can shop for all the gorgeous "must have" Spellbinders dies right here.  Shop for Spellbinders 


Products Used:
Maja Design called, Denim & Friends (Stonewashed, Summershirt, Jeans & Tie, Paisley)
White cardstock
Gingham ribbon
thin black pen
lace 
blue gems

Friday, June 30, 2017

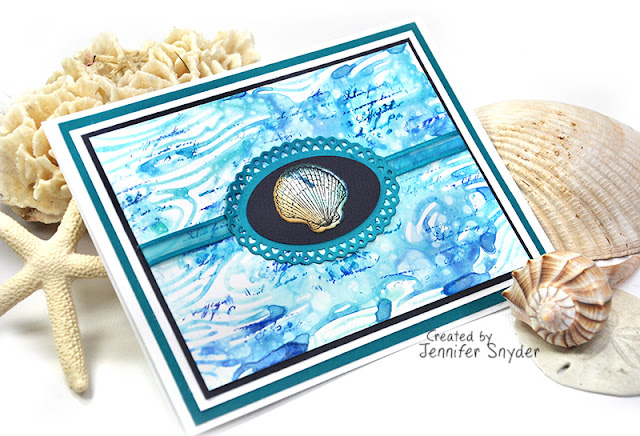
DIY - Using A Woodgrain Stamp to Create an Ocean Setting

Transforming A Woodgrain Stamp into an  Under-The-Sea Ocean Background

My cards feature some fabulous products from JustRite.  
Scroll on down the page and I'll show you what I did.  Plus I have a 3min video to explain the simple DIY process.  I love short videos.  They rock. 

It's great when you can find multiple uses for products to help stretch the crafting budget and get some added flexibility from your crafty products. It feels GREAT!

That's what I've done with JustRite Papercraft's new Woodgrain background stamp.   I've used this woodgrain stamp to create an ocean setting for my card. 


 The Woodgrain background stamp is magnificent because it's large and fits the entire size of an A-2 card ( 4.225" x 5.5").  It's great for all sorts of crafty projects and perfect for mixed media due to the generous sizing.  BUT I want my stamps to have multiple uses.  

Now it does!  hahahaha.  It doubles as land and sea ( wood and ocean).  
I have multiple samples of my results.   I had so much fun creating these that I could not help myself. 


In addition to the JustRite Woodgrain Background Stamp, I also used the following stamps and dies from JustRite on my cards ( all shown below):


How Did I Do this?

First , I'd like to point out that I used "Specialty Stamping Paper for Inks ".  This is paper with a slippery coating on it meant to make the Distress inks easy to blend.  
Since the paper is coated, it also helps create the watery look by not absorbing the mist and water quickly.  

I used two different mediums to create the cards. The first was made using various blue mists sprayed on the stamp for the ocean.  
The second was crafted by stamping various Distress inks directly onto the stamp for the same effect.   

 You can also use acrylic paints thinned out with a bit of water as well. 

The first few cards shown below are made with mist.  

Here is the Short Video


Whatever mediums you chose to use, multiple colors will work best and provide the most effective ocean background.  

These are the Mists I used.  I guess I might suggest adding the darkest color last and sparingly at that.  You can add more dark but it's much more difficult to lighten something up.    


Any mist will work.  These are also perfect for the project: 

My beautiful center medallion embellishments were made using the some stamps and dies from JustRite Papercrafts


Method Two Using Tim Holtz Distress Inks

I know Tim Holtz Distress Inks are wildly popular.  They are perfect for these kinds of projects.  They react so nicely with water.  I thought I would provide a sample using Distress Ink as well.  

Once again I used the Specialty Stamping Paper for Inks  here as well.  

Tim Holtz Distress Inks to Use: 

The Shell Images

I adore the shell images.  These are JustRite - At the Beach Clear Stamp Set  .

If you watched my quick video, you may notice that I stamped with the assistance of the Misti Stamping Tool - (Most Incredible Stamping Tool) .

Do I love my MISTI?  You bet I do.  I am not a good stamper so the MISTI helps me add more ink perfectly when I need it.  In fact during the video, I needed to go back in with more ink to complete the  stamped image with multiple colored inks as I wanted.   That's where my MISTI helps create perfection. 


Thanks for stopping here.  I value your time. 


Supplies
JustRite products
JustRite Woodgrain Background Cling Stamp - CL-05110 (4 1/4" to 5.5" A2 sized)
JustRite Sea shells at the Beach Dies - DIE 05058
JustRite - At the Beach Clear Stamp Set -CR-05057
JustRite Joy Oval Frame Dies set Die- 05049

Color Bloom Mists to use:
Prima Color Bloom Mist - Cobalt 573898
Prima Color Bloom Mist  2 - Dragon Fly 588830
Prima Color Bloom Mist - Summer Sky 573867
Prima Color Bloom Mist Deep Teal - 580322
Prima Color Bloom 2 Mist - Fairy Pond


Tim Holtz Distress Mists to Use: 
Tim Holtz Distress spray Stain - Blueprint Sketch
Tim Holtz Distress Spray Stain Mini- Mermaid Lagoon
Tim holtz Distress Spray Mini -  Broken China
Tim Holtz Distress Spray - Salty Ocean

Tim Holtz Distress Inks to Use: 
Ranger Tim Holtz Distress Inks MINI - Broken China


Ink for Stamping the Shell Images
Tsukineko Versafine Ink - Small Ink Pad - Majestic Blue
Tsukineko Versafine Ink - Small Ink Pad - Deep Lagoon
Tsunkineko Versafine Small Stamp Pad - Onyx Black
Specialty Stamping Paper for Inks 
Heat It- Heat Gun Embossing Tool
Misti Stamping Tool - (Most Incredible Stamping Tool)

Thursday, November 10, 2016

DIY Soft -Sculpted Canvas with Matching Card - with Petaloo, FloraCraft and Authentique

Soft Sculpture Canvas with Petaloo and FloraCraft
Hello.  I'm here today to share more autumn goodness using the beautiful colors of the season.  Today, I am sharing a canvas/sculpture and matching card crafted using Petaloo flowersFloraCraft Foam Balls  and other assorted products from FloraCraft in conjunction with Authentique's Harvest paper collection.   

My inspiration for both projects started with the Authentique Harvest paper with it's warm orange, browns and festive theme.  The card came first.  I picked an adorable 3"x4" image from the journal card sheet called "Harvest One"


The adorable pilgrim boy is pushing a cart full of pumpkins, squash and produce from the field.  I selected the Petaloo flowers to accentuate the colors of his abundant harvest.      

Here are the close ups of the gorgeous Petaloo floral cluster.  
The green center flower, Petaloo Botanica Mini-Pistachio , makes me smile because I think it looks like cauliflower in the cluster.  How perfect!

My makeshift cauliflower is surrounded by Petaloo Sugar  Mini Mocha flowers and dotted with some older Petaloo berry sprays from my stash in burgundy.   The finishing touches include a rich burgundy ribbon and some paper punched pine sprigs.  


After I created the card, I did some thinking and imagined how fun it would be to make those wonderful fruits come to life so I set out to make it happen.  That's how the canvas came about.   If you keep scrolling down, I provide a mini-tutorial as to how I created the assorted produce.  

 The canvas started with FloraCraft's  foam balls.  This package was great because there were various sized balls to help make my vision possible.  The pumpkin was created with the 4inch foam ball while the apple and pear were created using the 2.5inch foam balls.  


Step 1.  Cut foam ball in half so that it can fit nicely in a reverse canvas setting.  
Step 2. Cut a piece of muslin cotton to wrap and cover the foam.  I added color to the muslin by using a combination of mediums to color the fabric - some mists and inks.  A pumpkin has a variety of colors - yellow, brown, green, orange - so I used a variety of colors.   

Notice in the photo below that the fabric is not totally colored. I left a bit of white space in the fabric to provide a bright highlight on the finished piece.  Do not worry that the colors are not blended nice and softly at this point.    

Step 3. I saturated the muslin cotton with a sculpture medium, then draped the fabric over the foam ball, smoothing till I was happy.  

There are many mediums that will work well including the old fashioned and inexpensive white school glue thinned with water. 

Tip: Once you add a sculpting medium to the fabric, the colors will all blend together and make your project look more unified and nicer.  Trust me!
 
Step 4.  This is what the back of my pumpkin looks like.  A mess!  But no need to stress over this because no one will see it.  I did make sure to twist some fabric into a stem.  

Step 5. The glorious thing about foam is that it can be shaped and sculpted.  I chose to sculpt and shape after the fabric was added and had dried.  I just thought the pumpkin ridges would be more apparent if added after the foam was covered.  

I used a wooden skewer to make the ridges by rolling the skewer over the foam and rocking it back and forth till the ridge was satisfactory.    It worked quite nicely.  I also was able to add more color after the fabric was on the foam.  

Step 6. I added thin jute to the pumpkin and tied it in the back.  I believe this helped accentuate the ridges.  
Step 7.  I have a few finishing touches. I wrapped the stem with brown floral tape and I added some tendrils to the pumpkin's stem created using FloraCraft Green Stem Wire.  I twisted the stem wire around a wood skewer - which is a great tool for making tendrils.   
 Additional tips for making the pear and the apple:  I made the pear and apple the same way - using muslin covered FloraCraft foam balls.  Once covered, I sculpted the shape of the pear and apple by rolling the covered foam on the edge of a table to help mold the foam till I was satisfied.    The stems of the apple and the pear were created using the end of the wood skewer.  


Step 8.  Moving on to the canvas...
This is an 8x8 canvas.  I turned it around and used the back as a sort of shadow box. 
I cut a piece of Authentique Harvest paper  and inserted it into the background of the canvas.  I added ink to the frame of the canvas to blend the project and provide a finished, cohesive look.  

I stapled  FloraCraft Burlap Garland to the wood frame of the canvas so that the sculpted fruits could rest nicely in the burlap.  

And here are a few more close ups of the finished canvas to show the gorgeous Petaloo floral accents.  This photo shows  the beautiful reds and greens of the Petaloo Briar Rose Canvas Holiday Mix  flowers (RS5008-502/4).  

This shows the beautiful image from the Authentique Harvest paper  topped with a bow and Petaloo's Botanica Mini-Pistachio flowers.
This photo shows how sweet the Petaloo Botanica Mini-Gold/Sienna flower looks here to resemble the cauliflower.  


I wish your family a wonderful and warm Thanksgiving.  Thanks for spending time here.  


Canvas Sculpture - Petaloo Supplies:
Petaloo
Petaloo Flowers - Botanica Mini-Pistachio 1101-108
Petaloo Briar Rose Canvas Holiday Mix RS5008-502/4
Petaloo Flowers - Botanica Mini-Gold/Sienna RS1131-0124/6
Petaloo  Flowers - Berry Spray Burgundy 1829-322
Petaloo - (leaves from )Sugared Blooms Royal Blue 1130-122

Other Supplies including FloraCraft :
Authentique Harvest Collection 
FloraCraft Burlap Garland
FloraCraft  Stem Wire - Green
FloraCraft Foam Balls - bag of various sized balls
Authentique Harvest Collection 
Green Floral Tape
Pinecones
Cinnamon Sticks
Wood Skewers
Muslin Cotton Fabric
Various mists/ inks
Prima Sculpture Mixture

Card -Petaloo Supplies:
Petaloo Flowers - Botanica Mini-Pistachio 1101108
Petaloo Flowers -Sugar  Mini Mocha -RS1131-123/6
Petaloo  Flowers - Berry Spray Burgundy 1829-322

Other Supplies:
Authentique Harvest Collection 
Green Cardstock
Ribbon (Misc)
Martha Stewart Punch - Branch
Spellbinders -Card Creator Dies -Valiant Honor A2