Showing posts with label step-by-step. Show all posts

Friday, April 29, 2016

Shaker Card DIY Tutorial - Prima Julie Nutting Doll Stamps

Shaker Card Simple DIY Instructions
I created a few quick and easy shaker cards for Make-N-Takes and group projects featuring the Prima doll stamps created by Julie Nutting.  As a result, a few folks asked me to compile some easy DIY instructions so they could use the technique for group projects as well.  

I made two cards - a boy and a girl card.  They have different sentiments and the boy has a mat background - but otherwise the techniques are the same.  

If you scroll down, I share my DIY instructions as well as some pit falls and "fails" that I have overcome after some dismal shaker card attempts.   I offer tips for shaker success.  

This little darling is Keira all gussied in purple and pink.     

Here is the sweet boy, Toby.  


These are my instructions: 

 My card is about 6.25" x 5" big.  I do buy pre-folded card/envelope sets  because I love the convenience.  I also love having envelopes that fit.  I hate trying to hunt down envelopes for irregular sized cards.  

Step 1.   I knew I wanted to use watercolor pencils for my card so I used watercolor paper for the window and doll stamp.  I cut a piece of watercolor paper to fit my needs.  I do think watercolor paper works best when using watercolors.  The paper doesn't rip and tear when it gets wet as patterned paper or cardstock may do. 

My shaker card "fail" and my tip for success: 
I punched first then I stamped the doll image.  The punch was first because then I could determine exactly where to add the stamp.  I tried stamping first and the poor sweetheart lost an arm.   

Step 2.   Every shaker card needs a "sandwich layer".   I found that Fun Foam makes for great sandwich material.  It's super easy to cut, light weight, has a consistent flat surface and is very inexpensive.   

My shaker card "fail" and my tip for success: 
So why didn't I use cardboard?  Well I tried a shaker card using cardboard.  Ya know those cool little tunnels in the corrugation of the cardboard?  Well, they become less cool when the beads and shaking material fall out of the tunnels of the cardboard onto your floor.  An empty shaker card looks ridiculous. 

So why didn't I use foam tape? Many reasons actually.  

  • Foam tape is much more expensive than a sheet of Fun Foam.  
  • With my window being more circular, it's so much harder to create a good seal with foam tape so that shaker material doesn't fall out.  
  • I need to use a lot of foam tape to cover the surface of the card and provide support.  If I do not have a flat surface for the top layer, I may get dips and ripples in my top layer.  Man I hate dips and ripples in my cards.  Hate that!  Plus I am too cheap to waste all that foam tape.  


Step 3.  I used the punched window as a template for tracing onto the foam.

My shaker card "fail" and my tip for success: 
Do not add the window to the card until you create your foam template and know where to cut the foam.  Yeah - I've messed up a few times and glued my window to the card before tracing.  Let's just say I am not good at guessing where to cut the perfect hole.  haaaaa!  Good thing Fun Foam is cheap.  

Another tip....if you are making a bunch of these, it's usually best to custom cut the foam for each card.  Unless your punching is spot on perfect for every card, you are going to run into foam problems.  Once again...I appreciate the fact that Fun Foam is cheap after 5 cards for Make -N-Takes didn't fit properly.  


Step 4. Cut the foam bigger than the traced lines.  Now is not the time to bother with perfection.  No one will see the foam underneath.  
Step 5.  Glue the foam to the base layer of the card.  Make sure you have added a sufficient amount of glue around the circle of the foam.  You need to create a good seal so you do not lose your shaker material.  

I like using a strong durable glue that works well with many surfaces. I am using Beacons 3-in-1 glue.    This also dries crystal clear.  It really is remarkable. 

My shaker card "fail" and my tip for success:   Do not try outsmarting the Fun Foam by pulling out your glue gun and using it to adhere the foam to the card.  The foam will have the last laugh and you'll be thankful Fun Foam is cheap.  haaaaaa.  

The foam does melt and warp when using the heat gun or hot glue gun.  I've done it.  And yes.....I was thankful  Fun Foam was cheap.  


Step 6.  Now you can add anything you want inside the window.  I added glass beads.  You can add sequins, trinkets, crystals, and anything that moves freely.  

My shaker card "fail" and my tip for success: 
Is glitter ok to use?  You can certainly add glitter but it does have a tendency to stick to the acrylic window from static.  When I used glitter for the first time, all I saw was the glitter.  It stuck to the acrylic like a glitter blizzard.  I just could not get it to shake off.  

You can wipe the acrylic with an Embossing Buddy (a little pillow filled with a cornflour like substance to remove static from cardstock).  You can also wash the acrylic with soap and water which will help.  

I'm too lazy to do either of those so I pick shaker material that I know will shake.  


Step 7. Now's the time to find some acrylic for the window.  I love to save acrylic from packaging.  Sometimes embellishments come with an acrylic package.  I save everything with acrylic; produce comes in acrylic ( lettuce, strawberries, tomatoes...whatever), baked good come in acrylic (YUM), below was a CD set that came in wonderful fabulous reusable acrylic.   I save it all!

Step 8.  Once again, I pulled out my strong glue because I know it will hold my acrylic in place.   Add glue all the way around the window to create your seal.   


Step 9 Attach your window to the card.  Add glue around the window to create a secure seal. 

Warning Warning Warning...add your shaker material before you close up the window.  While that should be absolutely obvious, this remains the single hardest step for me to remember.   I cannot tell you how many times I have closed up an empty shaker card.  sheesh.  I tend to get so excited that I am just about finished that I plumb forget to add the beads.  I'm just telling it like it is. 

Step 10  Decorate your card as you wish.  
Step 11 I used Prima's watercolor pencils and waterbrush to add pops of color to my doll stamp.  I also added Prima flowers and a pretty gingham ribbon.  

And here are a few more photos of the  successful shaker cards.  


Thanks for stopping.  I treasure your support and comments.


Products
910808 Prima Julie Nutting Doll Stamp - Keira
910969 Prima Julie Nutting Doll Stamp - Toby
846961  Prima Epiphany 6x6 paper pad
585891  Prima Watrerbrush Pen set
576714 Prima Mixed Media Watercolor Pencils - The Basics
712396 Prima Wildflowers Pillar Pack Botanical Flower Mix
571726 Prima Lucido Spring Flower Mix
Fun Foam
Beacons 3in1 glue
Pre-folded Cards
Gingham trim
Glass Beads
stamps
Ink

Sunday, March 27, 2016

DIY Cards Featuring Prima Tales of You & Me by Frank Garcia


Tales of You & Me - by Prima and Frank Garcia

Prima's newest collection by Prima and Frank Garcia, Tales of You & Me ,  is one of those collections that is a "must have"  - with soft warm colors.  These papers are great for layouts but I am also having fun making cards using 990992 Prima Tales of You & Me - 4x6 Journal Cards and the 3x4 cards a well.    I love how the papers look with kraft backgrounds.  The kraft gives the paper an added vintage boost. 


 I accented this card with gorgeous gold trim... Prima Memory Hardware -by Frank Garcia - Rocquencourt Doily Lace.

This is my second card

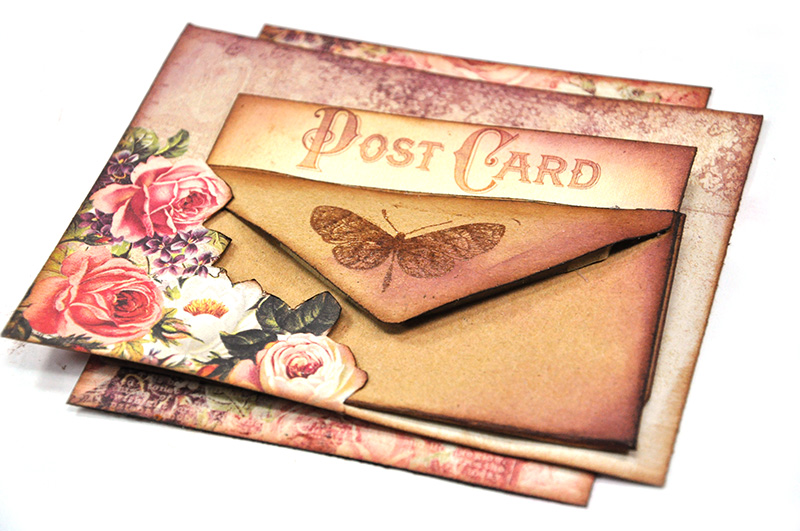
This card was made using layers upon layers.  I created a small envelope that I will share with you at the bottom of this post.  I also will show you how I made this card.  

Here's how I made this card:

Step 1. Cut layers.  Ink edges.  I used Seedless Preserves and Vintage Photo Distress Inks. I really wanted to pull out a rich purple hue with the Seedless Preserves. 

Step 2.  I made a small envelope using kraft paper. You can find the  envelope template here


Step 3.  I cut out the envelope making sure my postcard, or letter fit nicely. 
Step 4.  I added some foam tape under the flap of the envelope before I attached it to the envelope.  The I stamped the butterfly image onto the flap.  The stamp is from the Tales of You & Me collection as well ( Prima Frank Garcia Tales of You & Me - Stamp Set 990930).  I used clear embossing powder to make the stamped image  a little crisper and to pop a little. 
Step 5.  I gently inked the envelope to add more purple. 

Step 6.  I used a craft knife and cut into the flower images so that the envelope could nicely fit onto the top of the card.
Step 7. You can see the envelope now just slips into the card.  
Here is the template for the envelope that I created.  You can find the link right here.

Here are some close ups. 


Thanks for stopping here.  Enjoy Frank Garcia's collections! You can find the Tales of You & Me collection right here.  You can find Frank's other collections here as well and all the other fun Prima goodies at the Flying Unicorns Store

You can also grab a copy of the envelope template right here


Products:
990992 Prima Tales of You & Me - 4x6 Journal Cards
Prima Frank Garcia Tales of You & Me - Stamp Set 990930
583446 Prima Victorian Christmas by Frank Garcia - Rudolph's Nose
991012 Prima Tales of You & Me - 3x4 Journal Cards
991043 Prima Memory Hardware -by Frank Garcia - Rocquencourt Doily Lace
kraft cardstock
Seedless Preserves and Vintage Photo Distress Inks

Tuesday, February 2, 2016

Shake up February with a Shaker Card

Shaking up February   

I love shaker cards.  They are fun to make , fun to receive and even more fun to give away.   I used my February kit from the Flying Unicorn , featuring Riddersholm's Newport collection to help me shake it up.  

I also have some photo step-by-steps so you can see my process.  They are pretty simple once you have the hang of things.  

Here's How I Made this:
Step1.   I love to finish my edges with ink.  I like the way the ink makes a great soft edge on my projects.  I also love using pre-folded cards with envelopes because I am not the best at paper scoring to create my own cards.  Plus I find it frustrating to look for enveloped that match.  If I buy them as a set, I eliminate the search for envelopes. 


Step 2. The kit included some Prima Paintables 4x6 cards.  I used the printable card as a frame and cut the center out.  
Step 3. Time to add the window of the shaker card.  Easiest and cheapest way is to save your acrylic from packaging and recycle it for the cover of a shaker card.  

Save the acrylic from packages of flowers, embellishments, and any other product that you have.  

Now I must admit that mine came from a package of cookies or danish - not sure which.  I am wondering if I love shaker cards so much because subconsciously they make me think of cookies and delicious baked goods?  That could very well be.  

Step 4.  Do NOT glue the window onto the card yet.  We need to fill the window still with goodies.  I wanted to add some stamping to the inside of my window and a paper butterfly as well.   

Fun foam makes for a wonderful layer for the shaker card.  It's very inexpensive and cuts easily.  You want to make sure you use a material that doesn't let the shaker beads and sequins leak out.  Cardboard isn't the best to use because the corrugation on the cardboard makes for a lot of opportunity for beads to fall out.  


I tried using cardboard once and when I held up the card and gave it a shake, my micro beads tumbled to the floor.  YIKES.  


Step 5. Add shaker beads, sequins, and anything else you desire. Once the material of choice is added, you can close up and pop the top onto the card.  

Step  6.   Continue to decorate and embellish the card.  I added some flowers and ribbon here.  Not much else.  I wanted the shaker to be the main feature. 

It's just THAT easy!


Visit our NEW Store!
Are you visiting the Tallahassee area soon?
Stop in and say hello!
Plan a day trip! Crops -Classes-Fun

926 North Monroe St
Tallahassee, Florida
Tel: 850.270.6366 Toll Free 800.231.7119


Supplies:Main Kit Includes : Papers—Riddersholm Design—Newport Collection , Petaloo Flowers, Prima Vintage Printables, Petaloo Forget-Me-Nots in Mauve, gold sequins


Saturday, January 30, 2016

DIY Quick and Easy Valentines Cards - So Simple


Create some quick and easy Valentines day cards

I used Simple Stories "You & Me " Collection to whip up the sweetest and easiest cards. Simple Stories helps make it easy with their journal cards.  The key to these cards lies in layering papers.  


Here are the simple instructions


The Simple Stories "You & Me" collection was meant to be layered and to mix up the fun patterns. In addition, this collection has a wonderful fun array of journal cards ands ATC's for pocket pages, cards, fast scrapbook pages and journaling.  
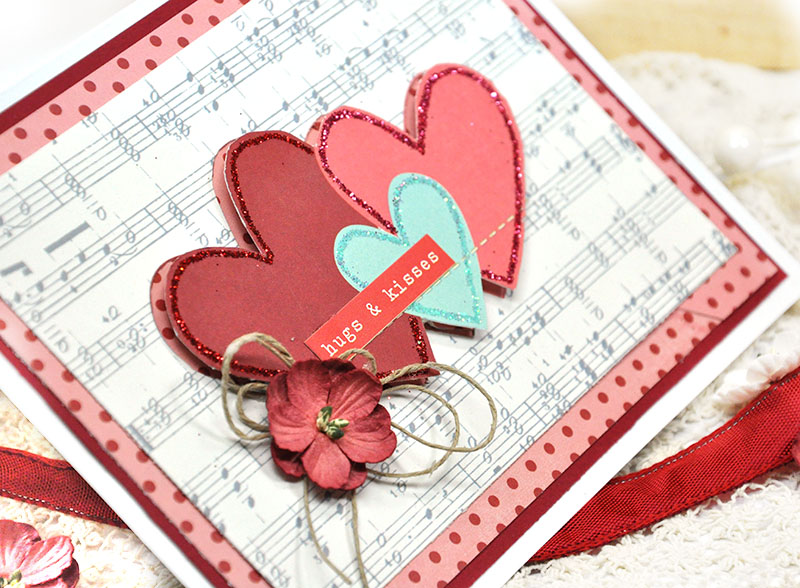
I cut the heart images from this 4x6 journal card.  Set the hearts aside.  These are going to be embellished and given some dimension with foam tape.
I grabbed a glue pen and some glitter to give these hearts a touch of glitz and glam.  The glue pen is easy to use and perfect for making thin lines. 


Drizzle the glitter over the wet glue pen lines and you're all set!  BAM, instant bedazzling.  I like to use a bead funnel as a glitter funnel - makes clean up a  snap. 

Embellishment time! Simple Stories has awesome stickers included in each collection.  I aded a sticker from the Simple Stories, "You & Me" collection, a small flower and a hemp twine bow.
I wanted the hearts to have some dimension so I backed them with  foam tape to make them pop.  
Fun, right?  And Easy too. 


This card is equally easy and primarily consists of a few layers. In addition to white cardstock, I selected a journal card from Simple Stories, "You & Me" collection, and some patterned paper from the collection to use as a mat.


I added some texture using  an embossing folder - this is the Tim Holtz Music folder. 

I tied some hemp string around the card. Then I added foam tape to the back for a raised layer.


Simple and yet lovely. 


In this card,. I used some kraft and red cardstock as matting for the card topped with a 3" x 4" ATC from Simple Stories, "You & Me" collection.
 The ATC has a fun image of a key tied with twine. I wanted to make that "come to life" so I wrapped the ATC in hemp twine and tied the key sticker from the collection to the card.


I wanted to make the heart pop a bit so I pulled out the Inkessentials Glossy Accents. This is easy to use. Just apply evenly to the surface of the heart and let air dry. As the Glossy Accents are drying, you can add sequins, micro beads, glitter and other embellishments as you like. The Glossy Accents act like glue and will hold all those embellishments perfectly. 

 Once the Glossy Accents were completely dry, I highlighted the white polkadots on the heart with a white Sharpie paint pen.

 Here is the completed card with close ups:


Product List

Tape
Kraft Cardstock
Red Cardstock
Stickles Christmas Red
Stickles  Diamond
Glitter Set
Anti Static Pad
Sizzix Alterations Texture Fades - Postcards & Music Sheet
Hemp Cord
Craft Knife
Quickie Glue Pen
Foam Tape
Micro beads - Gold
Petaloo Flowers - Forgetmenots 0 Antique Red
Inkessentials Glossy Accents
Simple Stories - You & Me 12x12 Simple Set
Simple Stories - You & Me 6x12 Stickers 
Petaloo Forgetmenots - Antique Red
Prefolded cards/envelopes
White cardstock - for card 
Sequins 
Bead Funnel - 4.75" x3"