Wednesday, January 25, 2017

Cards for Valentine's Day - Petaloo


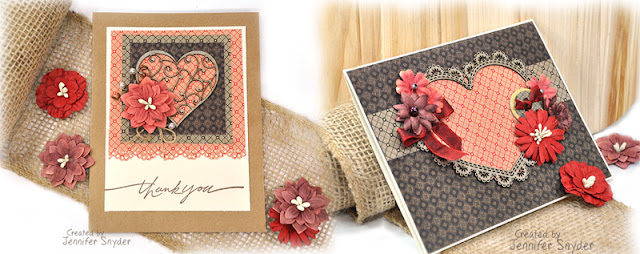
Hello.  I'm here with you to share some Valentine's or "appreciation cards" with you.   I'm calling them "appreciation cards" because I  have an outdated and old fashioned way of thinking about Valentine's Day - as a day set aside for your true love.  However I have many loves in my life  which obviously include my husband but extend to family and good friends.  Many of these loves in my life need to be appreciated and thanked for the amazing goodness they share with me.  
Thus "appreciation cards" or my modern day Valentines.  

Since my post is about love and appreciation, my cards are not complete until they have been adorned with another love of mine - Petaloo flowers.   I have two cards to share and both have some beautiful flowers on them from the Petaloo Darjeeling collection
I hope you enjoy them.  


This first card is a simple design but the intention is quite clear.  It's obviously a card to show my love, but not overly gushy mushy love.  That I save for my husband, lucky man.  

I used Graphic 45's, Off to the Races collection for my cards.  You may think that's such an interesting choice for Valentine's Day, but the patterns and colors are so fabulous together  and work absolutely perfectly with my Petaloo flower choices.  

 In addition to the Graphic 45 paper, matching Graphic 45 chipboard from "Off to the Races", I've used the following Petaloo flowers:

I've also added a wonderful delicate heart chipboard piece from 2Crafty - the gorgeous delicate Lace Heart frame.  

This is the second card.  I'm sending it to my sister because she has the kindest heart and is such a helpful person who takes great care of my parents.  That certainly is a perfect reason to send a Valentine's appreciation card. 

The Petaloo Darleeling Dahlias Red looks wonderful paired with the Graphic 45 paper collection, "Off to the Races".  I have accented the red Petaloo Dahlia with some white pearl berries from Petaloo Spring Berry Cluster.  I also used the sweet hemp bow that comes with the Berry Cluster.  It's a perfect little topper. 

Here's an angled look at the card to show the dimension.   This card also has a chipboard piece from 2Crafty - the Elegant Heart.  

 You can find more Petaloo products listed here, and we invite you to join and LIKE us on Facebook right here.    You can find more Graphic 45 products right here.  

Thanks for stopping by and don't forget all the folks you love and appreciate this Valentine's Day.  They all deserve cards adorned with Petaloo!
Don't forget the new Petaloo collections will soon be available.   You can see  Magnolia sneaks here, Garden Roses here,  and adorable Glittered Bugs ( Butterflies and Dragonflies) right here


Petaloo Products Used:

Other Products:
Graphic 45 -Off to the Races 8x8 paper collection 4501459
Graphic 45 -Off to the Races chipboard 4501465
2Crafty Chipboard ( Elegant Heart m00473), ( Lace Heart Frame - fr0087)
ribbon
Martha Stewart edge punch
Stamping Up  - Thank you stamp

Tuesday, January 24, 2017

Home Decor - Shabby Chic Love Canvas

Shabby Chic Mixed Media Canvas

This home decor canvas was a collaboration for two amazing companies - Maja Design and Petaloo.  

I originally crafted it to be featured at the Petaloo table at Winter 2017 Creativation ( formerly known as CHA or Craft Hobby Association).  The sweet folks at Petaloo needed pieces to go on tables - not walls - thus I created to be either a tabletop piece or to hang on the wall.  I did decorate and finish the backside of the canvas so that if used as a tabletop home decor piece, then it was beautiful on both sides and could be picked up and held.

I thought this would be perfect on the table for a bridal shower or at as a table top piece for a wedding - because it is pretty from all sides.  
The original canvas is 5"x7" and 2 inches deep.  Once gussied with some gorgeous Petaloo flowers, my own lace trims from my stash and some floral berries, it is a bit bigger. 

Let me tell you a little about the flowers I added to decorate the piece.  I wanted to grab flowers that followed the gorgeous colors of the paper but wanted to pull more green from the paper.
To do this,  I used the following:


In the close up above and below, you will also find the following flowers and a butterfly too:
I used paper from two different Maja Design Collections : Enjoying Outdoors and Summertime.  Many of the collections can be mixed and matched which is what I chose to do. 

Here are some additional additional photos of different angles.  Because this piece has dimension and is made to be looked from all angles, more photos seem necessary for the full effect. 


You can find this piece listed in my ETSY shop right here - along with other pieces I have made that can be found here.  Grab it before it's gone.  

And as always - thanks so much for stopping here .  I appreciate your time,  I know you have many things to do with your time so the very thought that you stopped here is very much appreciated.  

Petaloo Products:
Petaloo Darjeeling Butterflies - Teastained Cream 1488105
Petaloo Darjeeling Mini Rosettes Green - 1491-107
Petaloo Penny Lane - Forget Me Nots - Antique Red 1837-050
Petaloo PennyLane Mixed Blossoms - Antique Red 1836-050
Petaloo Penny Lane - Forget Me Nots - White 1837-000
Petaloo Darjeeling Hydrangeas - Green 1493-107

Maya Design - Summertime collection
Maja Design - Enjoying Outdoors Collection
Canvas 5x7x2
Trims - lace
Floral Berries

Friday, January 20, 2017

Petaloo Star Box - DIY Home Decor With Tips


Home Decor Featuring Petaloo (with important tip)
Today I am showcasing a patriotic box featuring Petaloo flowers to accent some fun papers from Graphic 45.

I used the "Place in Time" collection from Graphic 45 and paired it with the perfect flowers.  The Petaloo Darjeeling flowers look like they were made just for this collection.  

Tips on Avoiding Critical Mistakes When Decorating Boxes:
I have decorated a lot of boxes in my crafting time.   I started off making one critical mistake that cannot be fixed.  Don't make the same mistake I made.  Scroll down and I'll explain the gigantic problem and how to avoid being frustrated. 


I used the following Petaloo flowers to help gussy up this patriotic box.  


And I even added some Petaloo blooms to the inside of the box because it's equally nice to open a box of beautiful surprises.  
These lovely flowers adorn the inside of the box:

Tip Time
My first box was a mess.  A real train wreck.  Why?  Because the lid would not fit on after I finished adding the decorative paper and covered the sides of the box.  
Sooooooo, here is my TIP for avoiding heartache and problems when decorating boxes.  

This step is only necessary if you plan to decorate sides with paper.  You cannot place paper on the entire side because then the lid will not fit.  So absolutely MUST mark where the paper will go.  To do this, place the lid on the box and draw a pencil line around the bottom of the lid. This will give you an idea of how wide to cut your paper and exactly where your paper needs to stop. 

The photo below shows how your finished box will look.  
The top will fit nicely and will not rip and peel the decorative paper.

Thanks for stopping.  Please visit the Petaloo blog to see all the newly released flowers coming your way soon.  

Petaloo Products:
Petaloo Darleeling Dahlias - Teastained  Blue 1467-103
Petaloo Darleeling Dahlias Red - 1467-101R
Petaloo Darleeling Mini Garden Rosette Blue 1492-103

Other Products:
Graphic 45  - Place in Time Deluxe Collectors Edition 4501470 (July Cut-Aparts)
Graphic 45  - Place in Time  Chipboard
Webweave Trim
Gold Floral Berries

Thursday, January 5, 2017

Rustic Home Decor - Wooden Rooster with DIY Tips

Rustic Home Decor - Wooden Rooster with DIY Tips
Time to set aside the Christmas decor for another year and refocus on all-season items.  I gussied up this wooden rooster and gave it a new look - bold, rustic and quite the handsome fella on my tabletop. 

This is what the wooden rooster looked like before he was transformed.  It's got a chalkboard painted base but it reallys needs some additional love.  I have some gorgeous rich papers from Prima's Stationers Desk collection combined with Petaloo flowers to help with the gussying (gussying - not sure it's a real word but it's my new favorite verb).  

Decorating Wood With Paper 

I prefer to use some type of medium other than glue to adhere paper to most of my wood pieces that I decorate.  The reason for this is to provide some durability  and prevent the paper edges from bending, warping and peeling. 

For this particular project,  
I chose Mod Podge because that's what I had available.
You can make your own inexpensive finish by mixing white school glue and a bit of water and painting onto the project.  You can also use a clear, matte gel medium.  The key to using these mediums as sealants and protective coatings is to make sure your edges are completely coated and adhered. 

It's important to add the Mod Podge (or your choice of medium) to both the wood and the backside of the paper.  Once the paper is down, you'll need to smooth out all air bubbles with your fingers, brayer or such like that.  Once satisfied, add a final layer of Mod Podge over the paper paying special attention to the edges making sure they are all secure.  
Creating Custom Embellishments

For this project, I decided to also add some custom flowers created just for this fella.  This was done easily enough by combining two Petaloo flowers and topping with a button.  
The flowers I used were Petaloo Petaloo Textured Elements Blossoms in black and Petaloo Sugared Mini's in Burgundy .

Handy Tip when using buttons as embellishments...use a needle nose pliers to snap off the button shank.  If you do this one little stop, your button will rest flat atop your project.  

Once the button is ready, I layered the flowers as shown in the photo below. 

And this is what the finished custom flower looks like when added to the rooster.  

Now it's time to finish adding the embellishments and adore your new table piece.  I added more Petaloo flowers to the base of the rooster and also his gobbling neck.  


Here's one last photo to show how dimensional this piece is.  

Thanks for stopping by.  I hope you find a few moments in your day to craft and create.  


Petaloo Products:
Petaloo Textured Mix - Mini Blossoms Black 1263209
Petaloo Textured Elements Blossoms - Black 1256209
Petaloo Sugared Mini - Burgundy RAS 11311206
Petaloo Forgetmenots - Antique Red 1837-050
Petaloo Darjeeling Dahlias - Red 1467101R

Other Products:
Prima Stationer's Desk paper 813949
Wooden Chalkboard Rooster - Michaels Celebrate -It
Black pearl flourish


DIY Home Decor Wooden Purse - Petaloo

Refreshing and updating that old knick-knack 

I had a cute wooden purse knick-knack that I bought at a thrift store.  It was cute 10 years ago in a little girl's room but definitely needs some updated love and attention... and some Petaloo flowers to bring it back to life.  I say, "Let's give tired purse a second chance at love".  If you scroll down through this post, you'll find some helpful DIY tips as well to help make your projects 
durable.

Now here's my big secret in refreshing and repurposing items.  If at all possible, I try to salvage what I can and do as little painting as possible.  My expertise is in decorating - not painting.  I know painting can take a lot of time, effort and finesse.  I do not have an abundance of any of those.   So my philosophy is to work with what I have when possible - meaning no painting.  
The Graphic 45 "Place in Time" collection had perfect papers and colors for this project and worked well with the purple and green in the purse.  A project doesn't get much easier for me if I can leave the original paint alone.  


Making your home decor durable  

Another important aspect of home decor items is durability.  When making home decor pieces, I always think about pieces being handled, touched, dusted, moved.  Unfinished and untreated paper can become stained, get fragile, warp and the edges can rip.  You can add durability to your home decor paper pieces by coating it with a clear matte finish.   

I chose Mod Podge because that's what I had available, but you can make your own inexpensive finish by mixing white school glue and a bit of water and painting onto the project.  You can also use a clear, matte gel medium.  
The key to using these mediums as sealants and protective coatings is to make sure your edges are completely coated and adhered. 

I do not use glue on the paper.  I used the Mod Podge as glue.  To do this, I make sure to add the Mod Podge to both the wood and the backside of the paper.  Once the paper is down, it's important to  smooth out all air bubbles with your fingers, brayer or such like that.  Once satisfied, add a final layer of Mod Podge over the paper paying special attention to the edges making sure they are all secure.  
Before adding my gorgeous Petaloo embellishments, I wanted to add lace to the project but I realized the paper is busy.  In order to make my lace pop and give it some definition, I added a layer of paper behind it.  This prevents the delicate lace from getting lost in the busy patterns and embellishments.  


Here are some more close ups of the Petaloo flowers and  finished project along with the backside of the purse.  Here is a list of the Petaloo flowers that I added as perfect accents:

Thanks for stopping by. 

Petaloo Products:
Petaloo Darjeeling Flowers - Anenome Purple 1490104
Petaloo Darjeeling Flowers - Purple Petites 1465104R
Petaloo Darjeeling Flowers - Teastained Mini Butterflies 1486104
Petaloo Darjeeling Flowers - Mini Green Rosettes 1492107

Other Products:
Graphic 45  - Place in Time Deluxe Collectors Edition 4501470 (March Cut-Aparts)
Graphic 45  - Place in Time  Chipboard
Creative Charms - Vintage Brads VP-8210 Purple
ModPodge Matte
Green crystal flourish
Lace