Showing posts with label star. Show all posts

Monday, May 28, 2018

Shaker Cards - Using Chipboard - DIY Tutorial


I'm here today wishing you a Happy Memorial Day and remembering all those brave service men and women who gave their lives for our continued freedom.  

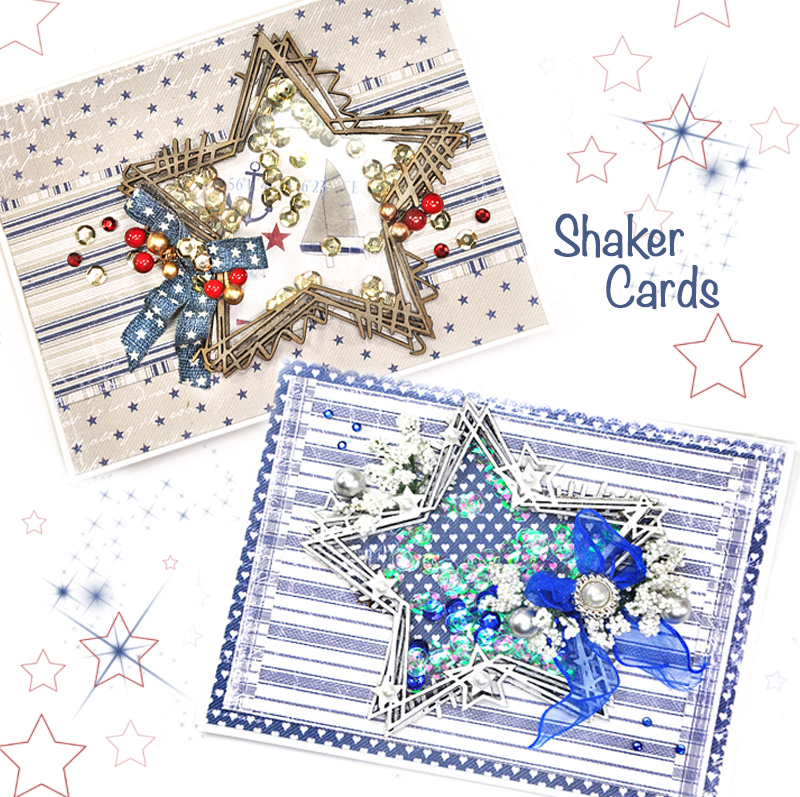
I've got some patriotic shaker cards to share using the cool and unique  Star Doodle Frame chipboard from Creative Embellishments.   

Shaker cards using chipboard?  Absolutely!  Super easy too! 
  Scroll down to see my DIY tips showing how I made these.  
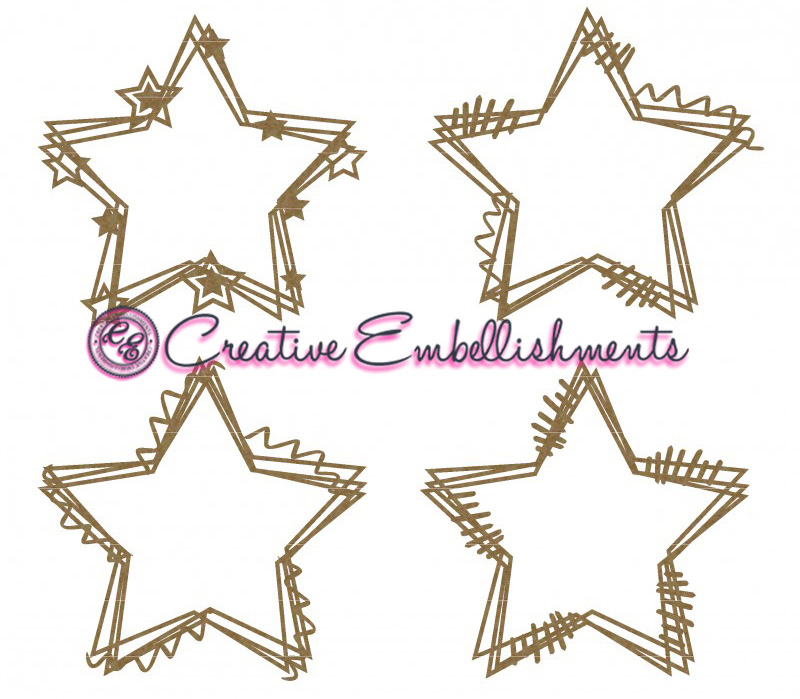

 I simply glued two chipboard star shapes together and filled them.  I don't think shaker cards can get any easier. 

The stars are not identical.  They are all different and beautifully unique - but don't let that distract you from trying this cool technique.  You really don't notice the differences when assembled.  Actually I think the differences add a bit more charm to the card. 


Here is my first card.  The papers I used on this card are from Maja Design and are from the "Life in the Country" collection. 

DIY Instructions - Tutorial
Choose your star chipboard pieces.  Once again, I used  Star Doodle Frame chipboard from Creative Embellishments.   

Back one star with paper.  

Next cut an acrylic star to fit the chipboard.  Don't have any acrylic?  This is what I do....I eat the rest of the baked goods I bought for the family - this one happens to be the beloved cheese danish.  Just wash and dry and instantly I have acrylic.  

Look at the top of the container....all that lovely usable acrylic begging to become a shaker card.  
The possibilities are endless - baked goods, fresh fruit and veggies, packaging from your crafts and crafting flowers....search the house high and low. 


Here is the second card I created.  I little more patriotic.   

I decided to leave the chipboard natural for this card because the kraft color of the chippies really made a nice accent for the paper.  


Thanks for stopping here today.  

Where to shop? 

You can shop for Maja Design Papers here
Shop for chipboard, wood and flair buttons from Creative Embellishments here.  Creative 


Products:
Creative Embellishments - Star Doodle Frame
Maja Design - Life by the Sea
Maja Design  - Life in the Country

Friday, July 1, 2016

Home Decor Star Box with Julie Nutting and Photo Play


Combining Julie Nutting's Paper Collections 

Time to play paper dolls and make something fun, fabulous and functional. I created this star shaped box by combining two beautiful collections by Julie Nutting and Photo Play Paper; "Nautical Bliss" collection and the "Paper Dolls" collection . 

While the collections are not related, they are nice compliments for each other and can indeed be combined.  My top sheet is Nautical Bliss Collection -12x12 Nautical Stripe sheet while the sides were crafted from  the Paper Dolls collection pack - specifically the individual papers called  Let's Play Paper Dolls Cards and Cuteness.  

If you scroll down, you'll find an opportunity to grab this adorable gift box from my ETSY shop at 30% off.  Everything is 30% off when you use the coupon code at the bottom of this post.  

My star box is 9x9x4.5.   I adorned it with chipboard images from the Paper Dolls collection as well.  Paper Dolls Collection adhesive chipboard comes in a 6x13 sheet - chock full of adorable images.   


Wanna know what is even better?  All of Julie's Photo Play collections are on sale at the Flying Unicorns.  


Here is a close up of the top of the box.  You can get a feel for the dimension of the embellishments on the box.  

Some surprises await when you open the box.   The inside is lightly decorated - while still remaining the potential for storing items in the box.  I added some chipboard and lace trim to gussy up the inside.  


You can grab this nautical star box on my ETSY shop at 30% off by using code "KITTY30" .  In fact all items are on sale with the code now through Labor Day - Sept 4th.  Use the code at check out.  

You can see the ETSY post right here 
Thanks for stopping by.  

Photo Play Paper - Julie Nutting - Paper Dolls Collection 6x13 Adhesive chipboard PD2157
Photo Play Paper - Julie Nutting - Paper Dolls Collection-12x12 paper Cuteness PD2194
Photo Play Paper - Julie Nutting - Paper Dolls Collection -12x12 Let's Play Paper Dolls Cards
Photo Play Paper - Julie Nutting - Paper Dolls Collection Pack 12x12 PD2199
Photo Play Paper - Julie Nutting - Nautical Bliss Collection -12x12 Nautical Stripe NB2240
Photo Play Paper - Julie Nutting - Nautical Bliss Collection -Element Stickers12x12 NB2244
Photo Play Paper - Julie Nutting - Nautical Bliss Collection Pack NB2246
Martha Stewart Punch - Doily Lace Edge
LaceTrim
Paper Mache Box
ribbon
Floral Berries
shells and flowers from stash


Thursday, July 2, 2015

Star Shaker Cards Tutorial


Shaker Card Tutorial 

Shaker cards are popping up all over.  They are adorable, fun and quite easy to make, once you know the technique.  Here is a patriotic shaker card I whipped up for the 4th of July.  
Mine is patriotic but these fun cards are perfect for so many occasions. 

I have a detailed tutorial on Blitsy's Blog, along with close up photos of this card.  

Products

Beacons 3 in 1
Martha Stewart Doily Lace Edge Punch
AC - DIY Shop Gold Twine
Star Sequins Gold
Kaisercraft Clear Stamp - Life
Ranger Tim Holtz - Distress Ink Old Paper
Ranger Blending Tool
Ranger Non-Stick Craft Mat
Ranger Liquid Pearls - Bisque
Spellbinders Nestabilities Star S4
Ribbon
cardstock or prefolded cards
Stamp Block
Ranger Heat It Heat Tool
Ranger Distress Embossing Pad
Prima Art Ingredients Micro Beads - Copper
Coordinations Card Stock
Gold Embossing Powder
Clear Acrylic sheets
Foam Tape


Let's take a look at the instructions:

1.
Start with either a pre-folded card or score your own card from cardstock. Cut some cardstock layers. Each layers will be smaller than the next so they stack nicely with a thin edge showing on each layer. Glue together.

2.
The top layer of the card will be white or ivory. Diecut a star in the middle of the cardstock ( I used the Spellbinders Nestabilities Star die - 2nd largest die.)


3.  Tape the Spellbinders Nestabilities large Star and 2nd largest star on blue cardstock. The tape will           help the dies stay in place so that a thin star frame is cut.


4.
Glue the thin star frame over the white cardstock star. You will have a perfectly layered star frame that will become the window of the shaker card. Do not glue to card yet. It needs to be decorated and filled first.

5.
For a vintage look, lightly ink the card with Ranger Tim Holtz Old Paper. Make sure to ink the inside edges of the star as well for a consistent look.
6.  Punch a decorative border, lightly ink to match the card, and glue to card as a border.


7.  Wrap some gold twine around the top layer of shaker.

8.  Add a piece of acrylic to the back of the shaker card and glue in place. I used Beacon 3in1 glue because it is very strong and works well with plastic, metal, fabric, glass, foam and more.


9.  Add foam tape to the backside of the shaker layer. The foam tape will be the barrier that holds the beads inside the card. Make sure you have completely surrounded the star and there are no small gaps. If you leave any gaps, you will most definitely have an empty shaker card and beads on your floor.

10.  Emboss your sentiment on the card before the shaker layer is added. Tip: place the top layer on the card and trace the star shape lightly in pencil. This way you know exactly where to place your embossed sentiment.
11. Add your beads and sequins. Then glue the card to the shaker top.
12.  Ok here is one of those moments when I looked at my card and decided it was missing something. It needs more red. Do not be afraid to revise a project. Simply lift the gold twine and add the ribbon. Most of the time if the glue is still tacky, you can gently lift and move and revise.


13. Glue sequins to the face of the card. Add small dots of Ranger Liquid Pearls along the edge of the star.

And here is one more look at the finished card: 

Happy Crafting and thanks for looking


Tuesday, June 30, 2015

Grapevine Star Canvas - July Off The Page with the Flying Unicorns


Flying Unicorns Off the Page Project for  July

Included in every "Main Kit" for the FlyingUnicorns is a cool extra item called the Off the Page Project.  It's a way to get you thinking about papercrafting as a dimensional hobby and a form of home decor as well as scrapping.   This month, Alda has included a grapevine star.  It's about 8"x8". 

I chose to make mine more Patriotic and rustic.  I love Patriotic decorations.  They hold a special place in my heart.   I also decided to mount mine on a burlap backed canvas.


I started with a 9x11 blank canvas and covered it with burlap.  Them I inked the edges and added light inking to the burlap.  I used Tim Holtz Distress ink in Vintage Photo and Aged Mahogany and dabs of Barn Door. 


Next I glued some trim on the canvas and added some microspheres from 13Arts.  I wanted to bring out a little gold accent,  


If you missed the kit this month and want to protect yourself in the future from such despair, Flying Unicorns offers a pre-order option available the 20th of every month.  Sneak previews are available at that time and you decide if you want to place an order.  This option is only available for 48 hours.  At which point, the offer vanishes and you risk having to fight the sell out shoppers.

Happy Crafting and thanks for stopping.

Clearsnap Mixed Media Inx - Peaches
Ranger Tim Holtz Distress Ink - Barn Door, Vintage Photo, Aged Mahogany
Prima Mini Alpha Stickers
Trimcraft Sweet Paris Collection- fan flowers