

Welcome. Thanks for joining our blog hop all day, Dec 5th. The blog hop starts at Frank Garcia's blog. You should have arrived here from Trina McClune's blog. We are here sharing our paper crafting passion and love for Frank's designs.
Here are his 2014 and 2015 designs in addition to the Victorian Christmas collection that I am showcasing today. 2016 only promises to be even more spectacular!

The Blog Hop Details
A few details...Frank has a giveaway for those who leave comments on our blogs.
I am also giving away a prize pack chock full of Vintage Christmas goodies in time for Christmas gifts, tags and holiday cards. So please leave a comment and tell me
what you are excited to see in the new year.
Prizes Prizes Prizes
We have some magnificent prizes. To win them, you must comment and follow the blogs.
First is the Grand Prize from Frank .

You will be eligible to win this prize collection by leaving a comment in my blog:

Before you scoot off to the next blog destination, I'd love to share a gift set I made using Frank's Vintage Christmas. I have a step-by-step as well. Please scroll through my tutorial because I usually have special tips and tricks to share.
The next blog hop destination is at the end of my tutorial!


So How Did I make This?
Step 1. I used my box as a template for the patterned paper and traced around it.

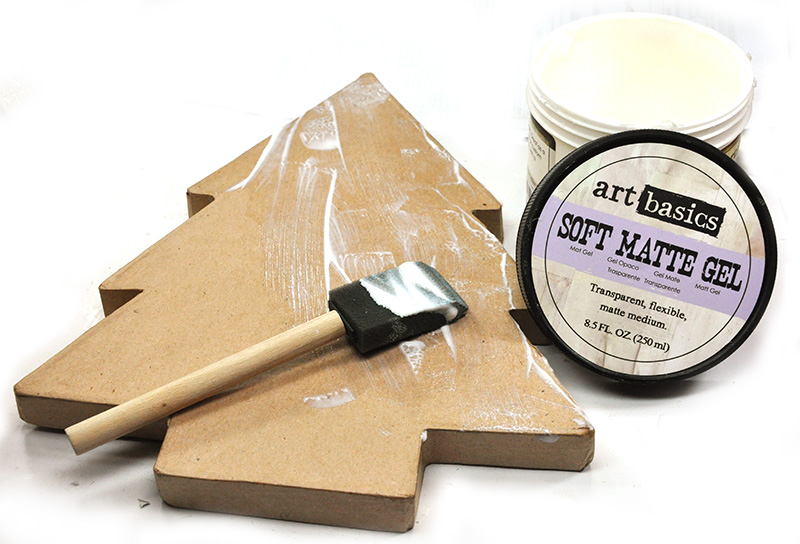
Step 2. When I am working on projects like boxes and canvases, I like to adhere my patterned paper using Prima's Soft Matte Gel. I slather on a nice layer of gel with my foam brush, lay down the paper and then use a brayer to make sure the paper has no ripples and bubbles.
Step 3. Once I'm satisfied my project is bubble free, I apply a thin coating of gel over the paper to seal it.

Step 4. This step may be the MOST OVERLOOKED step when decorating any box in my opinion - major emphasis on those words "most overlooked ".
Place the top on the box (whatever box you are using - including metal tins). See where the lid stops. It's important to note where the top ends - or how far down the top goes on the sides. If you glue paper all the way up the sides of the box and cover the sides totally in paper, the box top MAY NOT FIT, or may rip the paper each time the lid is removed and set back on. No good! You need to think ahead. Take note and work around that potential glitch.
I pop the top on. Make sure it's secure and then trace all the way around the box marking where the lid stops. This is where my paper is going to end. I need to leave the rest of the side bare neked so the top fits properly.

NOTE where my paper sides end!

Step 6. Add some of Frank's Memory Hardware Rocquencourt Doily trim.

Time to Create a Cluster
Step 7. When I decorate a box, I like to give the cluster some height ,dimension and angularity. The box most likely will go on a table or shelf so I want the floral cluster to be seen when the box is lying flat. No sense decorating a box with flat decorations in my opinion . It's meant to be shown , right?
To create this dimension, I will use the wire stems from Frank's gorgeous flowers (Victorian Christmas collection-Red Stocking). The wire stems are going to be used as supports for placing flowers at an angle and creating an angular and dimensional cluster.

This image shows how I use the wire stems as supports by bending then and gluing them onto the project with strong glue.


Step 8. Time to add the illusion of a bow. To do this, I grabbed Frank's Monpazier Gilded Trim from his Memory Hardware collection. This trim adds sparkle and glitz to any project and is especially joyful for a Christmas decorative piece.
You don't need to cut a giant piece and tie a bow, you just need the illusion of a bow. Tuck a few loops into the cluster and BAM, it feels like a bow ! Save the rest of the gorgeous trim for another project.

Step 9. I want to add more sparkle and glitz so I will pull out the Soft Matte Gel once more and dab on generous amounts of gel.
Sprinkle some sparkle with Prima's Glass Glitter. I promise the gel medium dries clear and your project will dazzle.

Here is a close up of the glass glitter areas.

Finishing Touches
Step 10. Time for some finishing touches. Those little finishing touches are what makes your project special and adds wow factor. Frank's collections have gorgeous and fascinating coordinated embellishments. The Vintage Christmas Collection is no exception. I grabbed the cool wood embellishment, "Noel" as a sentiment.
I selected a few more flowers from the collection for the top and tucked in some pine punches. Lastly,I placed a few Memory Hardware Pearls about the box.
I did add some trim from my stash around all the edges of the lid and I ran a bit of RubNBuff around the edges of the box for gilding.

I also made a matching card to go with the gift set.

Here are a few more close ups:


***************************************************************************
So Back to the Blog....How to win a prize?
I hope you enjoyed my step-by-step tutorial for my box set. The Vintage Christmas Collection is totally divine and I'd like for you to have a mini kit to enjoy. To be eligible, please leave a comment on my blog.
Your next stop in the hop is Delaina's blog.
Enjoy, good luck and Merry Christmas!
*****************************************************************************
Here is the complete Blog Hop line up:
Jennifer ( you are here)
Product List:
Prima Products Box:
990480 Prima Victorian Christmas by Frank Garcia paper - Pere Noel ( Top of tree box)
990503 Prima Victorian Christmas by Frank Garcia - Le Sapin de Noel (sides of box)
583453 Prima Victorian Christmas by Frank Garcia -flowers Joyeux Noel
582517 Prima Victorian Christmas by Frank Garcia -Wood Embellishments
583477 Prima Victorian Christmas by Frank Garcia - Red Stocking Flowers
991043 Prima Memory Hardware -by Frank Garcia - Rocquencourt Doily Lace
961428 Prima Art Basics Finnabair - Soft Matte Gel Medium
991036 Memory Hardware - by Franks Garcia- Monpazier Gilded Trim
961428 Prima Finnabair Art Basics -Soft Matte Gel.
961657 Prima Finnabair Art Ingredients Glass Glitter - Gold Lush
990381 Prima Memory Hardware - by Franks Garcia-Pearls
Prima Products Card:
990510 Prima Victorian Christmas by Frank Garcia paper - Un calendrier deLAvent
990503 Prima Victorian Christmas by Frank Garcia - Le Sapin de Noel
583439 Prima Victorian Christmas by Frank Garcia - flowers Christmas Eve
583415 Prima Victorian Christmas by Frank Garcia -Flowers Holiday lights
583477 Prima Victorian Christmas by Frank Garcia - Red Stocking Flowers
Other Products:
branch punch
Trim/Ribbon
Jennifer,
ReplyDeleteSomeone will be doing a happy dance when you gift this box! It wouldn't matter what was inside - as the outside is totally gorgeous! Your tutorial is wonderful and very helpful - and thanks for sharing!
this is truly a gorgeous project and amazing collection. Congrats on the team :)
ReplyDeleteOh now this is fabulous! Judy x
ReplyDeleteOh what a fabulous tutorial...I love the box and matching card...Just stunning!
ReplyDeleteThis collection of Frank is really beautiful!!! Love your projects and tutorial! All have magic!!!!!!!
ReplyDeleteYour Christmas box & card are so gorgeous, I'd happily recieve these as a gift.
ReplyDeleteFantastic tutorial Jennifer.. What I'm excited about for the next year.. well.. I do get to work with you at the flying unicorn team! pretty excited about that.. I also got a happy mail the other day.. soo over excited about that for the next year as well.. :) :) Thanks for the chance to win :) Hugs to you!
ReplyDeleteGorgeous! Thanks for sharing the tutorial. I learned so much from it.
ReplyDeleteYour so creative Jen!! I love this so much!!
ReplyDeleteAnother creative project! Great tutorial, added to my to do list for sure!
ReplyDeleteThis is awesome Jen!!! I love this collection and can't get enough of it!!! Thank you for sharing the tutorial!! You all are awesome and create the best pretties!!! Thank you!!
ReplyDeleteOh Jen, this little project is fabulous!!! I just love Frank's collection and you have worked it up so beautifully!!! Congratulations on your new DT, such an exciting adventure!
ReplyDeleteLove your project and thanks for the tutorial. Victorian Christmas is so beautiful.
ReplyDeleteWow, Jen, this looks stunning! What an amazing project!
ReplyDeleteAn awesome project Jenn. So pretty. I look forward to seeing what Prima's new collections will be. New stencils, doll stamps, what will they add?
ReplyDeleteJanelle R
Oh Wow!! This is so pretty. I love all the details and the tutorial is great. Thank you for sharing. Became a new follower.
ReplyDeleteThanks for the tutorial, it is so beautiful!!!!!
ReplyDeleteBeautiful and so happy for Frank.
ReplyDeleteLove that you always think "outside the box!" So apropos for this project! Lol. Seriously, fab job! Xxx
ReplyDeleteCongratulations on being selected to join such a wonderful new design team! Your box is fabulous. I really appreciated the tip concerning the top of the box. This is such a beautiful box. Thank you for sharing.
ReplyDeleteLove the project Jen! Thanks for sharing!
ReplyDeleteWOW! So stunning!! newbie here... the card is just as beautiful
ReplyDeletewhat a beautiful piece. love all the layering of embellishments!
ReplyDeleteGreat project and tutorial - thanks for sharing!
ReplyDeleteWow!, Love your project, Thank you for the tutorial.
ReplyDeleteFabulous, Jennifer, I love it!
ReplyDeleteWhat a beautiful project! And thanks for the tip about not putting the paper on the sides all the way to the top! Love your use of one of my favorite of Frank's lines. I am looking forward to more tutorials from this new design team !
ReplyDeleteThis comment has been removed by the author.
DeleteCongrats - while you did not win either of the grand prizes, I have some goodies to share with you! Please send me a message telling me your address.
DeleteWOW! Love your gift set! Beautifully embellished. Thanks for showing how you created your box.
ReplyDeleteKaren
That's such an elegantly beautiful gift set, and your tutorial for making it is wonderful!! Thank you for the inspiration!!
ReplyDeletewow this is stunning, love the edges of the tree! This is one of my most favorite collections and your tree is amazing! Thank you for explaining so simply for us so I can try it out.
ReplyDeletesuper cute!! I see dingle berries!!!
ReplyDeleteHow gorgeous! I love all the extra touches you fully explained to us. And, yes, I have made that mistake of glueing the paper right to the top edge of the box! (luckily it is a small round box that houses my ugly tomato pin cushion - I keep it because it was my Mom's, and Mom passed in 2001) I still miss her every day. Thank you for sharing your secrets with us so we can make beautiful things to give too! Germaine
ReplyDeleteWow you tutorial was very helpful. Great job I loved it.
ReplyDeleteBeautiful project ... Congrats on dt!!!
ReplyDeleteGreat tutorial. ..iI think you had hubby help you... while he is getting bored in bed..😊
ReplyDeleteExcited to see in the new year.... your hubby well and playing music and in my house, a completed reno so that I can do some international travel later in the year... Busy lady Jen!!!
DeleteThis comment has been removed by the author.
ReplyDeleteBeautiful box and card! Thank you so much for sharing your wonderful tutorial! Love everything about it!
ReplyDeleteIt is official! The sky has opened and all the Angels in Heaven are peering down so they can get a better look at this gloriously gorgeous creation!! My jaw is on the floor and my eyes popped out of the sockets when I saw this! Absolute perfection! I am totally in love with the red flower!! Sugar coated yumminess!
ReplyDeleteThank you for the awesome tutorial and the extra little tips!! I have learned the cover/box/paper fit lesson more than once! Following your blog and I would be honored to win either of these delicious prize packages! Thanks for the chance to!!
Just amazing!! Wow!!
ReplyDeleteThis is a stunning Christmas project! Thanks for the tutorial! You did an awesome job!
ReplyDeleteAmazing close-up photos and detailed steps!! What a great tutorial for a gorgeous project!
ReplyDeleteWhat a gorgeous project! Thanks for the great tutorial on the Christmas Tree box! I love those Prima papers by Frank Garcia and I really appreciate the chance to win some of that vintage goodness!
ReplyDeleteyou did really wear this stuff! thank you for sharing and congratulations!
ReplyDeleteAn adorable box - it could hold so many tiny Xmas gifts in it. It would be a real treasure to receive it!
ReplyDeleteSuch a gorgeous box and very easy to follow your tutorial. Thanks for opportunity to win some of the fabulous Vintage collection.
ReplyDeletealways gret projects from you. Congrats on the DT and 2016 is going to be a very creative scrappy year!!!
ReplyDeletestunning piecework..! I hope to see more pictorial tutorial on altered photo frame or mini-album.
ReplyDeleteTotally and perfectly yummy! You are a rock star!
ReplyDeleteSo, pretty! So, glad I have this collection to treausre!
ReplyDeleteLove your project and your awesome tutorial. I hope that next year I can improve myself in every day. I would love to win. Frank's Christmas collection was sold out before my local scrapbook store could get it. Thanks for the chance to win. 💕💕💕
ReplyDeleteThis is a beautiful box and a great step by step Jennifer <3 I just LOVE your work <3
ReplyDeleteI hope you have a great Sunday <3
Hugs from Norway
Frank's designed collection together with your imagination produced a gorgeous gift set. The box is wonderful, the card a perfect accompaniment. Thank you for sharing the very thorough tutorial - next best thing to a video from you - I can even hear you giggle!!
ReplyDeleteThank you Jennifer - Julie
I adore this collection of Frank's and your tree is just stunning Jen!
ReplyDeleteHi Jennifer! Congrats on making this wonderful team! Your work is always beautiful!...what do I want to see upcoming???--> EVERYTHING!!! LOLOLOL!
ReplyDeleteThis is gorgeous!!! Thanks for the tip about the lid!!! That is totally a mistake I would make! Thanks for sharing! All the best! :)
ReplyDeleteWhat a fantastic project. I love it! Can't wait to have some time to use it for inspiration. Congrats on making the design team!!
ReplyDeleteLOvely tree....and love the step by step thank you!!!!
ReplyDeleteWow...such a beautiful creative project...a treat indeed..I am in love with this....the tutorial is cherry on the top..thank you for the awesome treat..xx
ReplyDeleteWhat a cute little trinket box! I love your advice about the paper not going to the top of the box. I would have made that mistake for sure! LOL
ReplyDelete