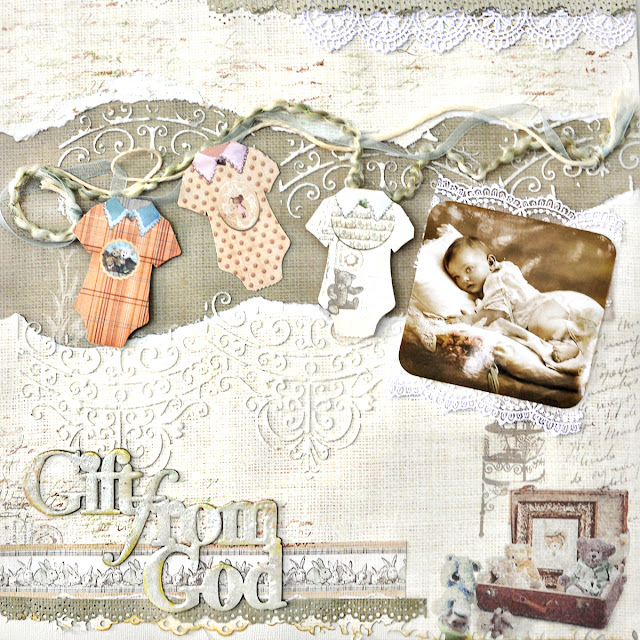
This is a layout using the wonderful new collection Baby Bear from FabScraps. The papers remind me of vintage childhood photos with neutral tones and sweet teddy bears. So I grabbed a vintage photo from Magic Moonlight Free Images - which offers free vintage images with no copyright restrictions.
Here is the chipboard I used from this FabScraps collection:
Gift from God chipboard DC57007
I painted the image first with gesso and let it dry. Then I embossed it with Shimmerz Enamlez - Sparkaliscious and inked the edges with a warm olive ink - Donna Salazar's Mixd Media Inx in Mossy.
I used an oldie but goodie Prima mask - the Gate - 550042 and followed the curves of the ripped paper.
Thanks for looking. Visit the FabScraps facebook page here. Visit the blog here to see the newest collections to be released soon.
FabScraps – Baby
Bear –Gift From God
Instructions
1. Background Paper Preparation:
2. Start with FabScraps Baby
Bear Collection –Bunny Bear 2 C57008
– punch the bottom edge -
about 9 inches wide starting at the left.
3. Lightly ink the punched
edge with olive green or a neutral tone, like light brown.
4. Punch two 8in strips of
FabScraps Baby Bear Collection –Bubble Bear 1 C57005 making two thin punched
borders. Glue one edge to the top
of the Bunny Bear 2 paper starting at the right corner. Glue the second punched edge to the
bottom of the Bunny Bear 2 paper starting at the bottom left corner.
5.
Cut a decorative strip from FabScraps Baby Bear Collection
–Journal Pre-Cuts MC57 001A. Glue the strip to the bottom of the
page so that it is touching the punched edge in step 4.
6. Rip a 3 in strip of the
Bunny Bear paper horizontally starting about two inches from the top. Rip all the way across. You can set aside the actual ripped
section for the purposes of this project.
You will not need it.
7. Reposition the two
pieces onto the FabScraps Baby Bear Collection –Bubble Bear 1 C57005. Like puzzle pieces with the center
section missing. You will see the
green from the Bubble Bear paper showing through.
8. Glue in place.
9. Using a decorative
mask/stencil and white molding paste, add some stenciling to the edges of the
ripped Bunny Bear paper-stencil both the top and bottom of the rips. Let dry.
10. Photo Image Preparation:
11. Glue lace to the top
and bottom edges of the photo as a photo mat.
12. Glue to the layout on
the right hand side covering part of the ripped section.
13. Chipboard Preparation:
14. FabScraps Baby Bear
–Gift From God chipboard DC57007 –coat chipboard words with white gesso and let
dry. Cover with embossing ink and
generously pour white embossing powder on the chipboard. Do not shake off the excess embossing
powder. Leave it thick. Heat set.
15. Use olive green ink to
lightly ink the edges of the words.
16. Glue the chipboard to
the page at the bottom left corner.
17.
Finishing
Touches:
18. Loosely place some
fibers onto the ripped section from side to side. Let drape and twist and fall as it wants. Glue in place.
19. Select three diecut
baby shirts from Baby Bear
Collection – Journal Pre-Cuts MC57 001A. Add dimensional dots or cardboard to the back of two
shirts to lift them off the page and add dimension
to the page.
20. Glue on top of the
fibers as if they are hanging on a laundry line to dry.
21. Enjoy.
- FabScraps Papers – Baby Bear Collection –Bunny Bear 2 C57008 (12in x12in)
- FabScraps Papers – Baby Bear Collection – Bubble Bear 1 C57005 (12in x12in)
- FabScraps Papers – Baby Bear Collection –Gift from God chipboard DC57007
- FabScraps Papers – Baby Bear Collection –Journal Pre-Cuts MC57 001A
- Inks – Donna Salazar Mixd Media Inx Mossy
- Martha Stewart edge punch - Doily Lace
- Prima Gate mask 550042
- White Molding paste
- lace and trim
- Fibers 14 inches long
- Dimensional dots
- Shimmerz Enamlez - Sparkaliscious / embossing ink and heat gun


Gorgeous layout! I love it!
ReplyDelete