Thursday, June 27, 2013

Maja Design - Blooms


First - just want to announce that Maja Design will be releasing Limited Edition Sofiero Collection very soon. 
Sofiero - by Maja Design 
now  on to my piece using Fika collection.  

Here is a piece I created using the Maja Design Ska Vi Ta En Fika Collection.

While it is no longer spring and the tree in the image is long past it's bloom, I just love being reminded of how pretty the lilac bush in my yard is when it starts to blossom.

I accented the page using Maja Design Fika Collection. The collection has the same rich warm colors as my photo.

This gorgeous plum color is  Henna hos mig.
This is Blommor Pa Bordet
This is Blommor Pa Bordet - B side


I punched a border using the This is Blommor Pa Bordet -B side of the paper.  I added a   Prima flowering vine from 
Thanks for looking.  Please stop by the Maja Design Blog and see what the other designers are creating.

Supplies:
Maja Design Ska Vi Ta En Fika -Blommor Pa Bordet paper
Maja Design Ska Vi Ta En Fika -Hemma hos mig paper
Prima Flowers -TendrilsViolaceous 549077
Donna Salazar Mixd Media Inx - Berries, Mossy
Viva  Decor Inka Gold - Old Gold
Pan Pastels

FabScraps Milkshake Chic Collection -Elegant Garden


Here is a layout featuring the new Milkshake Chic collection from FabScraps.  It has a fascinating nostalgic theme to the paper with an elegant twist.

This collection also has the MOST magnificent die cuts.  They are garden trellis arches. Ohhh my so delicate.  I used them to create my elegant garden feel, along with my sweet niece to pose in the garden.

I gussied up my garden with some string pearls and lace.
Thanks for stopping by.  Stay tuned to FabScraps because in addition to Milkshake Chic and Baby Bear collections,  they are coming out with some crazy cool collections for CHA.    You can find peeks on Facebook.

Instructions
1.     Background  Paper Preparation:
2.     Start with two pages of FabScraps Milkshake Chic Collection –Bubblegum  C58002 – cut the checked border from one sheet and glue to the bottom left corner of the second sheet.
3.     Glue the die cut arches from FabScraps Milkshake Chic Collection –Pink Soda Milkshake MC58006 and Strawberry Milkshake MC58002 to the Bubblegum paper.
4.     Grab a stencil or mask and some white molding paste and add some stenciling to the page – starting from the top left corner down to the bottom right corner.  Leave a little of the arches showing.  They are far too pretty to completely hide.
5.     Add a thick layer of molding paste on the bottom of the arches.  Add string pearls and lace over the molding paste to dry.
6.     Glue a 3in piece of lace trim right under the graphic of the lady on the paper.  This will appear to be the ground for her feet.
7.     Photo Image Preparation:
8.     Cut an image from photo paper.
9.     Glue to the arches where the two arches meet.  
10.  Finishing Touches:
11.   Glue your choice of flowers to the bottom left corner and embellish as if it is a floral garden.
12.   Add floral berries and resin birdhouse.   

13.   Enjoy.

Supplies:
  • FabScraps Papers – Milkshake Chic Collection –Bubblegum  C58002 (12in x12in)  plus the checked border from a second sheet
  • FabScraps Papers – Milkshake Chic Collection – Pink Soda Milkshake MC58006 
  • FabScraps Papers – Milkshake Chic Collection –Strawberry Milkshake MC58002
  • Prima Poppies and Peonies Turkish Grunge
  • Prima Tatiana Collection - Coral Flowers
  • prima Scrapbook Jewelry - Blizzard
  • White Molding paste
  • lace and trim, string of pearl beads
flowers, floral berries, resin birdhouse 


Wednesday, June 26, 2013

FabScraps Baby Bear Collection - Gift From God

Gift From God
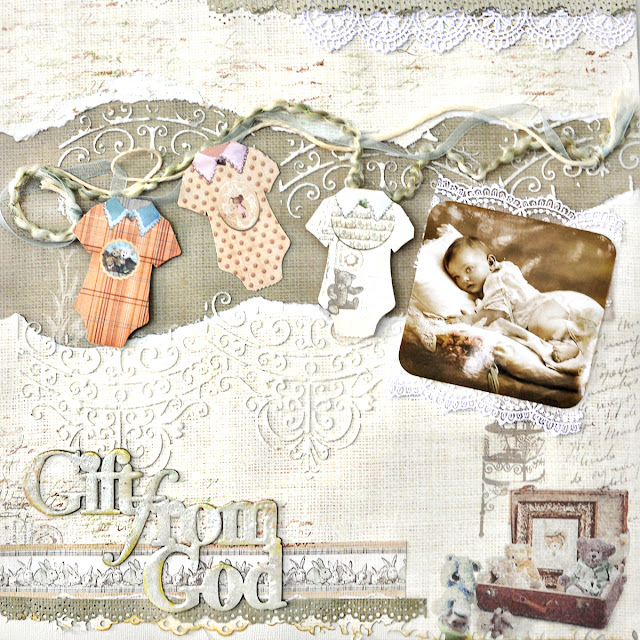
This is a layout using the wonderful new collection Baby Bear from FabScraps.  The papers remind me of vintage childhood photos with neutral tones and sweet teddy bears.  So I grabbed a vintage photo from Magic Moonlight Free Images - which offers free vintage images with no copyright restrictions.

Here is the chipboard I used from this FabScraps collection:

Gift from God chipboard DC57007
I painted the image first with gesso and let it dry.  Then I embossed it with Shimmerz Enamlez - Sparkaliscious and inked the edges with a warm olive ink - Donna Salazar's Mixd Media Inx in Mossy.
I used an oldie but goodie Prima mask - the Gate - 550042 and followed the curves of the ripped paper. 


Thanks for looking.  Visit the FabScraps facebook page here.  Visit the blog here to see the newest collections to be released soon.  


FabScraps – Baby Bear –Gift From God
Instructions
1.     Background  Paper Preparation:
2.     Start with FabScraps Baby Bear Collection –Bunny Bear 2 C57008  – punch the bottom edge  - about 9 inches wide starting at the left.
3.     Lightly ink the punched edge with olive green or a neutral tone, like light brown.
4.     Punch two 8in strips of FabScraps Baby Bear Collection –Bubble Bear 1 C57005 making two thin punched borders.  Glue one edge to the top of the Bunny Bear 2 paper starting at the right corner.  Glue the second punched edge to the bottom of the Bunny Bear 2 paper starting at the bottom left corner.
5.     Cut a decorative strip from FabScraps Baby Bear Collection –Journal Pre-Cuts MC57 001A.  Glue the strip to the bottom of the page so that it is touching the punched edge in step 4.
6.     Rip a 3 in strip of the Bunny Bear paper horizontally starting about two inches from the top.  Rip all the way across.  You can set aside the actual ripped section for the purposes of this project.  You will not need it.
7.     Reposition the two pieces onto the FabScraps Baby Bear Collection –Bubble Bear 1 C57005.  Like puzzle pieces with the center section missing.  You will see the green from the Bubble Bear paper showing through.
8.     Glue in place.
9.     Using a decorative mask/stencil and white molding paste, add some stenciling to the edges of the ripped Bunny Bear paper-stencil both the top and bottom of the rips.  Let dry.
10.   Photo Image Preparation:
11.   Glue lace to the top and bottom edges of the photo as a photo mat.
12.   Glue to the layout on the right hand side covering part of the ripped section.
13.   Chipboard Preparation:
14.   FabScraps Baby Bear –Gift From God chipboard DC57007 –coat chipboard words with white gesso and let dry.  Cover with embossing ink and generously pour white embossing powder on the chipboard.  Do not shake off the excess embossing powder.  Leave it thick.  Heat set.
15.   Use olive green ink to lightly ink the edges of the words. 
16.   Glue the chipboard to the page at the bottom left corner. 
17.  Finishing Touches:
18.   Loosely place some fibers onto the ripped section from side to side.  Let drape and twist and fall as it wants.  Glue in place.
19.   Select three diecut baby shirts from Baby Bear Collection – Journal Pre-Cuts MC57 001A.   Add dimensional dots or cardboard to the back of two shirts to lift them off the page and add dimension to the page. 
20.   Glue on top of the fibers as if they are hanging on a laundry line to dry. 
21.   Enjoy. 


Supplies:

  • FabScraps Papers – Baby Bear Collection –Bunny Bear 2 C57008 (12in x12in) 
  • FabScraps Papers – Baby Bear Collection – Bubble Bear 1 C57005 (12in x12in) 
  • FabScraps Papers – Baby Bear Collection –Gift from God chipboard DC57007
  • FabScraps Papers – Baby Bear Collection –Journal Pre-Cuts  MC57 001A
  • Inks – Donna Salazar Mixd Media Inx Mossy 
  • Martha Stewart edge punch - Doily Lace
  • Prima Gate mask 550042
  • White Molding paste
  • lace and trim
  • Fibers 14 inches long
  • Dimensional dots
  • Shimmerz Enamlez - Sparkaliscious / embossing ink and heat gun

Monday, June 24, 2013

Giggles - FabScraps


This is a layout I created for my cousin and her son.  He is such a little sweetie and cutie pie that  the FabScraps chippies were a must for a page about him. This features the Baby Bear Collection. 

Giggles are infectious with little kids.  Get one started and everyone is soon giggling.  So I wanted to add more giggles to my page.  I used the chipboard piece as a stamp to create more giggles.  keep reading and I'll tell ya what I did. 

First, I want to show off the products I used:
Bunny Bear 1 CS57 007
Story Bear 1 CS57 003
Story Bear 2 CS57 004


Giggles Die Cut chipboard DC57 006
Journal Tags Die cuts MC57 001A
Sweetie Pie Die Cut chipboard DC57 008
OK back to the giggles stamping technique.  I painted both sides of the chippie with Shimmerz Texturez in Artie Choked , a wonderful warm green.  While the paint was still wet, I dabbed some gold paint on the front and back.  I misted the back of the chipboard with water and used as a stamp - adding paint for the stamping as needed. 

At the bottom of this photo, you can see a darling little bear peaking from behind the paper tear. 


Thanks for  visiting.  Below is a quick tutorial of my process. Hope you enjoy FabScraps Baby Bear Collection as much as I do!

Instructions
1.     Background  Paper Preparation:
2.     Start with FabScraps Baby Bear Collection –Bunny Bear 1 C57007 – cut ¼ inches from each side of the paper and punch all the edges with a decorative punch.
3.     Make a small tear of paper at the top left side as well as bottom right  side.
4.     Glue Bunny Bear 1 paper to FabScraps Baby Bear Collection – Story Bear 2 C57004 (12in x12in)
5.     Select three die cuts from the FabScraps Baby Bear Collection – Journal tags MC57001A. Glue to the center of the page making three little decorative sections.
6.     Glue your photo to the page where you want it. 
7.     Find a small graphic from the FabScraps Baby Bear Collection – Journal tagsand glue under the tear at the bottom of the page.
8.     Glue a small piece of lace to the tear at the top of the page.
9.     Chipboard Preparation:
10.   FabScraps Baby Bear –Giggles chipboard DC57006 – paint  front and back of giggles chipboard with light green paint or color of choice.  While still wet, dab some gold acrylic paint on the chipboard on the front and the back,  dabbing here and there right over the green.  The two colors will mix.  That’s ok.
11.   While the chipboard is wet, mist some water onto the backside of the chipboard and use as a stamp on the paper.  You may need to add more paint and mist with each stamping – depending on how bold you want the stamping to appear.
12.   After chipboard dries, glue “Giggles”  to the page below the photo.
13.   FabScraps Baby Bear –Sweetie Pie chipboard DC57008 – paint the front side of the Sweetie Pie chipboard using the same technique – green and dabs of gold.  Let dry and then glue to paper – near the top left side of the page
14.  Finishing Touches
15.   Add some lace under the word Giggles.
16.   Accent with some flowers if desired.   
17.   Add some yellow mist to the left and right of the photo for a gentle pop of color.
Enjoy

Supplies:
Fabscraps Baby Bear Collection Bunny Bear 1 CS57 007
Fabscraps Baby Bear Collection Story Bear 1 CS57 003
Fabscraps Baby Bear Collection Story Bear 2 CS57 004
Fabscraps Baby Bear Collection Giggles Die Cut chipboard DC57 006
Fabscraps Baby Bear Collection  Sweetie Pie Die Cut chipboard DC57 008
Fabscraps Baby Bear Collection Journal Tags Die cuts MC57 001A ( Bubble Bear MC57004)
Fabscraps Baby Bear Collection Journal Tags Die cuts MC57 001A ( Story Bear2  MC57003)
Fabscraps Baby Bear Collection Journal Tags Die cuts MC57 001A ( Story Bear 1 MC57002)
Shimmerz Texturez Artie Choked Green
Adirondack Acrylic Paint - Gold
Martha Stewart edge punch Doily Lace

Friday, June 21, 2013

Sewing Room Shadowbox - FabScraps Milkshake Chic Collection


Here is a shadowbox type piece I created using the Milkshake Chic collection from FabScraps.  It's actually a canvas turned around to utilize the depth of the frame.

This collection has some wonderful nostalgic chipboard pieces to accompany the vintage flavor of the patterned papers.

I own two sewing machines that date back to the early 1900's.  When I saw the sewing machine chipboard piece, it inspired me to use some of the old sewing notions left behind by the original owners of the machines.  Both still have thread and thimbles and buttons.   It's time to put them to use.

Here are the products from the collection that were used in this shadowbox.

Milkshake Chic Collection Vanilla - CS58 007
Sewing Machine - DC58 010
Scissors, Needle, Spool - DC58 011
Spool - DC58 012

 Pre -Cuts Pastel Tape - MC58 001A


Here is a close up of the sewing machine chippie.  What a great design.  I covered this in Tim Holtz. Distressed Embossing powder - Vintage Photo.  The edges have a little gold Rub N Buff on them.


The scissor chippy is really cute too.  They look very real.  In fact, I showed this shadow box to my friend and told her that all of the notions came from my antique treadle sewing machine and she said she loved the rusty scissors.  heheheee

I wound some gold embroidery floss around the large spool chipboard piece.  There is a better photo below.


As you may suspect by this project, I had a ball with this collection.  I hope you do as well.

Supplies:
Milkshake  Chic Collection  Die Cut - Scissors, Needle, Spool - DC58 011
Milkshake  Chic Collection Die Cut Spool - DC58 012
Milkshake  Chic Collection Die Cut Sewing Machine - DC58 010
Milkshake  Chic Collection Vanilla - CS58 007
Milkshake  Chic Collection  Pre -Cuts Pastel Tape - MC58 001A
Tim Holtz Distress Stain : Vintage Photo
Tim Holtz Distress ink - Straw/ Vintage Photo
Rub N Buff - Gold Leaf
Clearsnap Mixd Media Inx - Butternut/ Vintage/Peaches

Thursday, June 20, 2013

Prima Design Team for 2013-2014


Ohhhhh my goodness. I am over the moon excited about being part of the Prima 2013-2014 Design Team.
It's a dream come true for that little girl who only wanted paper dolls for her birthday.  Guess I never got over that infatuation.

I never imagined I would have such an honor, so thanks a million Prima.

Here is the Design Team for 2013-2014


Flying Unicorns - Mixed Media Kit June


Flying Unicorns presents the Mid Month Muse for June- Mixed Media Inspired  
This kit is a compilation of all the essentials to make some cool projects - mists, florals, canvas, masks, metallic rubon, chipboard and more. 

I made two projects from my Mixed Media Kit this month, a banner and a mail holder.  First the banner, shown above. 

I prepared a SHORT video showing how I created this.  It's less then 4min and yes, my hands  fly super fast but I just want to give you the idea and the feel for what I am doing without all the pain of watching paint dry!  


I had some old doilies that I tucked into the corners.  


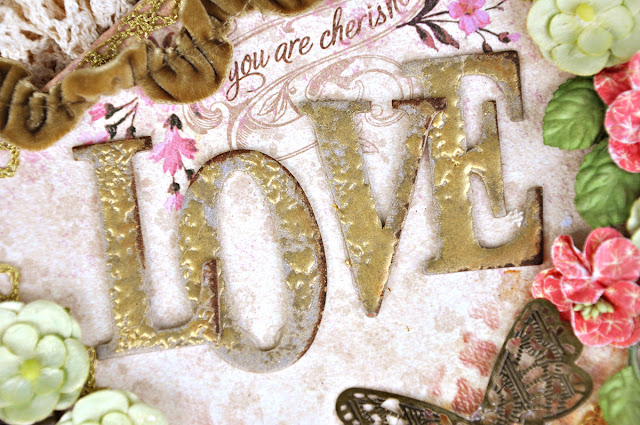
Here is a close up of my embossed letter with inked edges. 


Here is the gorgeous metal Adornment from the Flying Unicorns.   You can leave "as is" seen below for a vintage feel or you can paint, emboss, use alcohol inks and whatever your mind can envisions to finish the metal adornments.


Mail Holder
I created this with my husband in mind. He loves to stick things on the fridge and I prefer a clean fridge.   Well, if I can provide him some kind of compromise and a place to stick his bills, then we both win (only I win a little more hahahaaa).  

I created this mail holder. 


I stared out with the large 18in x27in canvas from the kit.  I cut a width of 12 inches and noted where my top was.  The top has a pocket for doweling or a rod for hanging. 

So I set out to use the large canvas in the kit and fold it so that to would form little pouches.  I punched holes where the folds met, and used a long decorative brad to hold the canvas in place.  You can sew the canvas on the side if you prefer, but I chose not to do that. 
 Here I embossed the letters with Stampendous Aged Ivory Embossing Enamel, inked the edges a little with  some Mixd Media Inx in Mossy, and dabbed with some brown ink.


My sweet little butterfly has a Prima Pearl in green.


 Thanks a million for stopping by.

Supplies Peace Love Joy Banner:
Flying Unicorns Mid Month Muse
Prima Flowers Millicent Doodle Deux  -555832 (two packages)
Flying Unicorns Metal Adornments
The Crafters Workshop (TCW) -6x6 Template - Mini Quartrefoil TCW381s
CraftT Products - Metallic Rub-ons
Canvas Corp -Burlap Flower CVS3308
Prima Flowers Avante White 566593
Lindy's Stamp Gang - Starburst Mist - Edelweiss Moss Green
Stampendous Aged Gold Embossing Enamel
Stampendous Big Boss Gloss - embossing ink roll-on
Canvas Corp Canvas Banner 18in x27in
Tim Holtz Vintage Photo Distress Ink
Misc doilies, lace and trims

Supplies Mail Holder:
Flying Unicorns Mid Month Muse
Flying Unicorns Metal Adornments
Prima E.line Pearl Crystals 300586
Prima Flowers Tangerine Tendrils 549138
Prima Flowers Bel Canto H 562168
Stampendous Aged Ivory Embossing Enamel
Canvas Corp Fringe CVS3311
The Crafters Workshop (TCW) -6x6 Template - Mini Quartrefoil TCW381s
Stephanie Barnard Sprays - Artichoke
Clearsnap Donna Salazar Mixd Media Inx - Mossy
Tim Holtz Vintage Photo Distress Ink
misc fibers and floral berries
misc brads