Showing posts with label spellblogger. Show all posts

Saturday, November 11, 2017

Pop-Up Christmas Ornament Swag Card - DIY Instructions


DIY - Unexpected Card using Unexpected Colors for Christmas

I love making cards that have a surprise inside - cards that are not JUST cards, but cards that deliver a smile and a little piece of me to those who open it. 

And Christmas is all about smiles, love and joy.  
So that's exactly what this card is all about.  It features
 some spectacular Spellbinders dies and stamps:

 and
Nothing beats a quick video to show the true impact of a pop-up card - the "cuteness factor".   
I used watercolor paper to create the ornaments. I wanted a thick heavy paper and had planned on coloring the dies with watercolor paints.  

When selecting paper for your project, keep in mind the mediums you will use for coloring.  Thin paper may not produce the best results. 

DIY Instructions for making the ornament swag

Step 1.  Create your ornaments by stamping, die cutting, then coloring your piece.  I find the process easier if I stamp first, then die cut.  
Step 2.  Make a small slit on each side of the ornament to help in the stringing process.  
Step 3.  Time to string the ornaments together.  I used gold jewelry thread and wrapped the thread around the top of each ornament.  A bit of tape also helps secure the tape and hold in place for the finishing step.  
Step 4.  Finishing touches - cut 3 dies from cardstock.  Glue the die to the backside of the ornaments.   This helps to secure the threads and cover up the messy backs. 

I glued the cardstock die cut off center a bit leaving a beveled edge look (notice the white edges peeking out from the pink cardstock.)
When you flip the swag over, it adds a nice accent of color.  
Step 5.  Time to glue the swag to the card.  I used the mini tree border stamp and die from the Spellbinders Happy Holiday Ornaments Holiday 2017 by Stephanie Low Stamp & Die Set   to help anchor the swag and hold the strings in place.  
Besides being adorable, they are totally functional in hiding the string.   

Make sure you allow enough thread so that when the card is opened it can hang nicely without being pulled too tight.   I used about 18 inches of jewelry thread for this swag. 

Front of the Card
I am going to transition to the front of the card. 
I backed the ornament with foam tape to add dimension.  From there, I was able to build my embellishment cluster under and around the ornament using more gold jewelry thread, 
floral berries, sequins, AND some Spellbinders leaf dies. 

The main embellishments in my cluster are diecut leaf vines from Spellbinders,  Spellbinders Shapeabilities Layered Leaf Vines - Timeless Heart Collection by Marissa Job .   

Some of the leaves were cut from watercolor paper and some from green cardstock.  Those leaves from watercolor paper have a bit of accenting added to the tips of the leaves using distress inks (Ranger Tim Holtz Distress Ink in Festive Berries and  Crushed Olive  applied with  Finger Tip Sponge Daubers


Thanks for stopping here.  I value your time.  

You can shop for all your Spellbinders dies here.   They have amazing sales and frequently have BOGO (buy one -get one) sales too!  

Products Used:
Shapeabilities Tallulah Frill Layering Frame - Chantilly Paper Lace Collection by Becca Feeken -S5-328
Spellbinders Happy Holiday Ornaments Holiday 2017 by Stephanie Low Stamp & Die Set  SDS-090
Spellbinders Shapeabilities Layered Leaf Vines - Timeless Heart Collection by Marissa Job -S4-795
Ranger Tim Holtz Distress Ink - Festive Berries
Ranger Tim Holtz Distress Ink - Crushed Olive
Sponge Daubers - Finger Tip

Friday, August 18, 2017

Beautifully Shaped Cards Using Dies - DIY Tutorial


Tired of your basic rectangular card shape?  Looking for a change? Need a unique card for someone extra special?  If so, then this is the perfect place to stop for a super simple card making  DIY tutorial. 

  I'm really bored of making rectangle or square cards.  I need to change things up and add shape to my cardmaking life.  
  I have some incredible Spellbinders dies and head turning paper from Maja Design that will help make this project perfect. 

Along with my DIY tutorial, I also have a give-away opportunity to win the new Maja Design paper collection.   Keep on reading to see both the tutorial and to see how to enter the drawing. 
First up - a little about the products I selected. 
I'm using the  Maja Design - Denim & Friends paper collection  along with a Spellbinders die, Spellbinders Designer Series -Venise Lace Victoriana Crest by Becca Feeken, as my inspiration.  


I've already shared an image of the paper collection.  This is the gorgeous die I used for the card.  Yep go ahead and add it to your "wish list".  


Here Are My Instructions: 
Step 1. Using a 12x12 sheet from Maja Design - Denim & Friends, grab a die that will make a nice card shape. I chose a die that was quite large to make a sizable card.   My paper choice is Jeans & T-Shirt from Denim & Friends, and the die is Spellbinders Designer Series -Venise Lace Victoriana Crest by Becca Feeken .

First, decide how much paper you need and where to cut your paper.   Your paper must be wide enough to fold - meaning you will be die cutting two layers at the same time.   Leave enough width to the right on your paper.  

Place the die on the paper and draw a line to mark how long the die is and where you need to cut and where you will fold.  This step is important. 

Step 2. After cutting the length of paper to fit the die shape, fold the paper.  The die needs to hang over the edge of the paper fold slightly in order to create a card that will open without falling apart into two sections.     Once your die is in place, secure with tape and run the folded paper/die through your die cutter.
Step 3. When you open your card, it should be connected at the fold.  If it is,  Great job!  If it falls apart into two pieces, it just means you probably did not let the die hang over the edge of the fold quite enough.  Just try again and move the die over a bit more.

Handy suggestion...try this technique first on a yucky sheet of paper and not your gorgeous Maja Design papers.

Step 4. The image below is what you should have if the die cutting has been successful.  

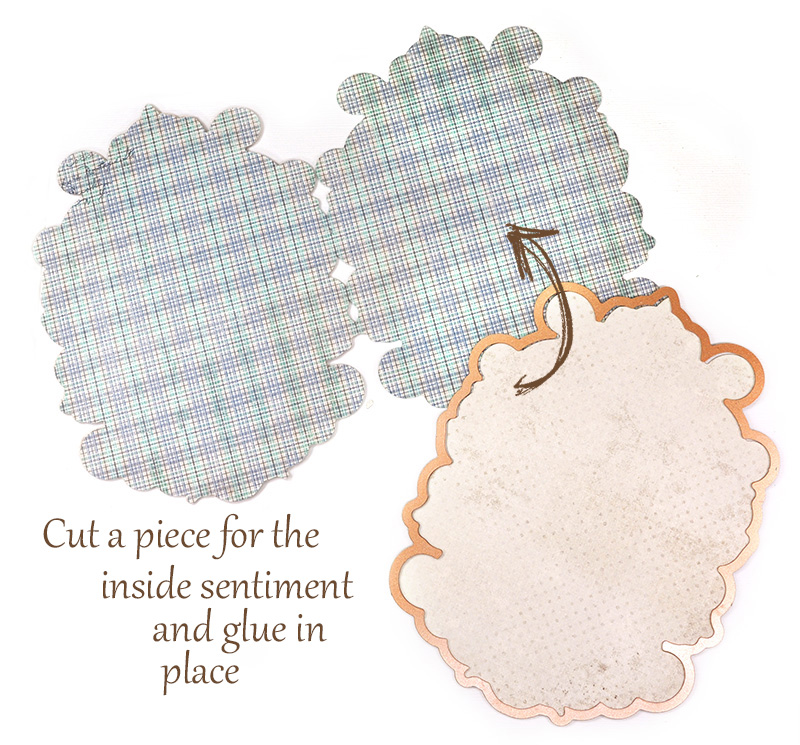
Step 5. When I opened the card, there was too much pattern for writing a sentiment.  I cut a separate die to glue on the inside. 


Step 6.       Decorate as desired.  I added another die cut from Spellbinders Designer Series -Venise Lace Victoriana Crest by Becca Feeken .to the center of my piece using foam dots (cardboard, foam tape) for dimension as you can see in the image below. 

To finish off the piece, I used pearl adhesives, a simple ribbon and some  coordinated Petaloo flowers. Petaloo by Floracraft : Darjeeling collection flowers Mini Garden Rosettes in Blue
These are paper flowers from Petaloo by Floracraft -Petaloo by Floracraft : Darjeeling collection flowers Mini Garden Rosettes in Blue .  You can shop for them right here or shop for them here.  

And that's all there is to creating a unique and graceful card that is NOT traditionally shaped.  Ahhhhh makes my heart happy and my creative spirit dance. 

Time to Explain the Giveaway
Would you like to win a set of your very own Denim & Friends paper from Maja Design?  All you have to do is leave a comment on this blog page.  This raffle is open for the month of August and I'll pick a winner on Sept 1st.  

You can earn additional chances to win by: 
- Checking out my other projects on the blog, created using Denim & Friends.  You can find them right here
 - comment as often as you wish for more chances to win
-share my blog post to your FaceBook page
- visit my Facebook page and leave a comment.

Good luck!
Thanks for your time today.  I value your visit. 

 You can shop for Maja Design products here
You can shop for all your Spellbinders dies here.   They have amazing sales and frequently have BOGO (buy one -get one)sales too!  

I  love being part of the Spellblogger Team.  
If you would like to be a Spellblogger, check out the details here: 


Products:
Maja Design  - Denim & Friends paper collection  - Jeans & T-Shirt, Fashion, Sneakers
Spellbinders Designer Series -Venise Lace Victoriana Crest by Becca Feeken S6-125
Petaloo by Floracraft : Darjeeling collection flowers Mini Garden Rosettes in Blue 1492103
Petaloo by Floracraft - Darjeeling collection flowers Mini Garden Rosettes in Blue 1492103
Petaloo by Floracraft flowers - Darjeeling collection - Teastained Dahlias in Cream 1467-105

Saturday, August 5, 2017

The Denim Blues- with Maja Design Papers and Spellbinders Dies

I've got the Blues...
( keep on reading for a chance to win the new paper collection from Maja Design Denim & Friends paper collection) 

I'm in a blue mood.  
Yep, I've got the denim blues.  In this case, the blues are great to have especially when they involve the newest paper collection from Maja Design and the newest die release from Spellbinders.  It's enough to chase the blues away from anyone, but in this case I'm loving my blue mood.  

Can I talk about my blue mood?  
It's caused by a new collection from  Maja Design called, Denim & Friends and the coordinating set of solids called Maja Design - Monochrome Collection  Shades of Denim & Friends .   Gorgeous rich blue color ranges guaranteed to make anyone smile.  
( keep on reading for a chance to win the new paper collection from Maja Design Denim & Friends paper collection) 
 
 The next big smile maker comes from pairing pretty papers with fabulous dies. 

This gorgeous paper collection has been accentuated by using some dies from Spellbinders, shown below.  Two  products that need to be at the top of your "must haves" list.


I wanted a graceful delicate card for an upcoming wedding.  The color palette for this wedding is  teal/seafoam so I picked out the perfectly matched papers and went to work creating from my heart.  
These are the paper choices:
 Maja Design Denim & Friends -Jeans & T-Shirt 

A little bit about the beautiful flower embellishments I selected.  
These are paper flowers from Petaloo by Floracraft - the  Petaloo Flowers - Penny Lane Collection Forget - Me- Nots in Teal.  
You can shop for Petaloo flowers here and here.  


I absolutely love the color combinations in this collection.   The next few photos are close ups and you can see how gorgeous the paper is.  


Win a Denim & Friends Paper Collection
Would you like to win a set of your very own Denim & Friends paper from Maja Design?  All you have to do is leave a comment on this blog page.  This raffle is open for the month of August and I'll pick a winner on Sept 1st.  

You can earn additional chances to win by: 
 - comment as often as you wish for more chances to win
-share my blog post to your FaceBook page
- visit my Facebook page and leave a comment.


Thanks for your time today.  I value your visit. 

 You can shop for Maja Design products here and you can  find the collection here
You can shop for all your Spellbinders dies here.   They have amazing sales and frequently have BOGO (buy one -get one)sales too!  

I  love being part of the Spellblogger Team.  
If you would like to be a Spellblogger, check out the details here: 


Products Used:
Maja Design called, Denim & Friends Jeans & T-Shirt, Blue Jeans, Summer Shirt
Spellbinders Nestabilities Iron Romance Die S5-285
Spellbinders Die D-Lites Iron Romance Accents Dies S3-253
Petaloo Flowers - Penny Lane Collection Forget - Me- Nots in Teal
Shop for Petaloo Flowers here and here

Thursday, July 13, 2017

Denim Papers and Fun Border Dies


It's Spellblogger time and the perfect opportunity to showcase some spectacular products that go perfectly together; beautiful new papers by Maja Design and fun dramatic new dies from Spellbinders.  

I created my card with new scrumptious papers from Maja Design called, Denim & Friends and the coordinating set of solids called Maja Design - Monochrome Collection  Shades of Denim & Friends The dark blue denim has some amazing rich brown accents.  


The gorgeous border work is from Spellbinders ...Spellbinders Shapabilities - Swirled Strip Etched Die .  Very cool - I'm in love. 

I also used the Spellbinders Shapabilities - Heirloom Oval  die for the centerpiece medallion under the floral cluster.  That's a darling die as well. 


The papers I used on this card are:
 "Dark Blue " from the Monochrome Shades of Denim" 12x12 collection and  "Paisley" from "Denim & Friends".

Shopping Details
The new Maja Design paper collection is available from the stores in the Store Finder link found here.  

You can shop for all the gorgeous "must have" Spellbinders dies right here.  Shop for Spellbinders  ( make sure to grab the
Spellbinders Shapabilities - Swirled Strip Etched Die  because you'll just adore it.) 

Here is a photo of the finished piece.


Thanks for your time today.  I value your visit.  If you would like to be a Spellblogger, check out the details here: 


Products Used:

Wednesday, July 12, 2017

DIY Denim Pocket Card with Easy Instructions


Coolest DIY Denim Ever Created with Spellbinders and Maja Design

Denim is in.  It's trendy, it's chic and now it's available in the form of beautiful papers by Maja Design.  It also looks darn adorable with die cuts from Spellbinders.  

I created an adorable pocket card to fit a tag or gift card with my two featured products from Spellbinders and Maja Design. 

If you scroll down the page, I have DIY instructions to show you how I crafted the pocket. 

I created my card with new scrumptious papers from Maja Design called, Denim & Friends and the coordinating set of solids called Maja Design - Monochrome Collection  Shades of Denim & Friends  .  This collection has something for everyone; masculine, feminine, playful, fun.  PLUS their new solid monochrome collection designed to accompany the Denim & Friends collection perfectly.

The monochrome papers do not have patterns but they have added richness in the design making them unlike solid cardstock.  

Introducing

These are the papers I used from the collection: 
(Stonewashed, Summershirt, Jeans & Tie, Paisley)
My DIY card is a sweet play on the denim theme - a pocket card with a frilly twist because jeans look great with lace.  Perfect for a gift card or tag.  Plus some DIY tips to show you how I made my easy pocket card. 

The pocket was made using this die from Spellbinders: (little side note:  I adore this die set and tend to grab this for many of my cards because of the classically clean lines and versatile shapes)

I  opted for crafting a coordinating tag for the card because I am obsessed with the "medallion" die that comes with the set. 

Here is a close up of the card with the tag tucked into the pocket.  


DIY Steps to Make a Pocket Card

Step 1.   Using the Spellbinders Card Creator Dies -A2 Divine Eloquence , cut the border frame.  Next add doodled stitches using a black fine tip pen. 


Step 2.  I used a die from Spellbinders (Spellbinders Card Creator Dies A2 Divine Eloquence)  and cut about 1/3 of the way down the die to create the base of my pocket.  
Step 3. After cutting the die to size, I backed the die cut with a piece of a piece of white cardstock for extra support and trimmed the white cardstock, leaving a small white edge around the die shape. 

The cardstock also helped accentuate the beautiful details of the delicate die and make them pop a bit more on the pocket.  I made sure the white cardstock was a bit longer at the top as well so I could add some embellishments as shown below in Step 4.

Step 4.  After backing with white cardstock in Step 3, I decorated the pocket by adding more doodled stitching, some lace trim and coordinating patterned paper from the new  Denim & Friends 12x12 collection.  

Step 5.   Making the Tag - I made a quick double sided tag using Spellbinders Card Creator Dies A2 Divine Eloquence .  
a.   Cut 2 dies.  
b.  Back both the die cuts with white cardstock.
c.  Glue some thin ribbon to the white side of one die (to use as a pull tab)
d.  Glue the dies together
e. Trim the cardstock to fit ( I left a thin white edge). 

Note:  I did add a piece of thin ribbon between the two dies before gluing the two died together.  By adding the ribbon before gluing, it helps make the tag look clean and polished.  

Step 6.   I wanted to pop the pocket off the page a bit with some foam tape so make the tag or a gift card tuck easily into the pocket.
  
In order to make sure my tag fit into the pocket, I flipped the pocket over and used the tag/die as a template to determine where I needed to place the foam so that the tag doesn't fall deep into the pocket.


Here is a photo of the finished piece.


Thanks for your time today.  I value your visit.  If you would like to be a Spellblogger, check out the details here: 

Shopping Details
The new Maja Design paper collection is shipping NOW! You can buy the papers from your favorite stores located in the Store Finder link here.  

You can shop for all the gorgeous "must have" Spellbinders dies right here.  Shop for Spellbinders 


Products Used:
Maja Design called, Denim & Friends (Stonewashed, Summershirt, Jeans & Tie, Paisley)
White cardstock
Gingham ribbon
thin black pen
lace 
blue gems