Showing posts with label sea horse. Show all posts

Thursday, May 28, 2020

Cards from the Sea - Sand Dollar Shakers and Sea Horses


Hello crafty friends.  Today I am sharing cards from the sea featuring some of Creative Embellishments beautiful coastal  and popular steampunk designs.    

 Have you seen CE's giant selection of shakers ?  They are captivating, fun and easy to make.  
******************************************************************************** 
*********************************************************************************
 I love the sea and feel most peaceful when I can visit (which isn't nearly enough). I left my cards simple with the chipboard as the main focal point to capture peaceful images and help ease anxious minds.

These cards are also reminders that you don't need to use fancy treatments on the chipboard.  The Creative Embellishments - Steampunk Seahorse has been inked darker using brown vintage ink.  
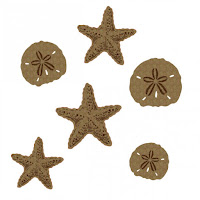
The sand dollar had been sponge dabbed with white paint. Simple. 


The paper used on this card is from Graphic 45's - Ocean Blue Collection.  Graphic 45's rich and robust colors and imagery are so striking in this collection.   
   
 Graphic 45 - Ocean Blue Collection - 8 x 8 Paper Pad


The Shaker Mix
The magic to any shaker is the shaker mix.  A fabulous shaker needs great mix which is why I love mixes from Buttons Galore
They have so many colors, options and choices loaded with traditional sequins, uniquely shaped sequins, beads, buttons, gems, crystals, and more.   

The shaker mix on the sand dollar card is  Buttons Galore - Shimmerz Splash  and the sequin mix accents on the seahorse card were created using Buttons Galore  Blues Mix - a blend of beads, and various sequins.   
*********************************************************************************
                    Patriotic Slider Pop-up Card
 
           stocking count
            Buttons Galore  Blues Mix

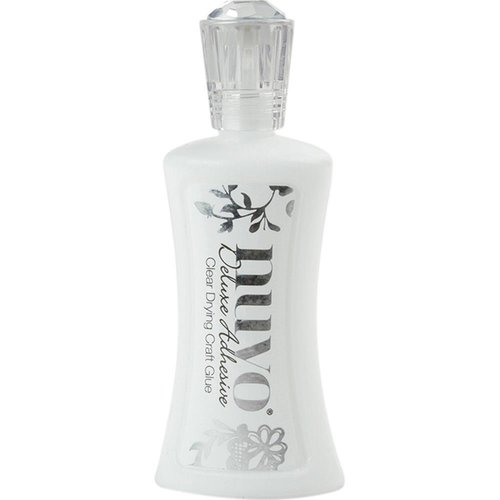
My new favorite glue for assembling chipboard shaker cards is  Nuvo - Deluxe Adhesive because you can add the thinnest line of glue to each chipboard piece when building the walls of the shaker.  It's not runny or drippy and dries super clear.  I also don't have to panic if I have a little glue on the acrylic window.  Since it's crystal clear there is no worries.   

*********************************************************************************
Nuvo - Deluxe Adhesive


Thanks for visiting.  Have a great start to your summer. 


Shop Here:
******************************************************************************** 
*********************************************************************************

Nuvo - Deluxe Adhesive
Patriotic Slider Pop-up Card
 Buttons Galore - Shimmerz Splash Z109
stocking count
*********************************************************************************


Sunday, July 21, 2019

How to Create a Beach Themed Shadow Box for Shells - with Creative Embellishments and Buttons Galore


Turn an average shadow box into a treasured memory keeping Shaker Shadow Box


I love the beach.   It's a peaceful place for me and a theme I use in my crafting quite often. 
Creative Embellishments has the most wonderful chipboard designs for beach and sea related projects. 

I bought an inexpensive wooden shadow box and thought I would alter it and make my own personal beach.    I have a "before" image below. 

I grabbed a few of my favorite pieces from Creative Embellishments beach  designs and lightly dabbed them with acrylic paint.  

*********************************************************************************
Creative Embellishments Seahorse
Creative Embellishments Starfish and Sand DollarsCreative Embellishments  -Starfish and Sand Dollars
Creative Embellishments Beach Words Set3

 *********************************************************************************

This piece of home decor has a bit of a twist because  I turned it into a shaker to hold sequin shaker mix, but to also hold some of the tiny shells found on the Caribbean Islands from a recent cruise vacation. 

The shaker mix is from 28 Lilac Lane /Buttons Galore and More's sequins and Beads collection.
28 Lilac Lane Sequin  and Bead Mix - Aqua Dreams


The outside edge of the box was covered with some rope to hide the edges of the  acrylic shaker window.  Sometimes you have to get crafty to hide the rough edges.  
Thanks for stopping.  


Shop Here:
*********************************************************************************
Creative Embellishments Seahorse
Creative Embellishments Starfish and Sand DollarsCreative Embellishments  -Starfish and Sand Dollars
Creative Embellishments Beach Words Set3

 *********************************************************************************

Creative Embellishments Shaker Sets

Tuesday, March 8, 2016

Sea Creature Canvases with Flying Unicorns


I'm here today to share my project made using the Flying Unicorn March Your Passion Your Art kit. 
I adore the sea.  I love the peace I feel from the sea.  The Studio75, Lavender Morning  papers from March's Flying Unicorn kit made me think of the sea thus I created a set of 6x6 panels with sea creatures. 

These may look difficult at first glance, but they are just paper piecings and nothing more.
I found free black and white clip art from Clip Art Panda that I thought would be fun, simple enough to use and also provide me with decent mosaic results.  You can try your hand at drawing your favorite creature. I am no good at drawing.  I opted for the cowards way out.  

The seahorse and sea turtle were perfect mosaic candidates - the crab not as much, but I still love it.   Here are the clip art links:


How I made these canvases
I'd like to share my process.  This will show you just how easy and do-able this can be.  Learning how seems to take the intimidation away - which is good.  Intimidation doesn't lend itself to creativity. 

Step 1.  Each canvas is 6x6.  I wanted to stay focused and not add a lot of confusing embellishments and distracting textures.   While  canvas boards usually come pre-treated, I like to add some extra clear gesso to protect myself from...well....from myself.   I fear my heavy hand when I am misting.  Clear gesso allows me the ability to remove mists from the panel if I want as a sort of "do-over".  I admit I need that "do-over " most often.  

I chose Prima Color Blooms in Glistening Waves and Summer Sky.  


Step 2.  I found some sweet little black and white clip art designs and printed out at least three copies of each design.  One will be used as a background template and the other tow will be used as patterns for paper piecing. 

Step 3.  One image will be used as the background template for the canvas.  I inked that with Distress Ink in Peacock Feathers. Why?  Because I am creating a mosaic and will not stress when  the cut shapes do not fit perfectly.  It will still all match and look wonderful with the teal peacock Feather color as the base.  

Step 4.  Time to start the background.  I ripped some thin strips of paper from Studio75 Lavender collection - inked the edges with black and applied them to the canvas with Clear matte Gel Medium.  This gel medium acts as a nice adhesive.  

Step 5. I cut a small piece of cheesecloth and misted it with the mists.  I did heat set it with the heat gun to  move the process along.  I glued little pieces of the cheesecloth to each of the canvas.  


Step 6.  Add the clip art image to the canvas using more soft matte gel medium.  To do this, paint some gel medium onto the canvas, add the image, then coat the image with more gel medium.

Step 7.  Use the remaining clip art images to cut paper pieces and adhere to the canvas with matte gel medium. Before placing on the canvas, I did ink the edges with both black and Distress ink in Vintage Photo. 
Step 8. When the mosaic process is complete, I touched up the image with a little gold paint for definition.
Step 9.  I added a few accents to the canvas with the stamp that came in the March kit - the wonderful Prima Salvage District Stamp.  I did not do a lot of stamping - I added some to the turtle and a few small sections to the canvas.

Step 10.  Add micro beads.  Apply a generous amount of Soft Matte Gel Medium to the canvas and sprinkle the beads on. If you use a generous amount of gel medium, they will stick nicely.   
Here are the close ups of the final canvases


Supplies Used:
Flying Unicorn March Kit of the Month Your Passion Your Art
Studio75 6x6 paper collection - Lavender Morning
Prima Color Bloom Mists - Summer Sky 573867
Prima Color Bloom Mists - Glistening Waves 573942
Prima Art Basics Finnabair - Soft Matte Gel 961428
Cheesecloth
Prima Salvage District Stamp 584726
Gold Paint
Black Ink
6x6 Canvas Panels
 

Tim Holtz  Distress Ink - Peacock Feathers , Vintage Photo, Black Soot
Micro BeadsCheesecloth