Showing posts with label altered. Show all posts

Monday, September 12, 2016

Flying Unicorns Skeletons in the Closet = Spooky Altered Home Decor -with Instructions


Skeletons in the Closet ( Skelly in the Closet)
Flying Unicorns Going "Off the Page" with Spooky Altered Home Decor 

This was created using the "OTP" from the Flying Unicorn September Kit of the Month - Your Passion Your Art.  I thought I'd play off that age-old idiom of having "skeletons in your closet" - meaning a shocking or hidden secret from your past.  I'm turning this  idiom into an actual closet for my darling skeleton doll.    

Let me back up a bit.  What the heck is "OTP"?   Often I toss around terms not even thinking of the folks who have no idea what I am talking about. I apologize.  "OTP" means "off the page" - or in other words, not a scrapbook page, but an altered piece of home decor.  

Every month, each and every kit comes with an OTP project that you can alter and decorate anyway you choose.  The options are limitless.  The OTP items vary from month to month.  September's project was a wooden hinged box from Darice.  It measures 7.9x2.2x1.6 inches - perfect for something like a necklace/bracelet box or jewelry box.   
 I chose to make it into a small closet for my newest doll stamp by Prima and Julie Nutting...meet Skelly.  

Here's how I made the wooden box:  

Step 1.  I painted the box black.  I had some black gesso with a matte finish available so that is what I used.  And it is true...I have the world's yuckiest paint brushes because I do not take care of them.  ( Husband and I are painting a room in our house today and my husband is in for a wild-eyed awakening if he is relying on me to actually clean the paint brushes. Ahhh but back to crafting....)


Step 2.  I added some gold accents to my box using the  Prima Art Alchemy Acrylic Paint that  came in last month's kit.  It's always great to find ways to use the supplies from prior kits.    I didn't add a lot, but enough to give some interest.  
Step 3.  In order to gussy up the wooden box, I pulled out the Prima IOD moulds and the IOD paper clay.  After I removed the paper clay from the moulds, I set the paper clay moulds on top of the wooden box to dry because the wooden box had a curved dome-like shape and I needed the moulds to conform to the box.   They need to dry overnight before proceeding.  

Step 4. The photo below shows the steps needed to finish the moulds.  Paint with purple (Prima Art Alchemy Dark Velvet),  add some gold accents ( Prima Art Alchemy Ancient Coin Gold), and top with a few sprays of gold mist ( Prima Color Bloom Mist in Antique Gold).   

Why bother with step 3 - mist with an antique gold color?  Because the mist soaks into the crevices on the moulds to enhance the details of the moulds.  It also adds some beautiful golden sheen to the finished project.


Step 5.  Add ribbons, flowers and embellishments.  Note - I used a super strong glue to adhere my moulds and embellishments.  My glue of choice is Beacons 3 in 1 glue because it holds darn near anything in place quickly - wood, metal, fabric, plastic, foam, clay, ceramic.  Plus it dries clear and without a shiny gloss finish.    I even touched up my flower with some gold paint for a nice blended look. 


Here's how I made the dimensional doll:  

Step 1.  Cut two Skelly dolls - from Prima and Julie Nutting.   

Step 2.  One doll will be decorated and the second doll will be used for the backside as support.  

Ink the edges of both dolls with black ink for shading and blending.   It's very important to make sure you ink the edges of the doll that will be used as the bottom layer.  You do not want any white edges peeking out when the doll is finished.   Once the doll is glued together, it's nearly impossible to add ink to the inside edges to cover up white.  The extra steps and care taken ahead of time will make the finished product so much more appealing.  

Select the doll that will be on the backside and flip her over.  Cut some small pieces from a wood skewer and glue to the doll. Wood toothpicks will add support as well, however I always have wood skewers on my craft table so that is usually my go-to supply.  

Make sure you add wood supports to all areas that may bend - like the legs, neck, arms.  


Step 3.  Color the doll as desired.   Add small black pearls to the eyes and shirt as buttons.  Create a statement hairbow or couture fascinator headpiece with some black cheesecloth,tulle, ribbon and a decorative brad.  Skelly likes dramatic headpieces.  I do too!

Special tip:  I bought my creepy black cheesecloth at the dollar store in the halloween decorations section.  Don't have a dollar store near you?  Grab some ordinary white cheese cloth that can be purchased anywhere....hardware stores in the paint department, grocery stores in the baking area, and on-line.  Pop your cheesecloth in a small plastic bag and mist with black mist or use black ink to transform and dye.  


Step 4.  Add layers to Skelly's skirt, along with some additional creepy black cheesecloth, and she's all done.  Paper Used on Skelly:  My Mind's Eye -Lost & Found Paper 6x6 Sunshine collection LF2104


 Here's the completed look.  Skelly's ready to take a stroll about town and turn some heads in her new scary couture outfit.  
Here are the rest of the photos:
I decorated the rest of the closet box using a variety of Prima supplies from Frank Garcia's Memory Hardware collection.   The complete list of products can be found at the end of this post.  Note the pretty little Prima mould clock on the left side.  


Want Skelly to come live at your house?  
This darling spooky box and Skelly doll are available in my ETSY shop.  Grab her while she is available!


Did you miss out this month? 
If you missed out on the Flying Unicorn kit for Sept., you may want to think about taking advantage of the pre-order option available on the 20th of every month.   The beauty of this option is that you get to preview all the goodies in the kit and decide if it is something you will like...and of course it will be!  You can find all the details here and never miss a kit that you want.  


Product List:
Flying Unicorn September Kit of the Month - Your Passion Your Art
Prima Julie Nutting Doll Stamp - Skelly 911621
Darice wooden box - measures 7.9x2.2x1.6 inches
Prima Art Alchemy Metallique Dark Velvet Acrylic Paint - 963125
Prima Art Alchemy Metallique Ancient Coin Gold Acrylic Paint -963057
Prima Color Bloom Mist in Antique Gold-573843
Prima Frank Garcia Memory Hardware - Pearls 990381
Prima Frank Garcia Memory Hardware -Montpellier Apothecary Vial Labels 991098
Prima Frank Garcia Memory Hardware -Montpellier Apothecary Vials 990619
Prima Frank Garcia Memory Hardware -La Rochelle Antique Trinkets 990725
Prima Frank Garcia Memory Hardware -Strasbourg Gold Trinkets -991142
Prima Frank Garcia Memory Hardware Chains - Antique 990633
Prima Frank Garcia Memory Hardware Vintage Trinkets -991135
Prima Mechanicals Stars-936654
Prima IOD Moulds - Vintage Art Decor Mould - Baroque 6 -814823
Prima IOD Moulds -Vintage Art Decor Mould - Baroque 4- 814809
Prima IOD Paper Clay - 814991
Black Matte Gesso
Black Cheesecloth
Tim Holtz Distress Ink - Black Soot, Crushed Olive,  Mowed Grass
Decorative Brads
Black Pearls
Flowers

Monday, May 2, 2016

Watering Can and Card Gift Set - Maja design

Maja Design May Mood Board.  

The May Mood Board at Maja Design is now posted on the blog.  You can find the details all right here.  The Mood Boards are meant to  inspire in a number of ways; from the color palette , from the images provided, and from the quote and words.  
You do not need to use them all in your creation.  You can create anything you choose.

Click here to play along.  Entries due May 26th and should be emailed  here moodboard@majadesign.nu

  I took my inspiration from the image of the watering can and used the watering can I had saved on a shelf in my basement.  Not terribly original, but still tons of fun to create.  

 You can find this Watering can set  here in my ETSY shop along with other items in my ETSY shop .

I created a matching card as well.  I thought it would make a great gift set.  


This is the watering can before and after I altered it.  


These are the papers I chose from the collection: 

Time for Reflection (B side)
Flourishing  (A side)
Tags &  Journaling Cards ( A and B side)

Here are a few more close ups of the projects: 


Thanks for stopping by. You can find this set and other items in the ETSY shop.   


Time for Reflection (B side)
Flourishing  (A side)
Tags &  Journaling Cards ( A and B side)
Prima Flowers - Royal Menagerie - Maude 583361
Prima Soprano flowers - Purple 561697
Petaloo - Burlap Blossoms Ivory   pl-1650-003
gold trim
Lace
hemp twine

Monday, March 14, 2016

DIY Faux Wood Photo Frame - With Prima, Frank Garcia and the Flying Unicorns


DIY Faux Wood Photo Frame -  Flying Unicorns and Prima's French Riviera by Frank Garcia

I'd like to share my Off The Page project for the Flying Unicorns March kit.  I'd also like to share my process further on down the page.  I've been in a sharing mood lately.  I feel that sometimes projects look complex and confusing - but when broken down, they just become one big "ahhhhhaaaa" moment. 

I love anything beachy, sea shorey, sandy and oceany - yeah I know those are not words but the real word for that is way to fancy.   Thalassophile   - means preference, fondness of the sea.  I prefer my words better.  At least I can pronounce my made up words.

I hope that someday I can fulfill my dream of living by the ocean along with my husband and cats, but till then, I'll keep making beachy, sea shorey, sandy and  oceany things. 

Prima's French Riviera, designed by Frank Garcia, made my job so easy.  It's gorgeous, warm, and peaceful looking -with that sandy weather worn feel. That's exactly the look I wanted to achieve with my Darice photo frame.  

Here is a close up of the faux wood frame.  If you scroll down, I'll share how I made it. 


This photo frame by Darice was included in the March, Your Passion Your Art from the Flying Unicorns.  The frame is not flat.  It has rounded sides.  The trick to the frame is to work with the rounded frame sides and create something that is durable.  For this reason I do not use hot glue.  Hot glue simply does not stand the test of time.  And by that, I even mean a year.  It starts breaking down and your beautiful embellishments could fall apart.  Well, that just isn't good. 

Think about getting a bottle of good strong glue that dries clear.  There are many brands.  My favorite is Beacon's 3-in-1.  It's clear, fast, durable and adheres darn near anything TO anything. 

Step 1.  I started with this sheet of Prima French Riviera paper Journees De Reves et Aventures 990787.  I cut 4 strips from the paper for each of my sides..  These 4 pieces look weather worn and sand beaten.   


Step 2. I used Prima's Soft Matte Gel Medium to adhere the paper to the frame.  Brush the gel medium directly onto the paper mache frame, and some on the strip of paper.  Place the strip onto the frame and brush a coat of gel medium over it making sure there are no air pockets, ripples and bubbles.  You can use a brayer as well to flatten out and remove bubbles.  

After all the sides are covered in gel medium, let dry.  The gel medium will seal the paper and make it durable, as well as protect the frame from fingerprints, stains and messes. 


Step 3. This is where my beloved Beacon's 3-in-1 glue comes into play and is important.  I am adhering thick jute to the sides of the frame.  I really would like my jute to grab and hold for me.  I have no patience for wrestling with trims, jute and cording to make them stay on projects.  They get one chance to behave for me or they get the boot. 
Step 4. I want to add some blue and sea glass colors to the projects so I decided to make my own perfectly colored embellishment.  I misted a small piece of cheesecloth and heat dried it with my heat gun.  The heat really stiffens up the cheesecloth.  I used Prima's Color Blooms in Glistening Waves and Summer Sky. 

Step 5.   Adhere little snips of the cheesecloth to the frame. 


Step 6.  Cut some images from the French Riviera paper.  Adhere to the project.  If I am placing an image onto the frame, then I will use the gel medium. Slather some gel medium onto the frame, some gel onto the image, then cover it with gel medium to smooth out.   The next few photos show the embellishments. 

I added some cardboard to the back of this to make it more dimensional.  The shell came back from Florida in my suitcase.    

This starfish image was adhered using gel medium.  


Step 7. Last step before all the final embellishments are added.  I  painted some watered-down white acrylic paint here and there onto the frame, embellishments, and jute.  


The final embellishments can be anything - shells, flowers, floral berries, sea glass, die cuts, drift wood...whatever you desire.   I added flowers from the French Riviera collection and floral berries. 

See how easy it is to bring the peaceful ocean to you?  Grab your collection here while it lasts.  


OTP - Supplies
(grab the  French Riviera collection here)
Flying Unicorns- Your Passion Your Art Kit for March
Prima Color Bloom Mists - Summer Sky 573867
Prima Color Bloom Mists - Glistening Waves 573942
Prima Art Basics Finnabair - Soft Matte Gel 961428
Prima French Riviera Collection - paper  990756
Prima French Riviera Collection -paperJournees De Reves et Aventures 990787
Prima French Riviera Collection Flowers
Cheesecloth
Darice 5x7 Paper Mache Photo Frame 2839-12

White acrylic paint
Seashell from my stash
Floral berries from stash


Tuesday, February 23, 2016

Bunny Home Decor


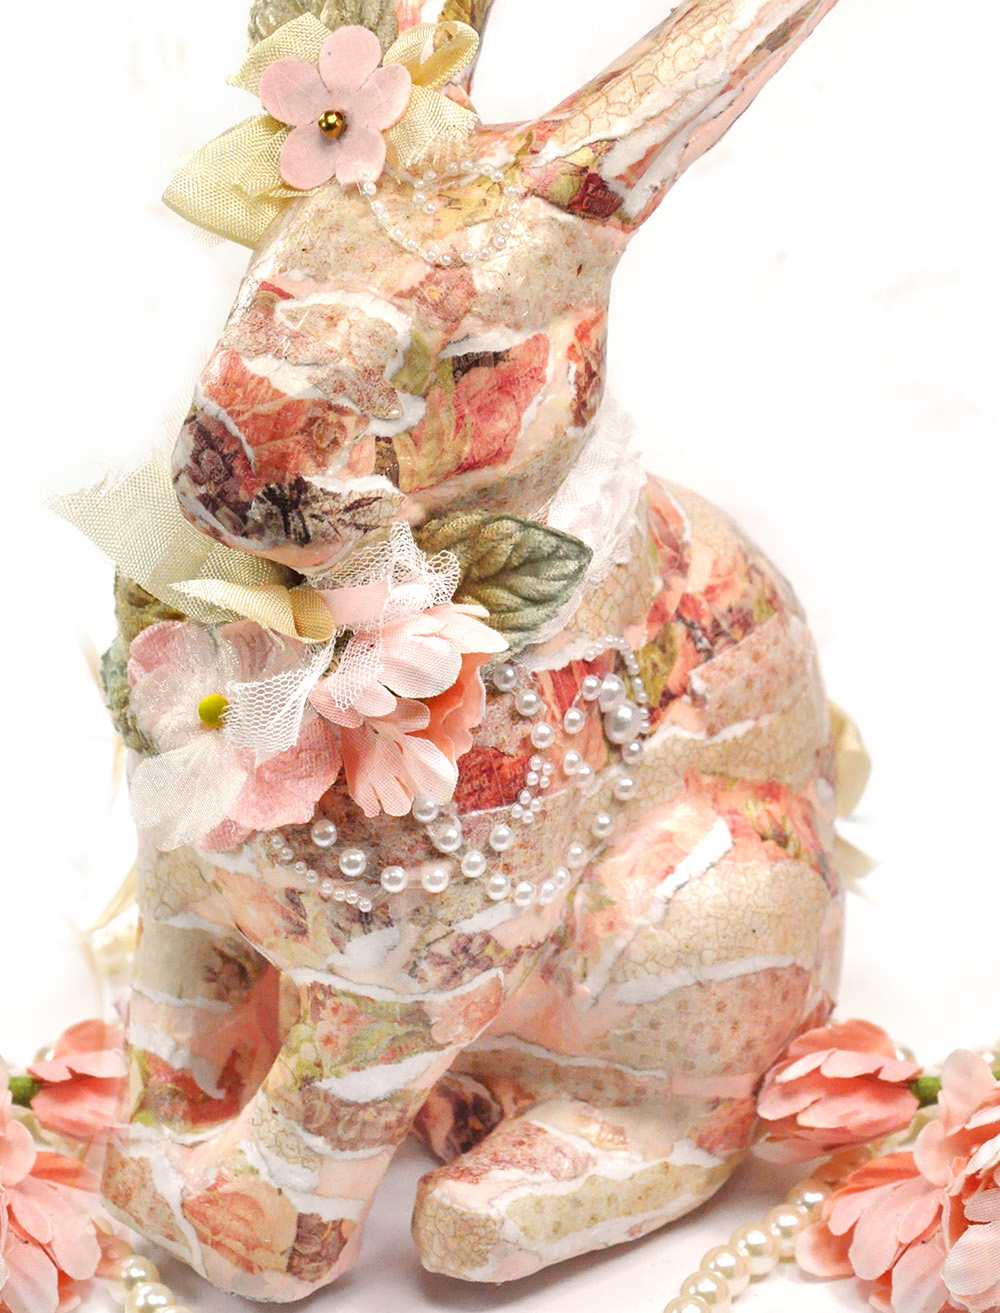
Prima's collection,  "Tales of You & Me", created by Frank Garcia, is one of those collections that is totally sensational and a "must have" for your stash.   ( You can see the original post for my bunny at Prima's blog, right here)

I made this sweet little  patchwork bunny with Easter in mind.  It will look great on the table with some flowers.  

I shared my instructions and some photos of the process which you'll find  if you scroll down.  This bunny is remarkably easy to make.  This is a simple process, but I cannot lie - a messy one.  First though, here are a few more close ups.   


Here is a head shot.  You can see his sweet little face.  To be honest,  it looks like he has an eye and a darker nose.  Totally unintentional.  It's really where the papers ended up but they do look perfectly placed.  I promise I'm NOT that detail oriented. 
I used the Memory Hardware by Frank Garcia - Petite Rosette Trim for the bunny's neck.  It's tiny and delicate and just what an Easter Bunny would wear.  
Here is his side profile. 

...and his darling puff bunny tail  made by using Memory Hardware by Frank Garcia - Grand Rosette Trim.

How did I make this?  

This is the plain paper mache bunny that I started with.  
I painted the paper mache with some gesso.  I used Heavy White gesso  and added a bit of water to thin it out.  After I painted it,  I mixed some Prima Chalk Board paints together to make a blush pink color.  

I did this because I wanted to create the patchwork bunny.  I knew there would be some bare uncovered spots and I didn't want gesso to show.  I thought the blush pink would be prettier as a base color and would blend with the papers better. 

I ripped a bunch of thin strips from the "Tales of You & Me" collection.  I kept  them very small. As I started the project, I noticed that big wide pieces of paper would not form nicely around the  paper mache and lie flat.  

The key to this project is to mist the papers with water and get them wet enough to bend - yet not dripping.  The paper needs to be flexible in order to drape smoothly over the bunny shape.  

 The second step is to coat each paper strip with  Finnabair's Art Basic Soft Matte Gel Medium.  Using matte  medium is important to me because I'm not a glossy gal.  I do not want my final project to shine.  I want it to be a nice subtle table decoration.    The Matte Gel Medium acts as a glue and securely adheres the papers as long as you coat each piece of paper with gel.  

Pay special attention to the ears and the direction you want your paper pieces to set.  I wanted my ears to be long  so I made sure my paper strips were adhered  length wise.

 Working in small sections one piece of paper at a time:

  • cover little spots on the bunny with Soft Matte Gel
  • add a small piece of paper
  • Cover the paper with soft matte gel

Yes I did this with my finger tips, though the foam brush works well.  I just get into a zone and forget the foam brush is sitting next to me.  But this is exactly why I say this project is messy!  Far less messy with the foam brush I imagine...though I guess I wouldn't know.  

 After the bunny is covered with strips and gel, let dry before you start top embellish.  The paper rips and tears easily when wet - so it's better to be safe. 
See how easy?  Embellishing is left up to your wonderful imagination.  

Thanks so much for stopping. 


Products:
990824 Prima Tales of You & Me paper - Belles Melodies d Amour
990817 Prima Tales of You & Me paper - Contes de Toi et Moi
529338 Prima SIIC
990466 Prima Memory Hardware by Frank Garcia - Grand Rosette Trim
961428 Prima Finnabair Art Basics -Soft Matte Gel.
990459 Prima Memory Hardware by Frank Garcia - Petite Rosette Trim
564452 Prima Flowers - Lyric
575311 Prima Flowers - Something Blue
580667 Prima Flowers -Butterfly - Bette

Other:
Ribbon