Saturday, March 26, 2016

As Beautiful as a Rose - Lemoncraft Neverending Summer Canvas


Lemoncraft - So Beautiful

I am in love with Lemoncraft's paper collections. They are soft, romantic and have that gorgeous touch of vintage grace.  I thought I'd share some projects and a step-by-step tutorial of a 8x10 canvas panel I made featuring Lemoncraft's Vintage Time ATC cards as well as a card ( found at the bottom of the post).

You can find the original on Lemoncraft's blog right here.   

Here's how I made this:

Step 1. Take a sheet of Lemoncraft NeverEnding Summer paper. I used the sheet called, "Swimming in the Lake".  I wanted to use the beautiful floral edges on the paper so I cut the paper, inked the edges and placed the paper on the canvas so the edges were showing.  


Step 2. I attached the paper to the canvas with a generous amount of Soft Matte Gel Medium and a foam brush.  I think the gel medium is better to use than glue  when working with canvas.  It seals the paper to protect it and also prevents the corners and edges of the paper from tearing and bending.   


Step 3. I covered the top of the paper with Soft Matte Gel Medium as well. 
 Step 4.  Time to adhere the beautiful Vintage Time ATC cards.  I cut three images, and added cardboard to the middle image for some dimension.  I used Soft Matte Gel Medium for this step as well. 
 Step 5.  I added a punched border onto the canvas then I started to embellish with my flowers and all other embellishments.
 Step 6.  I printed out a sentiment from my computer, cut the words out and inked all the edges.  I used Soft Matte Gel to attach them to the canvas.
Here are some close ups. 


Now to show you a card I made using card I made using Lemoncraft's Tiny Miracles collection and Vintage Time 003 cards.  Isn't it sweet?  

The Vintage Time ATC cars are simply gorgeous and I know you will enjoy creating beautiful projects with them. 

 Thank you for stopping by! 

Products
Lemoncraft Neverending Summer - Swimming in the Lake paper P0067
Lemoncraft Vintage Time Labels 2
Lemoncraft Tiny Miracles 12x12 Basic Pack
Lemoncraft Tiny Miracles  - Tiny Miracles 01 LPTM01
Lemoncraft Tiny Miracles  - Tiny Miracles 02 LPTM02
Vintage Time Cards - 003- LPVT003
Prima Flowers - Tales of You & Me 586348
Prima Flowers - Tales of You & Me 586362

Monday, March 14, 2016

DIY Faux Wood Photo Frame - With Prima, Frank Garcia and the Flying Unicorns


DIY Faux Wood Photo Frame -  Flying Unicorns and Prima's French Riviera by Frank Garcia

I'd like to share my Off The Page project for the Flying Unicorns March kit.  I'd also like to share my process further on down the page.  I've been in a sharing mood lately.  I feel that sometimes projects look complex and confusing - but when broken down, they just become one big "ahhhhhaaaa" moment. 

I love anything beachy, sea shorey, sandy and oceany - yeah I know those are not words but the real word for that is way to fancy.   Thalassophile   - means preference, fondness of the sea.  I prefer my words better.  At least I can pronounce my made up words.

I hope that someday I can fulfill my dream of living by the ocean along with my husband and cats, but till then, I'll keep making beachy, sea shorey, sandy and  oceany things. 

Prima's French Riviera, designed by Frank Garcia, made my job so easy.  It's gorgeous, warm, and peaceful looking -with that sandy weather worn feel. That's exactly the look I wanted to achieve with my Darice photo frame.  

Here is a close up of the faux wood frame.  If you scroll down, I'll share how I made it. 


This photo frame by Darice was included in the March, Your Passion Your Art from the Flying Unicorns.  The frame is not flat.  It has rounded sides.  The trick to the frame is to work with the rounded frame sides and create something that is durable.  For this reason I do not use hot glue.  Hot glue simply does not stand the test of time.  And by that, I even mean a year.  It starts breaking down and your beautiful embellishments could fall apart.  Well, that just isn't good. 

Think about getting a bottle of good strong glue that dries clear.  There are many brands.  My favorite is Beacon's 3-in-1.  It's clear, fast, durable and adheres darn near anything TO anything. 

Step 1.  I started with this sheet of Prima French Riviera paper Journees De Reves et Aventures 990787.  I cut 4 strips from the paper for each of my sides..  These 4 pieces look weather worn and sand beaten.   


Step 2. I used Prima's Soft Matte Gel Medium to adhere the paper to the frame.  Brush the gel medium directly onto the paper mache frame, and some on the strip of paper.  Place the strip onto the frame and brush a coat of gel medium over it making sure there are no air pockets, ripples and bubbles.  You can use a brayer as well to flatten out and remove bubbles.  

After all the sides are covered in gel medium, let dry.  The gel medium will seal the paper and make it durable, as well as protect the frame from fingerprints, stains and messes. 


Step 3. This is where my beloved Beacon's 3-in-1 glue comes into play and is important.  I am adhering thick jute to the sides of the frame.  I really would like my jute to grab and hold for me.  I have no patience for wrestling with trims, jute and cording to make them stay on projects.  They get one chance to behave for me or they get the boot. 
Step 4. I want to add some blue and sea glass colors to the projects so I decided to make my own perfectly colored embellishment.  I misted a small piece of cheesecloth and heat dried it with my heat gun.  The heat really stiffens up the cheesecloth.  I used Prima's Color Blooms in Glistening Waves and Summer Sky. 

Step 5.   Adhere little snips of the cheesecloth to the frame. 


Step 6.  Cut some images from the French Riviera paper.  Adhere to the project.  If I am placing an image onto the frame, then I will use the gel medium. Slather some gel medium onto the frame, some gel onto the image, then cover it with gel medium to smooth out.   The next few photos show the embellishments. 

I added some cardboard to the back of this to make it more dimensional.  The shell came back from Florida in my suitcase.    

This starfish image was adhered using gel medium.  


Step 7. Last step before all the final embellishments are added.  I  painted some watered-down white acrylic paint here and there onto the frame, embellishments, and jute.  


The final embellishments can be anything - shells, flowers, floral berries, sea glass, die cuts, drift wood...whatever you desire.   I added flowers from the French Riviera collection and floral berries. 

See how easy it is to bring the peaceful ocean to you?  Grab your collection here while it lasts.  


OTP - Supplies
(grab the  French Riviera collection here)
Flying Unicorns- Your Passion Your Art Kit for March
Prima Color Bloom Mists - Summer Sky 573867
Prima Color Bloom Mists - Glistening Waves 573942
Prima Art Basics Finnabair - Soft Matte Gel 961428
Prima French Riviera Collection - paper  990756
Prima French Riviera Collection -paperJournees De Reves et Aventures 990787
Prima French Riviera Collection Flowers
Cheesecloth
Darice 5x7 Paper Mache Photo Frame 2839-12

White acrylic paint
Seashell from my stash
Floral berries from stash


Thursday, March 10, 2016

Improving Your Photos - Easy, Quick DIY for the Best Photos Ever


Easy DIY for Getting Rid of the grey and blue cast in your photos 

Do you have a hard time making your photos bright and get whites to be white? When you look at your photos, do your white areas look blue-ish?  Well then this easy DIY is JUST FOR YOU!

This DIY quick fix is for folks of all crafting levels from beginner to pro....and for photos taken with any camera.

I know that none of my photos come out of my camera with bright white photos.   I need to edit the photos if I want them to look like the actual product in front of me.  This is called "white balancing".

Here is another very dramatic example of how those blue and grey casts in photos really distort the true beauty of your image and your project.   The enhancements in the image below were done with simply the "Curves" tool - for white balancing.  So let's learn about the "Curves" tool and white balancing.  

Last year, there was a silly photo on the internet causing a stir asking people to guess if the dress was white or blue.  An image that had been adjusted for White Balancing would have made this obvious.  If this was a white and gold dress, no one should be left wondering.

This is way easier than you can imagine BUT it probably will cause you to step out of your comfort zone and will require about 3 min of your time to edit.  How important are photos to you?

You do not need the fancy photoshop products to create better color adjusted photos.  There are many free products on the internet that will help you produce great, bright, white, true-to-life colors on your image.

I am using Ribbet - a free and totally great program that has all the essentials you would need for editing.   You do not download the program to your computer.  Nope - true.  No downloading required.  This is a"play as you go" type software - you upload a photo, make your edits, save and move on or close out.  All you need to do with this program is to open it up, choose a photo to upload and start the editing.

I am only going to show you how to adjust the white balance.  You can explore more editing options in Ribbet or use your own favorite program.  As far as white balancing, you need to know how to do this and what to look for.  The verbiage and icons are the same in every editing program.  If you have a program you love, then take the time to poke around and find the "Curves" tool - that is what you'll need.  If you are totally confused, then send me an email. I'll poke around for you and find something.

Or if you don't want to poke around, then do yourself a favor and use Ribbet  for at least this one easy little adjustment.

So let's dive into Curves and do some white balancing.  

Step 1.  Open your program and upload your photo.  This screen shot shows you what you need to look for when you open Ribbet .


Step2. For now I am going to ignore all the other editing options and move you right to the Pro Editor on the bottom of the screen.  I have found that in most free editing programs, the white balancing tool will be found hiding in the advanced tools section.  Do not let that frighten you.  You are brave and bold. 


Step 3.   When you click on Pro Editor, you will see two more options.  Select Pixlr Editor.

Step 4.  This is where the magic and fun start.  You will see a black screen with a lot of icons on the left side.  If you hover over those icons with your mouse, they will tell you what they are all called.  
Let's concern ourselves with the top menu bar.  

Select Adjustments on the tool bar.  A bunch of options will drop down - pick CURVES. As soon as you click on CURVES, a graph type box will pop up.  This is a histogram. 


Step 5.  What do I do with this crazy histogram?  Well, my easiest answer - you need adjust the whites on the photo so you are going to click on the tiny white box on the histogram.   
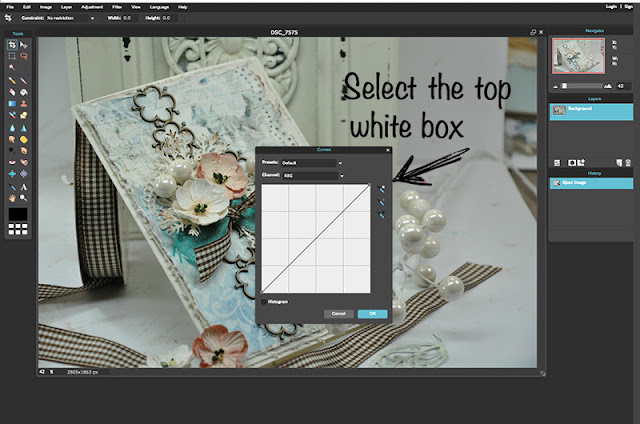


Step 6.  Once you activate the white box, your cursor turns into an eyedropper shape.  Move the eyedropper around the page and click on things that are supposed to be white.  You'll see your photo change each time you click.  If the change is not what you wanted, simply move to another spot on the image and click.  Sometimes it takes a lot of testing and clicking until you find the right white balancing.   

In the photo below, I've marked  all the different places I clicked till I found the best white balance result.  
This is exactly the reason I try and photograph on a white background or have something white in the photo around the edges as a reference point.  I never worry about adding white  to my photo around the edges because I will usually crop the photo and get rid of the crazy messy edges.   

You do need to establish a point of reference using something white. 


Step 7.  Looking at the photo image below, the red arrow shows the place where I ultimately found the best white balancing.  From there you are ready to save and continue editing as you always do.  

I am betting that the program you use probably has a "geek" section, a pro section, or something with advanced tools to help with white balancing.  It will probably have a histogram and it will probably utilize an eyedropper tool.  Look for the word CURVES.  That is the tool that will start you on your way to perfect colors.

Crafting is the fun part of creating.  You've got that solid!   Now you need to show that project to the world as it was meant to be seen.  Photo editing a project is often  time consuming but great photos really do make a difference.   

I am not going to lie and tell you this is always the answer but this is where I will always start.  Every photo.

Wednesday, March 9, 2016

Card for Spring - with the Flying Unicorns


Spring is almost here.  It's a great time for pulling out the Flying Unicorn  March kit and assembling a card to send as a pick-me-up for that special person who's had a long winter.  That's what this card is all about -   cheer and good wishes ( the Flying Unicorn way). 

This was created using the Flying Unicorn March kit featuring the Studio75 Lavender Morning collection. 


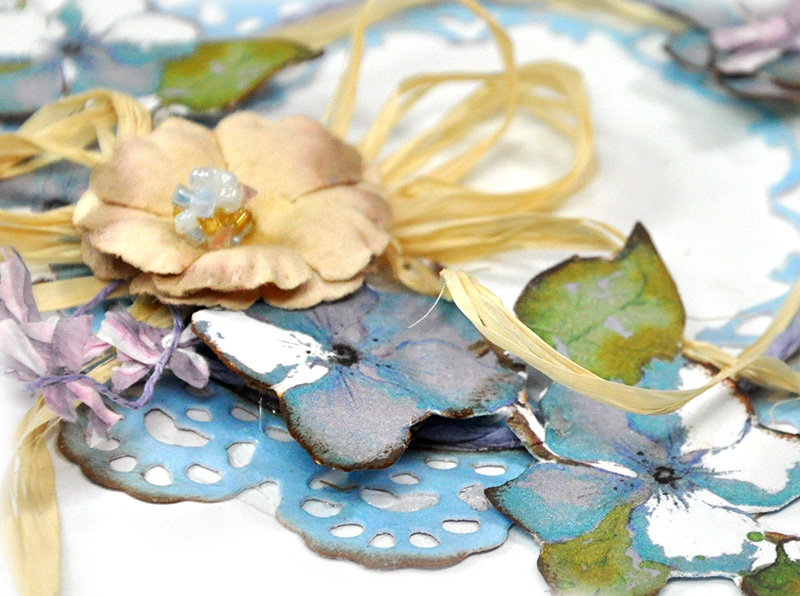
I used the Prima Marketing doily die as the focal point and simply cut out the center of the die so I could use it as a wreath type embellishment.  Then I did some detailed fussy cutting from the Studio75 papers for the leaves and blue flowers.  The papers had the sweetest images so I grabbed my scissors and cut away.  I did ink the edges of the papers for added definition. 
Finishing embellishments included: trims from the kit, paper twine and the new Prima flowers from the "French Riviera" collection.

If you missed the March Flying Unicorn kit, be sure to look for the pre-sale kit for April.  This goes on sale the 20th of the month.  The kits do sell out quickly so the pre-sale option is just perfect.  You get to see a few photos of the contents of the kit so you choose if the colors and style are right for you.  Doesn't get much better than that!

You can find the Flying Unicorn kit and Uni-store right here!