Monday, July 27, 2015

Prima's Altered Metal Telephone Frame


Prima's Altered Metal Telephone Frame (Blitsy Video Exclusive)

Blitsy is featuring Prima Metal Frames so this is a perfect time to share my recent project and video link.  

I recently grabbed the Prima Metal Telephone Frame by Finnabair.  I love whole range of  metal frames from Prima; the bicycle, house, clock, television and all the rest now being featured at Blitsy. They look great no matter which decorative style you choose as you add your special embellishments.  

I took a festive vintage approach.  I call it festive because I used a photo from my childhood and accented with bright happy colors that reflect the moment the photo was taken.   

Watch my short video at Blitsy.  See how I gave this magnificent metal frame my decorative touch.  


Special Tip

Jennifer used an old black and white photo, but any photo will work. Change the feel of your piece by adding different colored flowers and trims and different colored mists.

Close Ups

You can see how the mist adds a little bit of sheen and interest to the piece. The drips of blue mist add vintage patina appeal


.

Additional embellishment ideas

Are you thinking of creating this for someone and don't want to add a lot of flowers? Maybe you want to make it more masculine? Why not consider these embellishment options:
Burlap or trim
Beads
Metal charms, metal vintage trinkets.,chains
Cork embellishments/stickers
Stamp on the metal using StayzOn Solvent ink or other alcohol based inks
Chipboard or wood icons
Old clock pieces
Happy Crafting!


Products Used:

Prima Finnabair Altered Metal Phone Frame
Prima Color Bloom Mist - Glistening Waves
Prima Color Bloom Mist - Antique Gold
Ranger Tim Holtz Distress Ink Walnut Stain
Ranger Blending Tool
Ranger Non-Stick Craft Mat
Prima Bella Rouge Paper
Prima Flowers - Kindled Lush 581428 ( big flower)
Prima Flowers - Bella Rouge Leola
Prima Bella Rouge Flowers Emeline
Prima Bella Rouge Flowers Daisy
Prima Memory Hardware -Antique Chains
Prima Memory Hardware Pearls
Prima Timeless Memories Metal Trinkets
We R Memory Keepers Crop-A-Dile hole punch
Beacons 3in1 Glue
Ranger Heat-it Heat Gun tool

Thursday, July 23, 2015

Breezy Summer Seahorse Card DIY Tutorial

Breezy Summer Seahorse Card 
You don't have to visit the ocean for seaside fun.  I can help create a peaceful ocean seascape card.  If you scroll down, I have an easy-to-follow tutorial showing you the way to the ocean.  


Here's the list of products I used:
BoBunny Boardwalk 6x6 Paper Pad
Spellbinders - Borderabilities - A2 Curved Borders One
Joy! Crafts Cut & Emboss Die - Crab/Seahorse
Joy! Crafts Cut & Emboss Die - Starfish/2Shells
Cardstock
Want2Scrap - Strips Pearls - White
Ranger Liquid Pearls - White Opal
Sizzix Embossing Folder Outline Label Set
Double Sided Foam Tape
Ranger Tim Holtz Scissors
Martha Stewart Medium Punch - Branch
Cheesecloth
Ranger Tim Holtz Distress Ink - Vintage Photo
Ranger Tim Holtz Distress Ink -Peacock Feathers
Microbeads
Beacons 3-In-1 Advanced Glue
Ranger Glossy Accents
Pearl Adhesive Swirls
Adhesive Foam Dots

Here are the steps to make this card


1.
Choose some patterned paper that makes you think of the ocean or the waterside when you look at it. This patterned paper will be your top layer.
You'll also want to choose an accent color (mine is teal) and some white matting card stock. Cut your layers and glue them to your card base. Your card base can be a piece of card stock that you scored and folded, or it can be a pre-folded card. My project uses a 6"x6 card.


2.
Cut fun wave borders from cardstock using various accent colors. I used Spellbinders - Borderabilities Card Creator- A2 Curved Borders One . Layer and glue to card.


3.
Add pearl or crystal swirls.


4.
Cut a decorative label.

5.
Accent the card label with dots of Liquid Pearls. They dry rather quickly, so let them dry before you continue to work on the label.
.
6.
Cut small piece of cheesecloth and fold around the label. Arrange it so that some cheesecloth is behind the label and some on top of it. Fan out the cheesecltoh so you end up with a wispy look and feel to the card.

7.
Add foam tape to the back of the label and stick to card.

.8.
Punch or diecut sea forms: seahorses, shells, starfish. Lightly ink the edges of the diecuts.
9.
Create a wet glossy look by coating the diecuts with a light coating of Glossy Accents. Do NOT let dry.


10.
While the Glossy Accents is wet, sprinkle micro-beads onto the diecuts. I prefer to sprinkle with my fingertips so that I do not dump micro-beads onto the project and end up with a clump of micro-beads. Sprinkling micro-beads with your fingertips is the best way to achieve a delicate look. The Glossy Accents will hold the micro-beads in place when dry...and now you can let the Glossy Accents dry. I waited 30 minutes to be safe.


11.
Add dimensional foam dots to the diecuts as desired and attach the diecuts to the card.


12.
Time to make some coral. Punch branches, ink the tips of the pine branches and tuck into the card here and there. The branch punch makes excellent coral and seaweed.


13.
Finishing touch - add some pearl dots to the corner of the card and to the diecuts


Here are more photos of the finished card


Thanks for visiting.  I value your time.  

Friday, July 17, 2015

Maja Design - Life in the Country Cards


Life In the Country
It's supposed to be summer in NY, though our weather says otherwise.  So instead of being disappointed in this ridiculous weather, I'm bringing the summer feel to me.   I pulled out  Maya's "Life in the Country" collection because it's cheery, happy, fresh and looks like summer.   These are some cards I made with the collection. 

Gosh this is such a classic, fresh fun summer collection.  When I look at it, I feel like having a picnic and celebrating with a plateful of strawberries ( I cannot lie, I'd like some dipped in chocolate too.)


Here is my first card - inspired after picking strawberries.  I looked at the papers and they made me feel like I was back outside in the sunshine with my basket.  One strawberry in my mouth and one in the basket...one more in my mouth and one more in the basket.  The best way to pick.  
 Life In the Country Card 1
This card features “In My Flower Bed” , “Kitchen Garden” , and “In the Hammock”.  I also added a touch of raffia for a country look. 

Super simple to make - lots of layers, add a touch of raffia, and top with die cut leaves, flowers, bow and wood embellie. 

simple steps:
1.  Start with base card layer.  I love pre-folded cards.  I am not the queen of the crisp scored card.
  
2.  I picked 2 patterned papers for my card layers and separated them  with a layer of white cardstock.  
           My card sandwich goes like this:  
                           pre-folded card
                           Gingham layer
                           white cardstock
                           tan striped paper

3. Pick a floral pattern and cut a 2.5inch strip BUT do not glue to the card.

4.  Pick a few strands of raffia and wrap around the floral strip. glue raffia in place in the     back of the card.  

5.  Glue strip to card.  Embellish as desired 


 Life in the Country - Card 2
July in the United States is a time to celebrate the national colors.  I created a clean and simple card with a bit of a folk art design. 

                                 Life in the Country - Card 3
This card also has plenty of layers in neutral tones with the red from "Porch" paper popping some color into the card.  The neutral paper is called "Read A Book".  

 Life in the Country - Card 4
My last card is also a bit of Americana


Thanks for looking


Sunday, July 12, 2015

Flying Unicorns Box - July


Flying Unicorn July Kit of the Month  - Your Passion Your Art

Flying Unicorn July kit features Lemoncraft papers and embellishments.

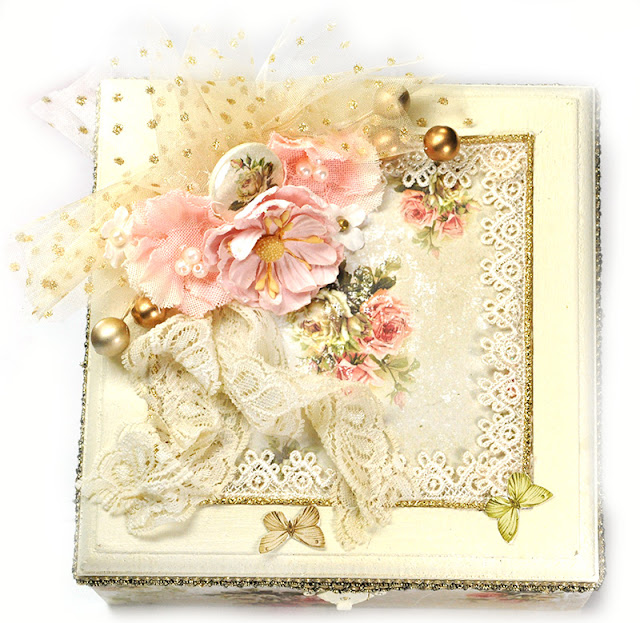
I had a wooden box lying around waiting to be decorated.  I painted the inside about outside a French Vanilla color and  thought it would match nicely with the Lemoncraft House of Roses collection.  I only needed one sheet of paper so I was happy about that as well.  The Lemoncraft paper is so delicate and gorgeously floral that I wanted the finished look of the box to be also light, delicate, and ultra feminine.


I accented this with a combination of Petaloo and Prima flowers from the July kit as well as embellishments from the kit as well.  The flair buttons from Lemoncraft are just fabulous  They tuck into a cluster easily.


If you missed the kit this month and want to protect yourself in the future from such despair, Flying Unicorns offers a pre-order option available the 20th of every month.  Sneak previews are available at that time and you decide if you want to place an order.  This option is only available for 48 hours.  At which point, the offer vanishes and you risk having to fight the sell out shoppers.

Visit my Etsy shop as well.  You never know what you may find.  I cannot save everything in my house.  You can find this and other similar items in my shop.  All items in the Etsy shop are here. 

Happy Crafting and thanks for stopping.

Supplies:
Lemoncraft House of Roses Collection -Flair Buttons
Prima Flowers - Pura Alexa 581848
Prima Lyric Flowers 565664
Lemoncraft Paper Collection - House of Roses
Bo Bunny Flowers
Lace
gold trim