Showing posts with label table decor. Show all posts

Monday, October 14, 2019

Turn Old Salt Shakers into Halloween Bats Decor Shakers - Buttons Galore


Turn Old Salt Shakers into Halloween Decor

Welcome to Part one my three part blog mini-series on re-purposing old salt and pepper shakers and creating fun, fabulous home DIY home decor. 

You can find Part Two here ( the scarecrow and jack-o-lantern witch): 
  Patriotic Slider Pop-up Card


There's something so satisfying about re-purposing old items and turning them into totally unexpected gems. Call it up-cycling, recycling, altering, re-purposing, junk to gem - but it's all fun, fabulous and utterly satisfying. 

These items happen to be salt and pepper shakers found at thrift stores, yard sales, and even new ones from the dollar store.  

I've made some simple yet spooktacular holiday  table decor.  


The bat is black foam.  I had it sitting in my craft room for some time and thought it would make the perfect bat topper for this particular short, squat salt shaker. 

I first set out to cut my own bat from black fun foam, however then I found this bat in my stash (originally from Michaels or Joanns).  


Let's talk shaker mix!
What makes the altered salt shaker fun is the mix inside.  You've spent the time making a boo-tiful project so take the time to fill with something equally fun.  I used Buttons Galore - Sparkletz - Boo.  

This mix is adorable with tiny bats and ghosts. Way too cute. 
Boo Sparkletz
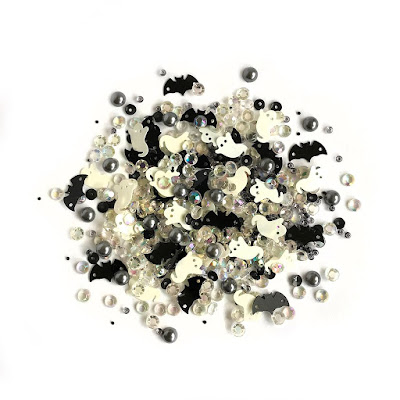
Buttons Galore - Boo Sparkletz SPK153


Once the shaker mix is added, 
I took off the top of the shaker, wrapped the wire from the bat, around the top of the shaker and twisted the top back on. Super easy.  

Next I added decorative ribbon and topped with a Halloween 3D Button from Buttons Galore and MoreI looped the ribbon through the shank of the button to make the embellishment and project more durable. 

Buttons Galore and More have a fun and festive collection of holiday 3D buttons that are perfect for finishing touches to projects.  

3D Buttons Happu Hauntings
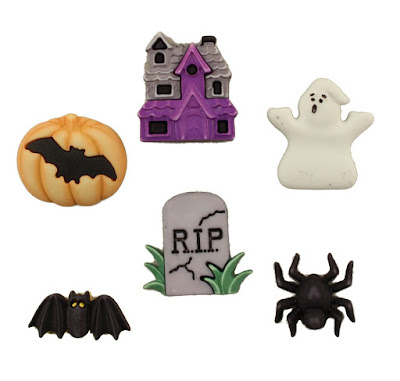
Buttons Galore and More- 3D Buttons - Happy Hauntings HH104


Stay tuned for more salt and pepper shaker home decor.  
Thanks for stopping. 

Shop Here:
*******************************************************************************

Happy Hauntings 3D buttons


Boo Sparkletz
Buttons Galore

*********************************************************************************


Patriotic Slider Pop-up Card

Tuesday, June 2, 2015

Patriotic Star Centerpiece

Blitsy Patriotic Table Centerpiece

Picnic season and outdoor BBQ celebration season is here! The summer offers many opportunities to get together and celebrate so why not make a fun patriotic centerpiece?
I have a fun step by step tutorial showing how you can make a fun and festive piece.  


These are the steps

1.  Paint boxes with acrylic paint. I painted lids and sides.
2.  This step is only necessary if you plan to decorate sides with paper.  You cannot place paper on the entire side because then the lid will not fit.  So you need to mark where the paper will go.  To do this, place the lids on the boxes and draw a pencil line around the bottom of the lid. This will give you an idea of how wide to cut your paper. 
3.  Cut paper strips to cover the sides.

4.  Decorate the tops of each box as desired. The Doodlebug Designs - Fourth of July paper collection came with some red acrylic letters ( Doodlebug Designs - Ladybug Assortment ABC's) so I added them to a box.
Here are some other ideas for decorations
  • Buttons
  • Doodlebug Designs - Ladybug Assortment ABC's ( red acrylic letters) #148
  • Ribbons and lace trim
  • Floral berries
  • Metal charms
  • Die cuts and decorative punched borders
  • Mini flags used on cupcakes
  • Resins and beads
  • String pearls
  • Stick pins
  • Chandelier Garland (crystals)
  • Crystal flourishes and gems
  • Chevrons and mini banners

Here are close ups of the tops:


5.  Decorate sides of boxes as desired with punched borders, flower, tied string, lace, or whatever fits your taste. I added little dots of Liquid Pearls to the sides and some on the top as well.


Time to make some star box toppers!


6.  You may have a star punch or die that will work nicely. I did not, so I drew a star pattern. I folded a small piece of patterned paper and made sure my star pattern was on the fold when I cut it out.
I glued the stars to a wooden barbecue skewer.

Add some bakers twine to the wood skewer.


Another Option - Add Cupcake toppers


Products:
Doodlebug Designs - 12x12 Asst paper pack - Fourth of July
Doodlebug Designs - Ladybug Assortment ABC's  ( red acrylic letters) #148
Ranger Liquid Pearls  - White Opal
DCC Star  Boxes 4in x 2in
Spellbinder Die Di-Lites Medallion S2-014
Acrylic Paint  - Red, White and Navy Blue
Martha Stewart Doily Lace Edge Punch
Lacy Trim
Decorative Stick pins - Stars
Buttons
Ribbons
Floral Berries
Pearl Dots
American Flag
American Crafts  - Premium Ribbon - Baking String
Toothpicks or Wood skewers