FabScraps
I decided to make a feminine and masculine card using the same exact papers. I had fun doing this project and it was a bit of a challenge for me. if you scroll to the end, you will find step by step instructions for each card.
The two sheets of paper were from the FabScraps Wild At Heart collection - Wild Tunes 2 and Wild Ride 2. At first glace these papers cater to the masculine side of life. With a little creativity and a boarder punch, its easy to add a delicate feel.
The masculine card uses Wild Ride 2 as the base for the card.
I coated the Wil;d At Heart chipboard piece with Molten Metal Enamelz from Shimmerz. This is such a cool product. When melted, it looks just like, well, metal. Perfect for a masculine rugged look.
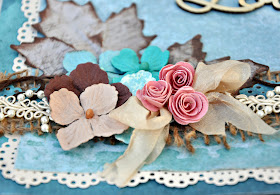
For the feminine card, I reversed the papers and used Wild Tunes 2 as the base of the card. The beautiful blue/teal work well for a feminine card. Add a touch of lace and some pink and it all comes together.

The little pink flowers are rolled from paper using Rolled Rose Die die from La La Land.
The leaves were punched from EK Success large leaf punch. I crumpled the leaves and then ran an ikn pad over the crumpled edges.
Thanks for stopping by. LIKE Fabscraps on FaceBook and visit their blog here.
For The Feminine Card You Will Need
Prima Marketing -North Country Flowers 553241
EK Success - Large Leaf punch
Blue Fern Chipboard - Good Vibes
Rose Die cut die - La La Land Rolled Roses
Rose Die cut die - La La Land Rolled Roses
burlap
pearl trim
Clearsnap - Mixd Media Inx - Truffle
seam binding
seam binding
Instructions for Feminine Card
1.
Base of Card Preparation:
2.
Cut 6in x 12 in strip
of FabScraps Wild At Heart Wild Tunes 2 paper C59008 for the base of the card. Fold
in the middle. You can have this card
open any way you wish.
3.
Cut a 4.5in x 4.5in
square of Wild Tunes 2 paper to use as
the front of the card.
4.
Using a decorative
edge punch, punch four strips of edges from the cream cardstock and glue to the
4.5 square of Wild Tunes 2 in step 3.
You will create a little frame
around the square.
5.
Glue Square to the
card base.
6.
Leaf Preparation:
7.
Punch or cut two large
leaf shapes from Wild At Heart Wild Ride 2 C59006.
8.
Crumple/ scrunch the leaves
and then run ink pad over the crumpled edges making sure to ink the creases on
the crumples.
9.
Ink the edges of the
leaves.
10.
Glue to the card.
11. Clustering - Finishing
Touches:
12.
Glue a piece of burlap
6 in to form a border for the leaves.
13.
Punch a 6in decorative
border strip from Wild At Heart Wild Tunes 2 and glue over the burlap.
14.
Glue a piece of lace
trim over the border punch.
15.
Complete with flowers
and a ribbon bow.
16.
Tuck in brown
embroidery floss around the cluster to give some definition.
17.
Add appropriate
sentiment using chipboard or stickers.
18.
Enjoy
___________________________________________________________________________________________
For The Masculine Card You Will Need
FabScraps Wild At Heart Collection - Wild Tunes 2 C59008
FabScraps Wild At Heart Collection - Wild Ride2 C59006
FabScraps Wild At Heart Collection - chipboard Wild At Heart DC59008
Shimmerz Enamelz Molten Metals
Ranger Embossing Roller
Prima Say It In Pearls 530747
Tim Holtz Trinket Pins
Trim
bubble wrap
gesso
Instructions for Masculine Card
1.
Base of Card Preparation:
2.
Cut 6in x 12 in strip
of FabScraps Wild At Heart Wild Ride 2 paper C59006 for the base of the card. Fold
in the middle. You can have this card
open any way you wish.
3.
Cut a 4.5in x 4.5in
square of Wild Ride 2 paper to use as
the front of the card. Use the flipside
from that used for the base of the card.
4.
Cut a 1in x4.5 in
strip of black cardstock and rip the edge.
Glue to the top of the 4.5 square.
5.
Cut a 6in x6in
piece of Wild At Heart –Wild Tunes 2 C59008 and rip the edges to give a
carefree appearance. This will become a
frame for the 4.5 square.
6.
Glue to the base of
the card.
7.
Rip a small piece of Wild
Tunes 2 paper and glue to the top of the square.
8.
Embellishment Preparation:
9.
Take a small piece of
bubble wrap and paint the bubbles with gesso or white acrylic paint. Glue to the bottom of the card.
10.
Cut 24 inches or
string, twine and wrap around the bottom of the card where the bubble wrap
is. I punched a hole near the edge of
the card to stagger my twine. Tie the
twine in the front.
11.
Attach safety pins/
trinket pins to the twine.
12.
Glue a 2in piece of trim over the twine in the spot
where you plan on placing the chipboard.
13.
Glue a 1in piece of trim to the top right corner of card.
14.
Add some decorative pearls
to the top right corner under the trim. This just adds more texture as an accent.
15.
Chipboard Preparation:
16.
Coat the Wild At Heart
chipboard piece DC59008 with embossing ink.
Cover with embossing powered and heat set with heat gun.
17.
Rip a small piece of
Wild Tunes 2 paper and glue to the back of the chipboard piece as a “splash” of
color accent to make the chipboard pop.
18.
Glue to card near the
trim and twine section of the card.
19.
Enjoy


beautiful cards! Happy Thanksgiving :)
ReplyDelete